In this tutorial we will learn how the HC-SR04 ultrasonic sensor works and how to use it with Arduino. This is the most popular sensor for measuring distance and making obstacle avoiding robots with Arduino.
I have already used the HC-SR04 ultrasonic sensor for building several cool Arduino projects and you can check them out here:
- Arduino Radar (Sonar)
- Range Measurer and Digital Spirit Level
- Security and Alarm System Project
- Arduino Ant Hexapod Robot
You can watch the following video or read the written tutorial below. It has additional information and examples for the sensor, including specifications, pinouts, wiring diagrams, codes and more.
HC-SR04 Hardware Overview
The HC-SR04 is an affordable and easy to use distance measuring sensor which has a range from 2cm to 400cm (about an inch to 13 feet).
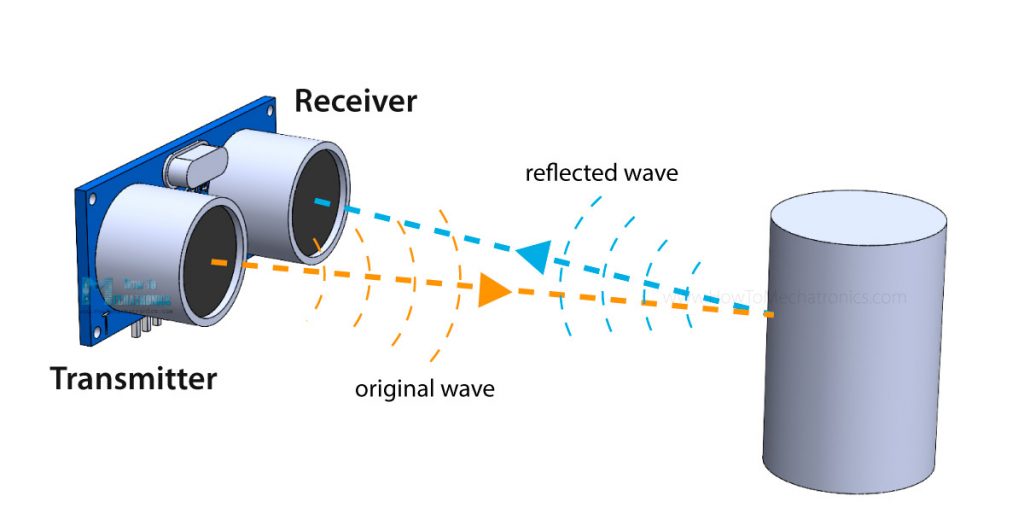
The sensor is composed of two ultrasonic transducers. One is transmitter which outputs ultrasonic sound pulses and the other is receiver which listens for reflected waves. It’s basically a SONAR which is used in submarines for detecting underwater objects.
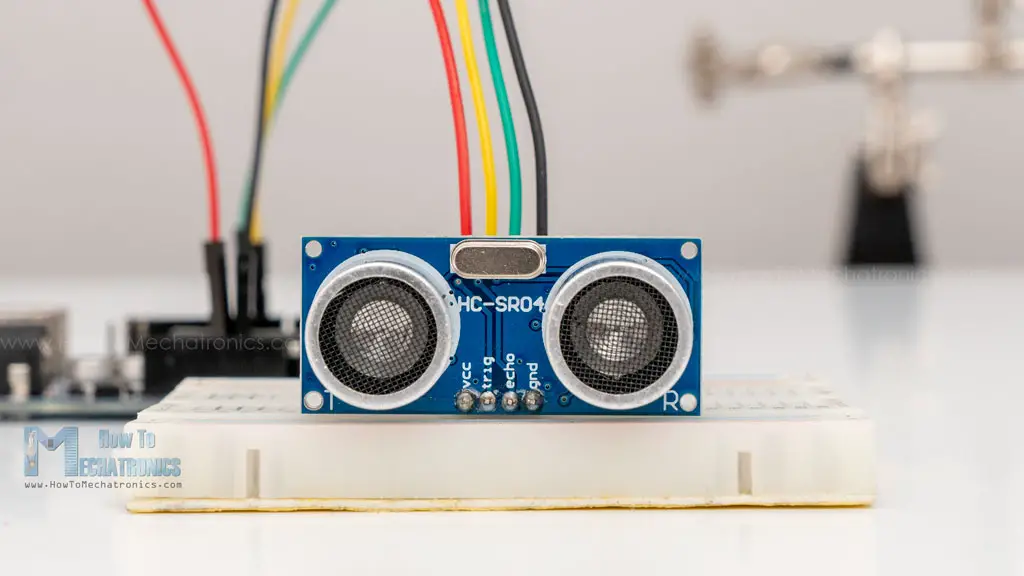
Here are its main specifications:
| Operating Voltage | 5V DC |
| Operating Current | 15mA |
| Operating Frequency | 40KHz |
| Min Range | 2cm / 1 inch |
| Max Range | 400cm / 13 feet |
| Accuracy | 3mm |
| Measuring Angle | <15° |
| Dimension | 45 x 20 x 15mm |
HC-SR04 Ultrasonic Sensor Pinout
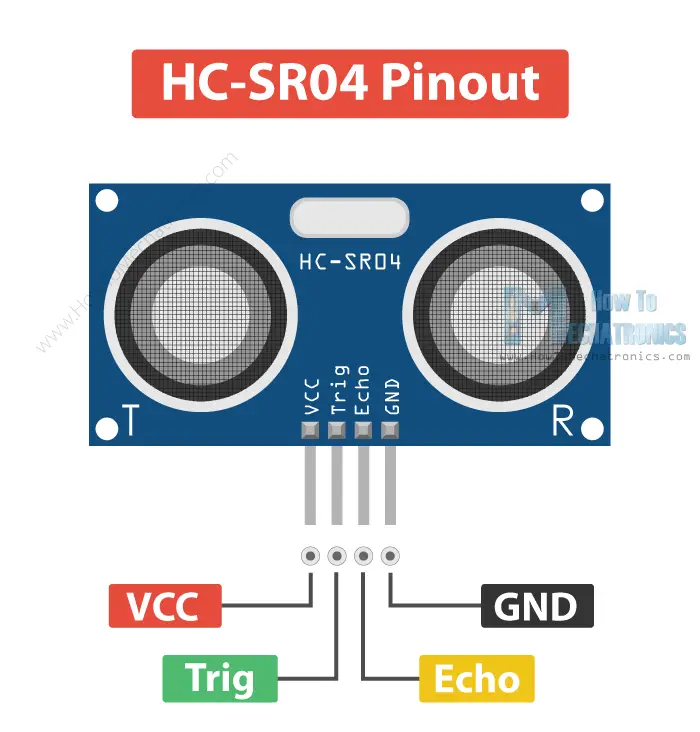
Here’s the pinout of the sensor:
The sensor has 4 pins. VCC and GND go to 5V and GND pins on the Arduino, and the Trig and Echo go to any digital Arduino pin. Using the Trig pin we send the ultrasound wave from the transmitter, and with the Echo pin we listen for the reflected signal.
How the HC-SR04 Ultrasonic Distance Sensor Works?
It emits an ultrasound at 40 000 Hz which travels through the air and if there is an object or obstacle on its path It will bounce back to the module. Considering the travel time and the speed of the sound you can calculate the distance.
In order to generate the ultrasound we need to set the Trig pin on a High State for 10 µs. That will send out an 8 cycle ultrasonic burst which will travel at the speed of sound. The Echo pins goes high right away after that 8 cycle ultrasonic burst is sent, and it starts listening or waiting for that wave to be reflected from an object.
If there is no object or reflected pulse, the Echo pin will time-out after 38ms and get back to low state.
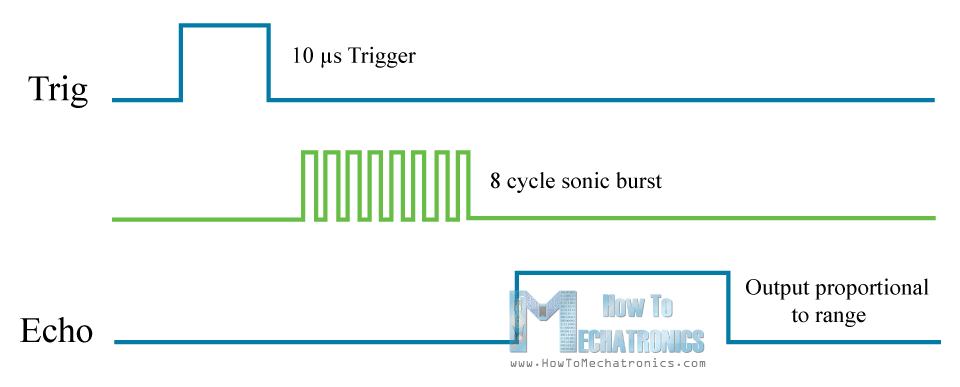
If we receive a reflected pulse, the Echo pin will go down sooner than those 38ms. According to the amount of time the Echo pin was HIGH, we can determine the distance the sound wave traveled, thus the distance from the sensor to the object.
For that purpose we are using the following basic formula for calculating distance:
Distance = Speed x Time
We actually know both the speed and the time values. The time is the amount of time the Echo pin was HIGH, and the speed is the speed of sound which is 340m/s. There’s one additional step we need to do, and that’s divide the end result by 2. and that’s because we are measuring the duration the sound wave needs to travel to the object and bounce back.
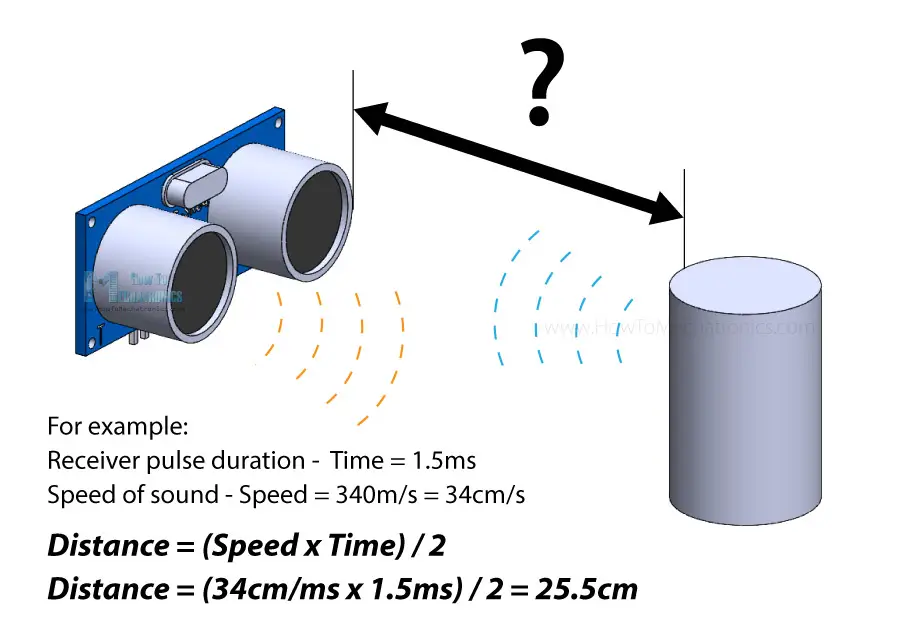
Let’s say the Echo pin was HIGH for 2ms. If we want the get the distance result in cm, we can convert the speed of sound value from 340m/s to 34cm/ms.
Distance = (Speed x Time) / 2 = (34cm/ms x 1.5ms) / 2 = 25.5cm.
So, if the Echo pin was HIGH for 2ms (which we measure using the pulseIn() function), the distance from the sensor to the object is 34cm.
How to Connect HC-SR04 Ultrasonic Sensor to Arduino
Here’s how we need to connect the HC-SR04 sensor to an Arduino board.
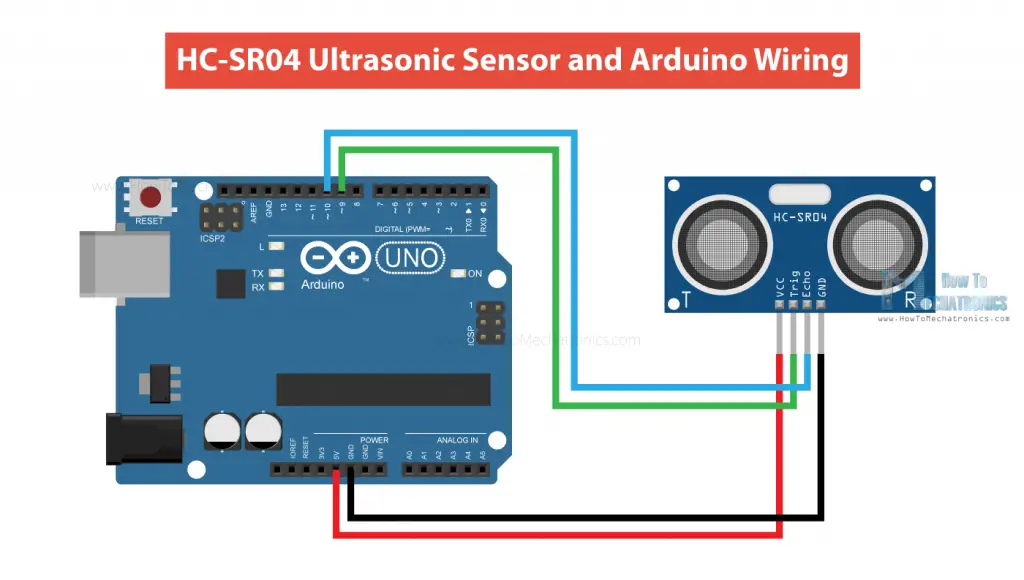
The Ground and the VCC pins of the module needs to be connected to the Ground and the 5 volts pins on the Arduino Board respectively and the trig and echo pins to any Digital I/O pin on the Arduino Board.
You can get these components need for this tutorial from any of the sites below:
- Ultrasonic Sensor HC-SR04 ………… Amazon / Banggood / AliExpress
- Arduino Board …………………………… Amazon / Banggood / AliExpress
- Breadboard and Jump Wires ……… Amazon / Banggood / AliExpress
Disclosure: These are affiliate links. As an Amazon Associate I earn from qualifying purchases.
HC-SR04 Ultrasonic Sensor Arduino Code
Here’s a code for measuring distance using the HC-SR04 ultrasonic sensor and Arduino.
/*
  Ultrasonic Sensor HC-SR04 and Arduino Tutorial

  by Dejan Nedelkovski,
  www.HowToMechatronics.com

*/
// defines pins numbers
const int trigPin = 9;
const int echoPin = 10;
// defines variables
long duration;
int distance;
void setup() {
  pinMode(trigPin, OUTPUT); // Sets the trigPin as an Output
  pinMode(echoPin, INPUT); // Sets the echoPin as an Input
  Serial.begin(9600); // Starts the serial communication
}
void loop() {
  // Clears the trigPin
  digitalWrite(trigPin, LOW);
  delayMicroseconds(2);
  // Sets the trigPin on HIGH state for 10 micro seconds
  digitalWrite(trigPin, HIGH);
  delayMicroseconds(10);
  digitalWrite(trigPin, LOW);
  // Reads the echoPin, returns the sound wave travel time in microseconds
  duration = pulseIn(echoPin, HIGH);
  // Calculating the distance
  distance = duration * 0.034 / 2;
  // Prints the distance on the Serial Monitor
  Serial.print("Distance: ");
  Serial.println(distance);
}Code language: JavaScript (javascript)
Code Explanation
First we have to define the Trig and Echo pins. In this case they are the pins number 9 and 10 on the Arduino Board and they are named trigPin and echoPin. Then we need a Long variable, named “duration” for the travel time that we will get from the sensor and an integer variable for the distance.
// defines pins numbers
const int trigPin = 9;
const int echoPin = 10;

// defines variables
long duration;
int distance;Code language: JavaScript (javascript)
In the setup we have to define the trigPin as an output and the echoPin as an Input and also start the serial communication for showing the results on the serial monitor.
void setup() {
  pinMode(trigPin, OUTPUT); // Sets the trigPin as an Output
  pinMode(echoPin, INPUT); // Sets the echoPin as an Input
  Serial.begin(9600); // Starts the serial communication
}Code language: JavaScript (javascript)
In the loop first we have to make sure that the trigPin is clear so you have to set that pin on a LOW State for just 2 µs. Now for generating the Ultra sound wave we have to set the trigPin on HIGH State for 10 µs.
// Clears the trigPin
digitalWrite(trigPin, LOW);
delayMicroseconds(2);

// Sets the trigPin on HIGH state for 10 micro seconds
digitalWrite(trigPin, HIGH);
delayMicroseconds(10);
digitalWrite(trigPin, LOW);Code language: JavaScript (javascript)
Using the pulseIn() function we read the travel time and put that value into the variable “duration”. This function has 2 parameters, the first one is the name of the Echo pin and for the second is the state of the pulse we are reading, either High or Low.
// Reads the echoPin, returns the sound wave travel time in microseconds
duration = pulseIn(echoPin, HIGH);Code language: JavaScript (javascript)
In this case, we need this set to it HIGH, as the HC-SR04 sensors sets the Echo pin to High after sending the 8 cycle ultrasonic burst from the transmitter. This actually starts the timing and once we receive the reflected sound wave the Echo pin will go to Low which stops the timing. At the end the function will return the length of the pulse in microseconds.
For getting the distance we will multiply the duration by 0.034 and divide it by 2 as we explained this equation previously.
// Calculating the distance
distance= duration*0.034/2;

// Prints the distance on the Serial Monitor
Serial.print("Distance: ");
Serial.println(distance);Code language: PHP (php)
At the end we will print the value of the distance on the Serial Monitor.
Arduino Ultrasonic Sensor and LCD Display Example
Here’s another example how to use the ultrasonic sensor with Arduino and display the results on an LCD.
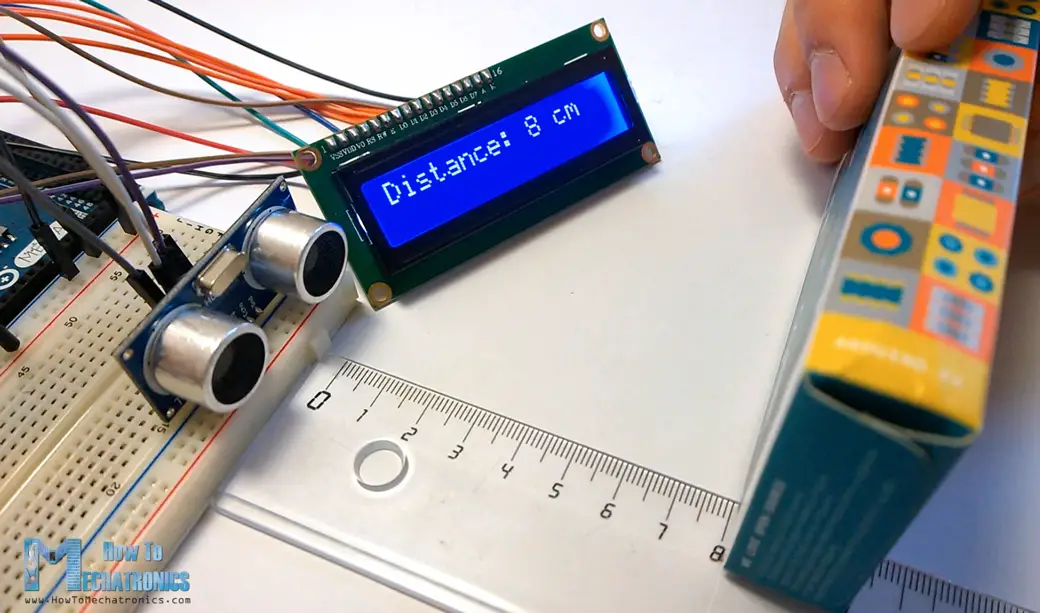
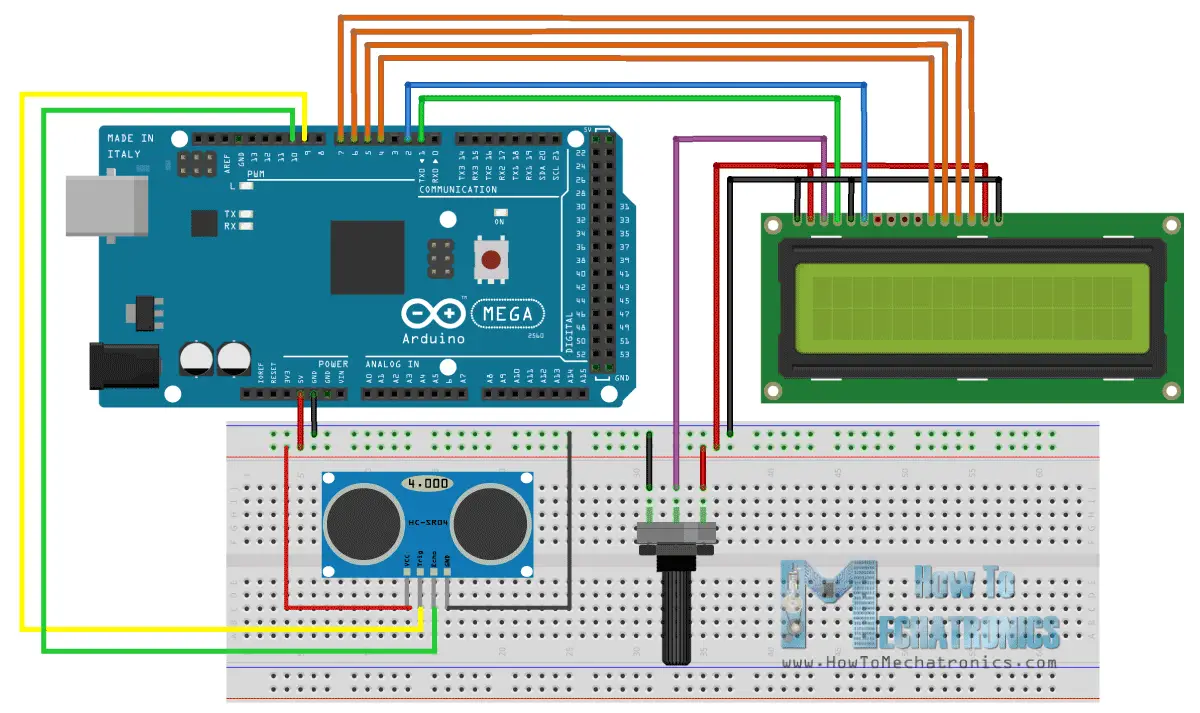
You can connect the ultrasonic sensor and the LDC as following:
The code measuring the distance is pretty much the same as the basic example. Here, instead of printing the results on the serial monitor we print them on the LCD. If you need more details how to use and connect an LCD with Arduino you can check my particular tutorial for it.
/*
  Ultrasonic Sensor HC-SR04 and Arduino Tutorial

  by Dejan Nedelkovski,
  www.HowToMechatronics.com

*/
#include <LiquidCrystal.h> // includes the LiquidCrystal Library
LiquidCrystal lcd(1, 2, 4, 5, 6, 7); // Creates an LCD object. Parameters: (rs, enable, d4, d5, d6, d7)
const int trigPin = 9;
const int echoPin = 10;
long duration;
int distanceCm, distanceInch;
void setup() {
  lcd.begin(16, 2); // Initializes the interface to the LCD screen, and specifies the dimensions (width and height) of the display
  pinMode(trigPin, OUTPUT);
  pinMode(echoPin, INPUT);
}
void loop() {
  digitalWrite(trigPin, LOW);
  delayMicroseconds(2);
  digitalWrite(trigPin, HIGH);
  delayMicroseconds(10);
  digitalWrite(trigPin, LOW);
  duration = pulseIn(echoPin, HIGH);
  distanceCm = duration * 0.034 / 2;
  distanceInch = duration * 0.0133 / 2;
  lcd.setCursor(0, 0); // Sets the location at which subsequent text written to the LCD will be displayed
  lcd.print("Distance: "); // Prints string "Distance" on the LCD
  lcd.print(distanceCm); // Prints the distance value from the sensor
  lcd.print(" cm");
  delay(10);
  lcd.setCursor(0, 1);
  lcd.print("Distance: ");
  lcd.print(distanceInch);
  lcd.print(" inch");
  delay(10);
}Code language: PHP (php)
Example Code Using the NewPing Library
There are actually a simpler and better way to program the Arduino to measure distance using the HC-SR04 ultrasonic sensor, and that’s using the NewPing library.
In the previously explained code we manually triggered the sensor and measured the received signal pulse duration. Then according to those results we calculated the distance based on it. Using the NewPing library we can get the distance with just a single line of code.
Here’s an example code:
#include <NewPing.h>

#define TRIGGER_PIN  9
#define ECHO_PIN     10
#define MAX_DISTANCE 400 // Maximum distance we want to measure (in centimeters).


NewPing sonar(TRIGGER_PIN, ECHO_PIN, MAX_DISTANCE); // NewPing setup of pins and maximum distance.

void setup() {
  Serial.begin(9600);
}

void loop() {
  delay(50);                    // Wait 50ms between pings (about 20 pings/sec). 29ms should be the shortest delay between pings.

  int distance = sonar.ping_cm(); // Send ping, get distance in cm and print result (0 = outside set distance range)

  Serial.print("Distance: ");
  Serial.print(distance);
  Serial.println("cm");
}Code language: PHP (php)
It is much simpler than the previous example. We just use the call the ping_cm() method on the NewPing sonar object and we get the distance in centimeters. If we want the distance in inches we can use the ping_in() instead.
The library also has few other useful features. For example, with the ping_median(iterations [, max_cm_distance]) method, we can get more accurate results, as it returns a median, or the middle value from several measurements. With the iterations parameter we set the number of samples the program will take for calculating the middle value. The default value is 5 iterations. The ping_median() returns the received pulse duration in microseconds.
Nevertheless, for more info and details you can check the NewPing wiki page.
Improving HC-SR04 Distance Sensor Accuracy with DHT22 Temperature Sensor
The HC-SR04 sensor is fairly accurate, but as it work depends on the speed of sound, for more accurate results we should also take the air temperature into consideration. The speed of sound can significantly change as the air temperature changes. For example, at 20°C, the speed of sound is around 340m/s, but at -20°C the speed of sound is around 315m/s. The relative humidity affects the speed as well.
So, if we use this sensor to measure distances at various temperatures we should implement a temperature compensation, and we can do that with the following formula:
Velocity = 331.4 + 0.6 x Temperature + 0.0124 x Relative_Humidity
Here’s an example:
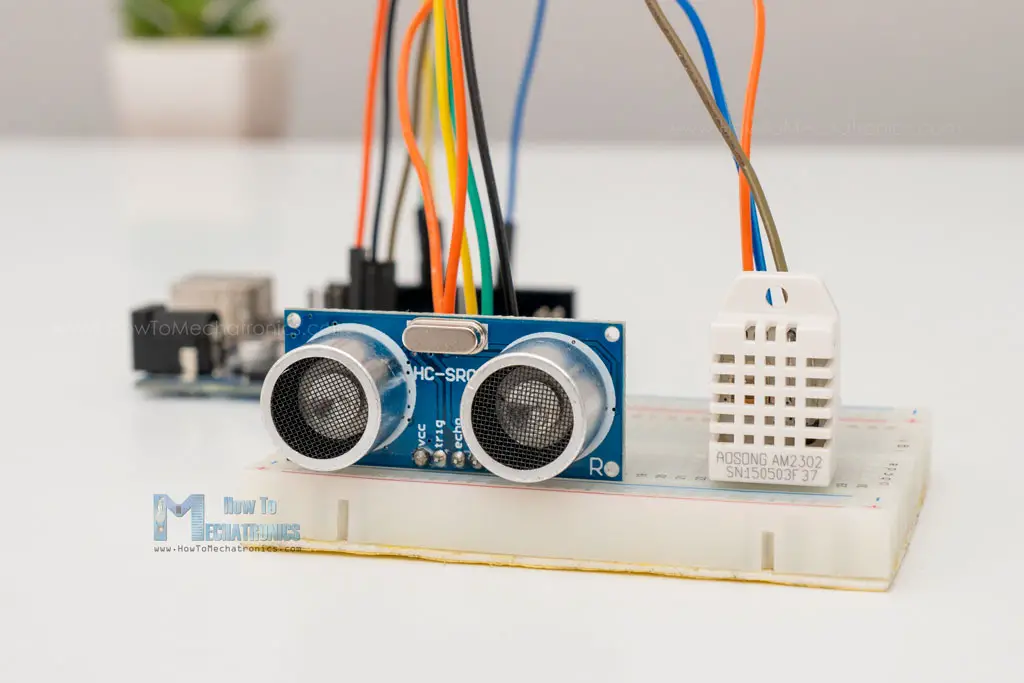
Along the HC-SR04 ultrasonic sensor, we will use the DHT11 / DHT22 sensor to measure the temperature and the humidity of the environment, and adjust the speed of sound value accordingly.
Arduino code
/*
  Example made by Dejan, How To Mechatronics,
  https://howtomechatronics.com/

*/

#include <NewPing.h>  // https://bitbucket.org/teckel12/arduino-new-ping/wiki/Home
#include "dht.h"      // https://github.com/RobTillaart/DHTlib

#define TRIGGER_PIN  9
#define ECHO_PIN     10
#define MAX_DISTANCE 400
#define dht22 5 // DHT22 temperature and humidity sensor

NewPing sonar(TRIGGER_PIN, ECHO_PIN, MAX_DISTANCE);
dht DHT; // Creats a DHT object

int readDHT, temp, hum;
float speedOfSound, distance, duration;

void setup() {
  Serial.begin(9600);
}

void loop() {
  delay(100);

  // Read temperature and humidity from DHT22 sensor
  readDHT = DHT.read22(dht22); // Reads the data from the sensor
  temp = DHT.temperature; // Gets the values of the temperature
  hum = DHT.humidity; // Gets the values of the humidity


  speedOfSound = 331.4 + (0.6 * temp) + (0.0124 * hum); // Calculate speed of sound in m/s

  duration = sonar.ping_median(10); // 10 interations - returns duration in microseconds
  duration = duration/1000000; // Convert mircroseconds to seconds
  distance = (speedOfSound * duration)/2;
  distance = distance * 100; // meters to centimeters

  Serial.print("Distance: ");
  Serial.print(distance);
  Serial.println("cm");

}Code language: PHP (php)
So, first we are reading the temperature and humidity values from the DHT22 sensor, and then use those values to calculate the speed of sound. Then we get the duration the sound wave travel in microseconds, convert them to seconds and calculate the distance from the sensor to the objects in centimeters.
HC-SR04 Dimensions and 3D Model
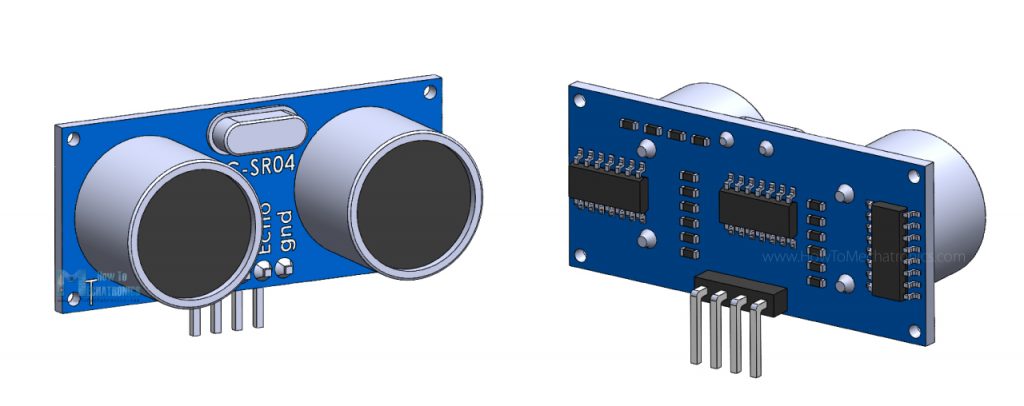
I made a 3D model of the HC-SR04 ultrasonic sensor in case you need one when making your next project with it. You can download it in from the link below.
You can find and download this 3D model at Thangs.
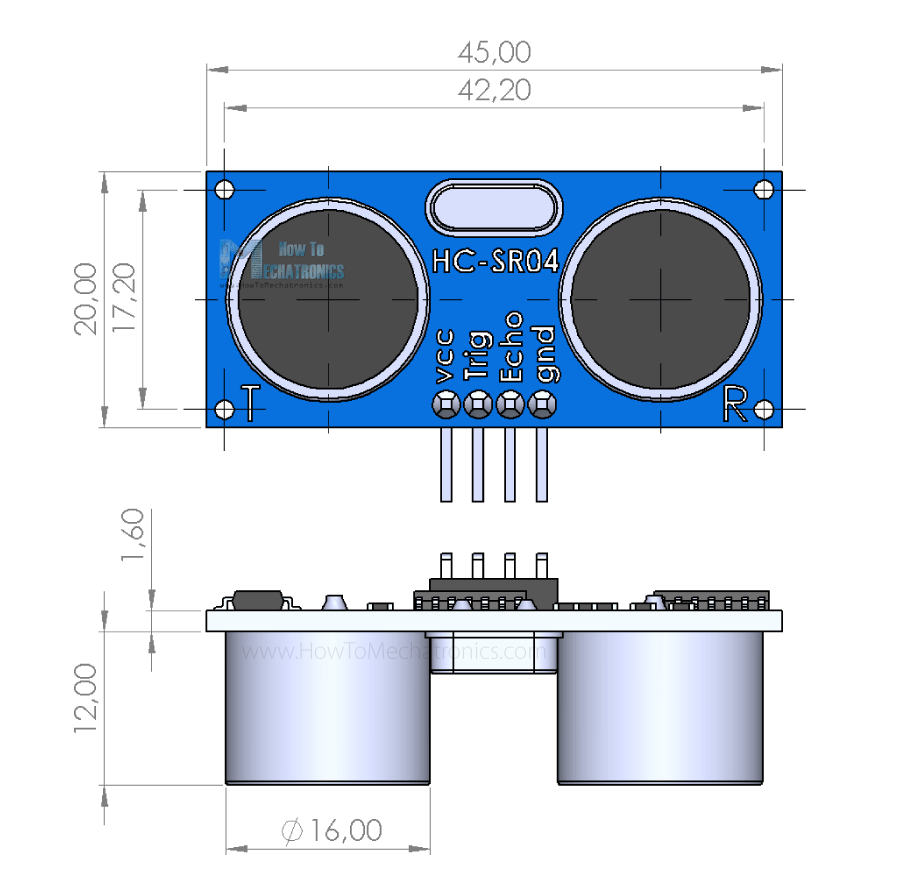
Here are the dimensions of the HC-SR04 sensor:
Please keep in mind that they can sometimes differ a little bit depending on the manufacturer.
Conclusion
So, we have covered pretty much everything that we need to know about using the HC-SR04 Ultrasonic sensor with Arduino. It’s a great sensor for many DIY electronics projects where we need a non-contact distance measuring, detection of presence or objects, level or position something etc.
I already mentioned the projects that I have made with this sensor at the beginning of the post. Here are some other cool projects using the HC-SR04 sensor and Arduino:
- Touchless Automatic Motion Sensor Trash Can
- Hand Gesture Smart Light Control
- Mini Acoustic Levitation
- Obstacle Avoiding Robot
I hope you enjoyed this tutorial and learned something new. Feel free to ask any question in the comments section below and don’t forget to check out my full collection of 30+ Arduino Projects.
Hi, this is a very complete explanation! And is very good idea to consider the speed of sound variation with humidity and temperature, to obtain exact measures!
I want to use this sensor inside a water tank, to control the water level, so I want to know if the humidity affects this sensor, or could use it without problem?
Thanks a lot for your help!
Hey, I’m glad you found this tutorial helpful.
Yes, the humidity and temperature affects the sensor accuracy. This has already been stated in the tutorial, please check the particular section.
Cheers
Thank you very much! I am a beginner and this was very useful
Hello Dejan,
Say for example I am measuring the volume difference in a container. How do I modify the code to measure volume instead.
Thanks
Hey, well you would need to measure three dimensions, width, length and depth and multiply them to get the volume. Check my Arduino Range Measurer project where I showed something similar, or how to measure area using this sensor.
Hi.
I’m new at this but i was wondering. Is it mandatory to use a breadboard? Or I can connect the sensor directly to my Arduino UNO ?
Thanks,
Cris
Hey, you don’t have to use breadboard. You can connect it directly to the Arduino.
the sensor is taking reading very fast i want to take it reading every .5 sec what should i do
You can add a delay or some kind of time counter into the program.
Thanks for the clear explanation. Still I dont understand. The counting starts when echoPin (input) gets the state HIGH (in this example). And the counting stops, when it gets the state LOW. Their time difference is 10us in the pingPin and their time difference is 10us in the echoPin. It is always the the same. The distance doesnt make any difference. The begin of the signal is moving as fast as the end of the signal. What actually starts the counting. It has to start, when the signal goes to pingPin. And it has to stop, when the signal come sback to echoPin. Would You please explain me more.
Well according the code and the logic of the trigger and echo pins your are totally right to be confused, so I was, but here’s the trick:
When we activate the trigger input (digitalWrite(trigPin, HIGH);), we send the ultrasound wave but at the same time, the sensor raises the echo pin internally. So the echo pin is already HIGH when the program gets to the pulseIn() function, which means the counting will depend on the objects distance.
hello its is true this sensor can detect from 2cm – 4meter? and if distance over than 4meter, what will show at lcd display?
That’s true. If the measured distance is over 4 meters it won’t give you correct values, just some random numbers.
isnt not have any solution if like that?
Super useful thanks for sharing!
Can the ultrasonic sensor turn on 24/7? for everyday? Will it burn or get hot? Thanks
That’s a good question. Well it’s electronics, so it should be able to work, but I cannot tell how reliable these cheap sensors are.
hello i am carmine from rome,
it is possible to change the absolute reading to a relative reading with a potentiometer change to a relative distance on the display?
Thank you
You should be able to do that if you modify the code to compensate the initial reading, probably with a simple arithmetic operation.
Quick question Dejan, I want to hook the distance sensor up with a raspberry pi 3, all tutorials I see seem to use resistors, how come ya don’t need them with the arduino but ya need them with the pi?
could i do it on the pi without resistors?
have you got a wiring diagram for the distance sensor combined with the lcd?
hi do you have a wiring schematic for the whole thing combined? the distance sensor and the lcd?
Sorry I don’t have it, but you can combine them easily if you check my Arduino LCD Tutorial.
is there any way to reduce te maximun distance measured?? great tuto by the way
Reduce the distance in what way? I didn’t get it. The range of the sensor is from ~2cm up to 4m.
I want to determine the coordinates(x,yz) of a point in space(room for exemple) by using ardouino, is that possible? and how to do it ?
You might be able to achieve that using this ultrasonic sensor. If you know the angle and the distance to the object you can determine it’s coordinates.
is it possible to stop dc motor with the help of PIR sensor??
Sure, it’s possible.
hi…nice project1
i have a question,,
what code arduino mega match with another tipe of arduino?like a nano,uno..etc
thank you
It’s the same code.
Hi mate, I wonder how to graph the data cast from the Ultrasonic Sensor on app inventor, could you help me with it? Thx and best regards.
Hi there. Well sorry but all I can say is to check my tutorial on app inventor and in combination with this tutorial, make the project on your own.
My work is teaching the basics of a particular sensor, module or a program, and your are that one that should use the knowledge gained from those tutorials to make a specific project.
Cheers!
Dude, your tutorials are fcking awesome !!!
I never find like this tutorial…
easy to understand, easty to implement… so yeah 😀
Do you have private contact ? i have final project in my colege and need new idea from you… Could you ? 😀
Thanks so much
Thanks! Sorry but I don’t work on private projects.
hi, i have checked this and many other codes but it is not giving accurate distance , only giving 2 inches. In addition I want to modify the range how I can do that?
The code is working 100%, so you either have a wrong connection or your sensor is faulty.
i connected the sensor to pic 16f877a and i wanted to measure the volume of water in a tank but i m getting false results what might be the problem
Sorry but I haven’t tested this module with the particular microcontroller.
Hey Dejan, is it possible to add a sound in the output so that the distance can also be used by the blinds!!
Sure it’s possible.
hello, if I want the measurement is not displayed in cm, if not in liters or ml as should be the formula? since I want to use this sensor to measure the water level of a tank
If you know the dimensions of the tank you can use and transform the unit “cm” to measure the “liters” of the tank.
Which Software have you used to Draw this circuit design
Fritzing.
MY HC SR04 is always gives maximum output 24 cm .
what to do now >
How come? Did you connect everything properly as presented in the tutorial, as well as, did you use the exactly same source code?
Dear, it possible the ultrasonic can detect the water leakage on the water pipe? mean the ultrasonic can receive the frequency or other value to show that when the water pipe has leakage, the value will changing? thanks
Well I’m not quite sure about this. I guess the ultrasonic wave could bounce when it would hit the water but I can’t say whether it would work for your idea.
Sir, because i need use ultrasonic sensor to detect the water pipe leakage which is receive the frequency / pulse from the water pipe, it possible the ultrasonic sensor can receive the frequency/ pulse ?? since this is ultrasonic project, would u can take time explain the concept of the ultrasonic sound use in detect water pipe leakage, i very confuse, thanks for reply me….
can I get your email,we want contract with you for this idea.
thanks.
Dear,
I have an idea to measure the amount of water in a water tank.
It has been seen on your video experiment to Motion Sensor.
Question: Is it possible to transfer centimeter change in the screen to a percentage, for example 40%, 50%.
Thank.
Rakan
Sure you just have to implement the math into the code.
can I get your email,we want contract with you for this adea please.
thanks.
Hi Dejan
Can I use HCSR 04 to send data to another HC SR04? I mean making one to act as transmitter and other as receiver? If yes how can I modify the code?
Well I haven’t tried something like that so I cannot say anything. You should try, it might be possible.
Dear Dejan, I am building a simple robot with this sensor. The problem is this: I want to avoid a collision at a distance of about 50 cm. How do I implement in code this value in the simple software I made. (the robot is programmed to drive an eight) with simple code as digitalWrite HIGH or LOW on two pins.
Regards, Ton.
Well the sensor can detect objects at that distance so I guess using some “if” statements you could make a simple code for avoiding collisions.
Can i use this code for arduino UNO board
Yes, you can.
can i do the same with a pic controller? with an altered program
Yes, sure you can.
can you send me the code of interfacing arduino with HCSR-04 sensor -SG-90 servo motor n lcd with buzzer interfaing send me code plz
Sorry, I don’t have such a code.
Is the source code for the sensor and LCD is under one sketch?? Or i need to use two arduino boards?? And if so, how can i connect the two then? 🙂
It’s one Arduino, one sketch. The ultrasonic sensor connection is as explained and for the LCD connection check my Arduino LCD Tutorial
Yea !!!!! I did it…. Anyway thanks.. 🙂
hi i have been working on HC-SR04 Ultrasonic Module and was wondering if you could send me a schematic of the project with the lcd hook up thank you for your time
Hi Sougata, Brilliant that you managed it! Could you give me the code? Thanks.
Hey Can you please upload/ Mail me the code and the diagram for measuring X-Axis And Y-Axis distance at the same time… Thanks
What do you mean, which example in this tutorial is that?
Actually I wanna know that, if i wanna connect two ultrasonic at a same time and show output in the display,,,… then what will be the code??? thanks
Can u email me or update the diagram of this project by adding the connections for the 16×2 lcd green screen ty in advance this website was a real help to me as my first arduino project and I use arduino uno is that OK or I have to change something in ue given project waiting for a quick response:)
Well combine the circuit schematics from my Arduino LCD tutorial and this one.
Hey, I got everything working and your tutorials are great! My display works, but it is just a blue screen. It is just blue and no numbers or anything on it, please help!
Well the problem is the contrast of the display. Use a potentiometer to adjust the contrast (as shown in my Arduino LCD Tutorial) or make a voltage divider with two resistors.
Great video. Thanks. I’m trying to set this up to trigger a gate or relay at a predefined range to set off a light if something gets too close. Have you already developed a sketch for this scenario. I just can’t seem to get it to work correctly myself. Thanks.
Thanks! Well this is a tutorial that can help you understand the basic working principle of the sensor and the code to get it working with the Arduino, but I don’t have a specific code as what you have described. Every project is a unique and needs a unique code, but I don’t make custom codes. I hope watching some of my other tutorials as well, will get your code writing knowledge good enough so you can make your own code for your project. Cheers!
hi,you forgot to write liquidcrystal in the lcd code
Yes thanks, it’s fixed now.
what type of arduino should I use?
Well you can do it with almost any model which operating voltage is 5V.
Unfortunately I get the same 0, 0, ….. response for the ultrasonic sensor on the monitor as well using Mega 2560 using just the sensor code by itself???
Any other suggestions?
Cheers, Ian
Sorry to hear that but I have just tried this code as well and it’s working perfectly with my HC-SR04. You got to be doing something wrong, or your sensor is not working properly.
Thanks for being so active on this.
https://howtomechatronics.com/tutorials/arduino/ultrasonic-sensor-hc-sr04/
Hi,
Followed everything I guess.
Still I see that the distance will no be bigger than 1 cm:
0in, 0cm
0in, 0cm
0in, 0cm
0in, 0cm
0in, 1cm
0in, 0cm
0in, 0cm
I am using a Arduino DUE, for the rest anything is connected directly to the board.
Any ideas?
Best regards
The problem might be that you are using Arduino DUE, which has 3.3V pins and the ultrasonic sensors is working with 5V. Try using an resistor at the echo pin, as the 3.3V are fine for the Trig pin, but the Echo pin of the sensor will output 5V to your Arduino DUI which might damage it.
Make sure your trig and Echo pins are connected to digital pins 9 and 10 instead of 11 and 12.
please give us the diagram of the ultra sonic with LCD
Here you can find details how to connect and use the LCD:
https://howtomechatronics.com/tutorials/arduino/lcd-tutorial/
Can we use a led to indicate the distance???? If yes than can u pls email me the codes…. Thanks
Yes, you can, but I don’t have such a code.
Please note the error in your fritzing wiring diagram that shows GND to VCC and VCC to echo.
Thanks
Thanks for the remark. I will change the that one.
Can you please email me the updated diagram of Ultrasonic Circuit sketch diagram ?
Thank you in advance,
Pradeep
It’s already updated.
connet vcc to +5 volt