Welcome to my collection of Arduino projects. As a maker, techie and mechatronics engineer I’ve been using Arduino for more then 8 years. Arduino is an incredibly versatile microcontroller with limitless possibilities for developing electronics applications and prototypes.
We can use Arduino for simple tasks such as controlling LEDs and DC motors, to controlling real CNC machines and robots. That’s right, in the following list I will share my Arduino experience with you. You will find Arduino projects for beginners and more advanced projects for Arduino enthusiast.
Even if you are just getting started with Arduino, you don’t have to worry about that. Each of the following DIY Arduino projects is covered with detailed step by step tutorial on how to do it yourself and includes circuit schematics, source codes and videos.
Using the comments section below, you can also suggest your ideas, as well as discuss anything related to these Arduino projects. I will continuously update this article with all new stuff that I make. Last update: February 2022.
Robotic Arduino Projects
As an Arduino enthusiast, I found making robots with Arduino to be most fun for me. There is so much to learn from them as a maker and an engineer. So, here are my Arduino projects related to robotics so you can learn too.
Arduino Robot Arm
When it comes to automated manufacturing, robot arms play big role with so many applications. They are often used for welding, assembling, packing, painting, pick and place tasks and much more. This Arduino project is actually a robotic arm made out of 3D printed parts, servo motors joints and controlled using an Arduino Nano. What’s even cooler we can control the robot arm wirelessly via a smartphone and a custom build Android application.
The robot arm has 5 degrees of freedom, so we need 5 servo motors, plus an additional servo for the gripper mechanism. For the communication with the smartphone we use the HC-05 Bluetooth module.
Difficulty: Intermediate
Link: DIY Arduino Robot Arm with Smartphone Control
Mecanum Wheels Robot
The following project is one of the coolest Arduino project in this list. It’s an Arduino robot car which instead of normal wheels, it employs omnidirectional wheels or mecanum wheels which enable to robot to move in any direction.
The wheels are attached on four stepper motors which are individually control. By rotating the wheels in certain pattern, they exert diagonal forces due the diagonally positioned rollers on the circumference of the wheels, and so they can move in any direction. The robot car can be remotely controlled either vie Bluetooth communication and an custom build Android application. Also, we can control it using an DIY RC transmitter with the help of the NRF24L01 transceiver module.
Difficulty: Advanced
Link: Arduino Mecanum Wheels Robot
Arduino Robot Arm and Mecanum Wheels Platform Automatic Operation
Here’s an upgraded version of the previous mecanum wheels robot project. On top of the platform I added the DIY Arduino Robot Arm project mentioned above and now they can work together.
As the robot uses stepper motors for the wheels and servo motors for the robot arm, we can precisely control them using the custom build Android application. What’s even cooler, we can record the movements of the robot and then the robot can automatically repeat them.
Of course, as for any of my Arduino projects, the Arduino code, the custom build Android application, as well as the 3D model files can be found and downloaded from the particular project article.
Difficulty: Advanced
Link: Arduino Robot Arm and Mecanum Wheels Platform Automatic Operation
See also: What are the Best Arduino Starter Kits in 2022?
SCARA Robot – 3D Printed
SCARA robot or Selective Compliance Articulated Robot Arm is the most common and suitable option, when it comes to pick and place and small assembly applications, which require moving a part from point A to point B.
This Arduino based SCARA robot is a step-up big compared to the previous projects in every aspect. It has a better and more robust design with precisely controlled stepper motors and custom build GUI for controlling it.
As a controller it has an Arduino UNO board, combined with a CNC shield and four A4988 stepper drivers. It has 4 DOF, driven by four NEMA 17 stepper motors.
Difficulty: Advanced
Link: SCARA Robot | How To Build Your Own Arduino Based Robot
Laser Engraving Robot
This and extension of the previous project or I converted my 3D Printed SCARA robot to work as a laser engraver robot. Instead of the gripper mechanism, here we are using a Laser module for engraving.
For controlling the robot we are using an Arduino Mega board in combination with a RAMPs board. This a popular combination used for 3D printing and it can be used for laser engraving machines as well. As for a firmware, we are using the Marlin 3D Printer firmware and the Repetier control software.
Difficulty: Advanced
Link: Laser Engraving with DIY Arduino SCARA Robot
DIY Mars Perseverance Rover Replica
Inspired by the NASA Mars 2020 mission and the successful landing of the Mars Perseverance Rover on the plant Mars, I build a 3D printed functional replica of it. I designed this DIY 3D Printed Mars Rover in a way that it can be easily recreated by following the instructions in the tutorial.
The rover features a rocker-bogie suspension which allows the rover to run smoothly on uneven terrain, just like the real rover. It has six independently controlled DC motors for driving and four servos for steering, and it’s controlled using an Arduino MEGA board. There’s also an FPV camera located in the cameras unit of the rover which can by used for controlling the rover remotely. The remote control is done with the help of a cheap commercial RC transmitter and receiver.
Difficulty: Advanced
Link: DIY Mars Perseverance Rover Replica – Arduino based Project
Arduino Hexapod Robot
Making biologically inspired robots is very popular among engineering students. This Arduino project is all about it, we will build a hexapod robot which features six legs, a tail or abdomen, a head, antennas, mandibles and even functional eyes. All of this makes the robot look like an ant.
Each leg have three joints, and for each joint we need a servo motor. That means that we need total of 18 servos for this project, and additionally 3 servos for the head movements and 1 servo for the tail. The brain of the robot is an Arduino Mega. We need MEGA because it’s the only board that can control more than 12 servos using the Servo library.
I also designed a custom PCB which acts as an Arduino Mega Shield so we can easily attach all servo connects. We can control the ant robot via Bluetooth and a smartphone, or radio communication. The ant also has built-in ultrasonic sensor in the head. With that it can detect objects in front, and it can even strike if the object is present if front of it.
Difficulty: Advanced
Link: Arduino Ant Hexapod Robot
CNC Machines Arduino Projects
The following projects show how capable Arduino is. A CNC or Computer Numerical Control is an automated control of machines, like mills, lathes, plasma cutters, 3D printers and etc. So, using the Arduino as a controller we are actually able to build any of these CNC machines.
DIY Laser Engraving CNC Machine
For the project my goal was to build the simplest CNC machine with minimum parts possible and by using just a single power tool. On top of that, I wanted to use common materials or avoid 3D printers so I used MDF board for building the base frame.
The CNC machine is composed of just two linear rails which are secured to a base frame made of 8mm MDF board. For controlling it we are using an Arduino UNO board in combination with a CNC shield and two DRV8825 stepper drivers. As a tool it has an laser module attached so this machine is actually a CNC laser engraver.
Difficulty: Intermediate
Link: Simplest CNC Machine with Minimum Parts Possible – DIY Laser Engraver
DIY Pen Plotter with Automatic Tool Changer
A CNC drawing machine or a pen plotter based with automatic tool changer. An awesome way to draw anything in any color.
The idea for this Arduino project was similar to the previous one, to build a CNC machine using minimum parts possible. Here I used 3D several printed parts, and just two MGN15H linear rails for the main construction of the machine.
Difficulty: Intermediate
Link: DIY Pen Plotter with Automatic Tool Changer | CNC Drawing Machine
Arduino CNC Foam Cutting Machine
Building your own CNC machine might seem like a big challenge for many of you, but the following Arduino CNC Machine project shows that building a CNC machine is actually not that hard.
This CNC machine is actually a foam cutting machine. Instead of bits or lasers, the main tool of this CNC machine is a hot wire. It’s a special type of resistance wire, which gets really hot when current passes through it.
The hot wire melts the foam when passing through, and so we can precisely make any shape out the styrofoam.
Difficulty: Advanced
Link: Arduino CNC Foam Cutting Machine
Arduino Wire Bending Machine
Controlling stepper motors using Arduino is without a doubt one of most satisfying thing for an Arduino enthusiast. There so many machines based on this motors, like CNC machines, 3D printers, various automation machines etc. This Arduino project is all about that. It describes how you can build such a machine. It’s a machine for bending wire, where with the help of stepper motors we can precisely bend wire and make various shapes and forms out of it.
The machine features three stepper motors. With the first stepper we feed the wire to the bending mechanism. Here we have another stepper motor used for the bending the wire at the right angle. There’s also another stepper, for controlling the Z-axis. This stepper enables the machine to create three dimensional shapes. With this project we can also see how useful 3D printers are for Arduino projects of this type or for prototyping.
Difficulty: Advanced
Link: Arduino 3D Wire Bending Machine
Radio Control (RC) Arduino Projects
Controlling Arduino projects using radio devices is quite useful and fun at the same time. I have made several radio based projects.
DIY Arduino based RC Transmitter
Many Arduino projects that I make require wireless control and that’s why I build this Arduino based wireless radio controller. With this RC transmitter I can wirelessly control pretty much with a range up to 700m in open space. It features 14 channels, 6 of which are analog and 8 digital inputs.
The brain of this Arduino project is an Arduino Pro Mini board which is the smallest Arduino board. The radio communication is based on the NRF24L01 module, it has 2 joysticks, 2 potentiometers and 4 momentary push buttons. Also an accelerometer and gyro module which can be used for controlling things with just moving around or tilting the controller. I mounted all electronic components on a custom design PCB and made a cover out of transparent acrylic.
Difficulty: Intermediate
Link: DIY Arduino RC Transmitter
DIY Arduino RC Receiver for RC Models and Arduino Projects
This is a follow up project of the above one. Just like DIY RC Transmitter, this DIY Arduino RC Receiver can be used for many application. We can easily pair the two projects together and control anything wirelessly. Among others, I made an example of controlling a commercial RC car model using these DIY transmitter and receiver.
The custom PCB that I made uses the same NRF24L01 module for the radio communication. The controller is an Arduino Pro Mini and it features input/ output 9 channels.
Difficulty: Intermediate
Link: DIY Arduino RC Receiver for RC Models and Arduino Projects
DIY Arduino based RC Hovercraft
The following Arduino project is a great example of utilizing the DIY RC transmitter from above. It’s a 3D printed hovercraft which I entirely designed on my own, and of course, the 3D printing files are available for downloading. The hovercraft uses two brushless motors, one for creating an air cushion for the lift, and the other for generating thrust or moving forward.
For the wireless control we are using the NRF24L01 module, which accepts the data coming from the RC transmitter. Then using the Arduino and two ESCs (Electronic Speed Controler) we control the BLDC motors speed. On the back side of the hovercraft there is also a servo for controlling the rudders, or for controlling the steering. I must say that driving this DIY hovercraft is so fun.
Difficulty: Advanced
Link: DIY Arduino based RC Hovercraft
Arduino RC Airplane
Anyone who had a chance of playing around with some RC airplanes knows how cool and fun it is. It’s even cooler and more satisfying if you build the RC airplane on your own. The following project steps the satisfaction up even further, because here I will show you how to build your own RC airplane which is 100% DIY build. Also, we have a 100% DIY radio control system based on the Arduino.
The airplane is entirely made out of Styrofoam and what’s cooler, the shapes are made with the help of my DIY Arduino CNC Foam Cutting Machine, a project already mention above. The radio communication is based on the NRF24L01 transceiver modules. For that purpose, I used my DIY Arduino RC Transmitter and DIY Arduino RC Receiver.
Difficulty: Advanced
Link: Arduino RC Airplane | 100% DIY
Arduino Robot Car Wireless Control
This Arduino project is an extension to the previous one, and here we will learn how to wirelessly control the Arduino robot car.
You can choose one of the three different methods of wireless control explained in this project, or that’s the HC-05 Blueooth module, the NRF24L01 transceiver module and the HC-12 long range wireless module. Additionally you can learn how to make your own Android app for controlling the Arduino robot car.
Difficulty: Intermediate
Link: Arduino Robot Car Wireless Control using HC-05 Bluetooth, NRF24L01 and HC-12 Transceiver Modules
Arduino Wireless Weather Station
This Arduino project idea is rather practical because it features indoor and outdoor temperature and humidity measurement. It is based on the DHT11/ DHT22 sensor, the NRF24L01 transceiver module for the wireless communication and the DS3231 RTC. For the display we can either use 16×2 character LCD or a 3.2 inches TFT touch screen.
The outdoor unit can be powered with batteries and the indoor unit with an AC adapter. The outdoor unit measures the temperature and the humidity and sends the values to the main indoor unit. Here these values are printed on the LCD along with the data and time values from the DS3231 RTC module.
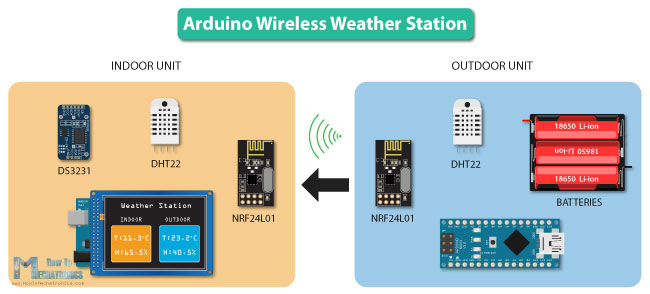
Additionally, we can use SD Card module for storing the data onto Micro SD card.
Difficulty: Intermediate
Link: Arduino Wireless Weather Station Project
Motors Control Arduino Projects
Controlling motors using Arduino is actually quite easy, and there are some many interesting projects with can make with Arduino and motors.
Arduino Camera Slider with Pan and Tilt Mechanism
Camera slider are great for capturing cinematic shots, and having pan and tilt system on top of it even further increase the possibility to capture better shots. In this project I will show you how you can build your own one, which costs way less then one found in the stores and still you can get great and super-smooth shots.
The slider has three NEMA 17 stepper motors controlled via the A4988 stepper drivers and the Arduino Nano board. Using a joystick we can control the pan and tilt movements and using a potentiometer we can control the sliding movement. With this DIY camera slider we can use the Set button to set two different IN and OUT points. Then the camera can automatically move from one to the other point.
Difficulty: Advanced
Link: DIY Camera Slider with Pan and Tilt Head – Arduino Based Project
DIY Vending Machine
If you are interested in building something more complex with Arduino then this project is the one for you. Although complex, you could easily recreate it as there is a detailed step by step explanation on how everything works, including circuit schematics and source codes.
The structure of the machine is made out of MDF. For discharging the items I used continuous rotation servo motors, while for the carrier system I used two NEMA17 stepper motors. For detecting the coins the machine uses an infrared proximity sensor.
Difficulty: Advanced
Link: DIY Vending Machine – Arduino based Mechatronics Project
DIY Arduino Gimbal / Self-Stabilizing Platform
The following Arduino project is a simple gimbal or a self-stabilizing platform. It can be used for keeping objects or the top platform level. The project is rather simple with just several electronic components.
Based on the MPU6050 orientation and its fused accelerometer and gyroscope data, we can control the 3 axes or servos that keep the platform level.
Difficulty: Intermediate
Link: DIY Arduino Gimbal | Self-Stabilizing Platform
Arduino Robot Car
The combination of DC motors and Arduino is always fun, and so is this project. Here we will build our own robot car from scratch. The car will be powered with Li-ion batteries and two 12V DC motors, and controlled using the L298N driver and an analog Joystick.
Through this project we will also learn how H-Bridge and PWM motor control work.
Difficulty: Intermediate
Link: L298N Motor Driver – Arduino Interface, How It Works, Codes, Schematics
Arduino Projects for Beginners
If you found the above projects a bit hard to start with, you can try the following projects which are good for beginners.
Arduino Radar (Sonar)
This is one of my most popular project and it’s really fun to build. The radar can detect objects in front of it and map them on PC screen using the Processing IDE.
For this project you just need two components along with an Arduino board, and that’s an ultrasonic sensor and small servo motor. The range of the radar can be adjusted to up to 4 meters with 180 degrees rotation.
Difficulty: Easy
Link: Arduino Radar Project
Range Measurer and Digital Spirit Level
Here’s another project utilizing the HC-SR04 ultrasonic sensor. This time we will use it to make an distance meter which can measure distances up to 4 meters, as well as, measure square area.
The project also includes and accelerometer which is used for the digital spirit level function or for measuring angle. The results are displayed on 16×2 LCD and all components are attached on a custom design PCB.
Difficulty: Intermediate
Link: Arduino Range Measurer and Digital Spirit Level Project
Arduino Color Sorter
Sorting out objects or products by their color has an important real world application. These types of machines are often used for sorting fruits, seeds, plastics etc. The working concept of these machines is rather simple. All you need is a color detecting sensor and of course a system that feeds the object to the sensor and then sort it out.
In this project we will learn how to use a color detecting sensor along with the Arduino. We are going to be sorting out colored skittles but you can use the same sensor and method for sorting out anything else.
Difficulty: Intermediate
Link: Arduino Color Sorter Project
RFID Access Control System
RFID technology has wide range of applications and access control is one of them. We often encounter this in hotels for accessing our room or at work for checking in or accessing restricted areas.
In this project we will learn how to use the Arduino to make an RFID controlled door lock. The system consists of an MFRC522 RFID reader and RFID tags/ cards that are based on the MIFARE protocol.
Difficulty: Intermediate
Link: How RFID Works and How To Make an Arduino based RFID Door Lock
Arduino Alarm System
If you ever thought of making your own security system then this project is a great starting point. Here we will utilize an ultrasonic sensor for detecting movement.
If a human or object passes in front of the sensor, the alarm will be activated. For deactivating the alarm you will have to enter a password using a keypad.
Difficulty: Intermediate
Link: Arduino Security and Alarm System Project
Arduino LED Matrix Scrolling Text
In this project we will control LED Matrices using the MAX7219 driver. This driver can control up to 64 individual LEDs while using only three wires. Also we can connect up to 8 drivers in series and still using the same wires.
To make this project more interesting I also added an example where you can update the text on the LED matrixes through your smartphone using a custom-made Android app.
Difficulty: Intermediate
Link: 8×8 LED Matrix MAX7219 Tutorial with Scrolling Text & Android Control via Bluetooth
Arduino Game Project
This game project is based on the popular Flappy Bird game for smartphones. Using the touch screen we control the bird while trying to avoid the pillars.
For this project we need a 3.2 inches TFT Touch screen, an TFT Mega shield adapter and an Arduino Mega board. The code is a bit longer but everything is explained in details.
Difficulty: Advanced
Link: Arduino Game Project – Replica of Flappy Bird for Arduino
Arduino Music Player and Alarm Clock with Touch Screen
In this project we will learn how to build our own music player. It features a touch screen, MP3 player, a temperature sensor and an alarm clock.
The code behind this project is a bit more complex with around 550 lines but everything is explained in details with comments for each lines. There is also a detailed video explanation for it.
Difficulty: Advanced
Link: Arduino Touch Screen Music Player and Alarm Clock Project
More Arduino Projects
Arduino Based Interactive LED Coffee Table
At first glance this table looks like a normal coffee table but once you turn on the power on it gets to a whole new level. The table has 45 sections which can glow in any color we want, plus it reacts on objects placed on top of it.
The heart of the table is an Arduino which controls the 45 WS2812B Addressable LEDs. The objects on top of the table are detected using infrared proximity sensors. What’s even cooler it has built-in Bluetooth module which enables interaction with a smartphone for selecting the LEDs colors.
Difficulty: Advanced
Link: Arduino Based Interactive LED Coffee Table
DIY Air Quality Monitor
Monitoring the indoor air quality is very important as it can affect us in many way. If we have a poor air quality in the room we are staying, it can lead to tiredness, headaches, loss of concentration, increased heart rate and so on.
In this Arduino project we are building an Air Quality Monitor which can measure several important air quality parameters such as PM2.5, CO2, VOC, Ozone, as well as temperature and humidity. I designed a custom PCB on which we can easily attach the sensors we need and show the results on a 2.8 inches touch display. The device can also keep track of the sensors values from the last 24 hours.
Difficulty: Advanced
Link: DIY Air Quality Monitor – PM2.5, CO2, VOC, Ozone, Temp & Hum Arduino Meter
Arduino Projects Ideas
The following section of this article contains Arduino projects ideas based on my detailed tutorials on various sensors and modules, as well as your suggestions from the comments section below.
For each project idea I will point out the required components as well as the particular tutorial for each of them.
6-Axis Arduino Robot Arm with Cycloidal or Harmonic Drives as Joints
Building more robust Arduino based Robot arm which will employ either Cycloidal or Harmonic drives as joints.
Using my detailed tutorials how a cycloidal and a harmonic gearboxes work we can develop robotic joints which will have high torque and efficiency.
Cycloidal Drive working principle:
Harmonic Drive working principle:
We can use NEMA 17 or 23 stepper motors in combination with these drivers which provide high speed reduction ratios. As for controller we could use an Arduino Uno or Arduino MEGA board.
Difficulty: Advanced
Android Smartphone Controlled Power Outlet Using Arduino
Controlling your home power outlets via a smartphone is the first step in home automation. You can easily make your own Arduino controlled power outlets utilizing the knowledge you can get from my Arduino tutorials.
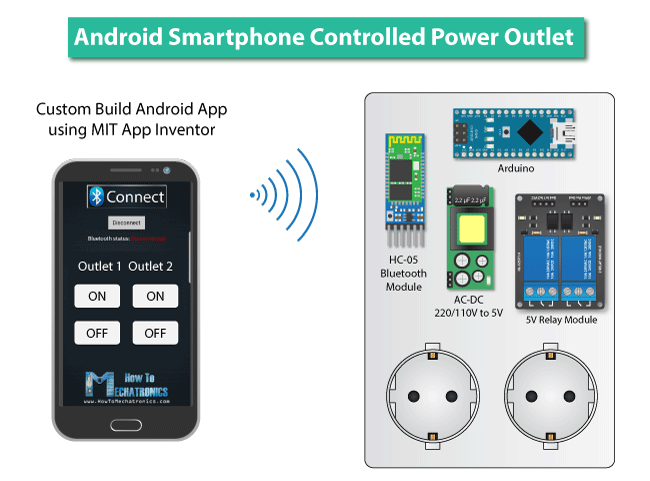
For this project you just need two components along with the Arduino board. An HC-05 Bluetooth module and a 5V Relay module for which I already have detailed tutorials. For powering the Arduino and the relay you can use 220/ 110V AC to 5V DC converter.
Using your smartphone you can connect and control your power outlet via Bluetooth. You can either use some already made apps for controlling Arduino from the Play Store or create your own custom made app. In this way we can also control the power outlets through voice control commands.
Difficulty: Advanced
Home Automation Arduino Projects
Home automation is one of the most popular Arduino projects nowadays. The goal of this project is to remotely control anything in your house like lights, appliances, temperature, security devices and so on, with a single device or your smartphone.
In order to make such a project we need decent amount of knowledge in Arduino. The following home automation concept that I suggest is based on my detailed Arduino tutorials for various sensors and modules.
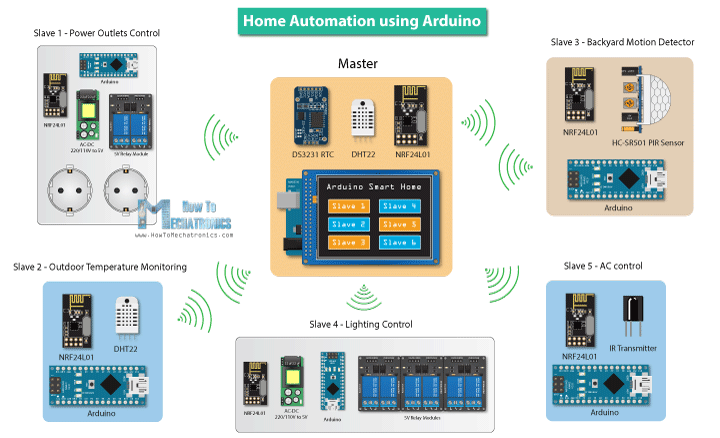
So the idea here is to have a master unit which includes a touch display, and several slave units which will execute commands coming from the master. As for the wireless communication we can use the NRF24L01 radio frequency modules. Each slave unit can have various functions like, temperature monitoring, power outlet control, lights control, security alarm and so on.
Of course, there are endless possibilities and combinations for building a home automation system using the Arduino board. You can always change and add more devices. You can also make a Bluetooth communication so you can control all of this using your smartphone etc.
Difficulty: Advanced
Arduino Gesture Control
The idea for this project is to remotely control an Arduino project using hand gestures. Let’s say we want to control the Arduino Robot Car that we mentioned above. So instead of the joystick we will use an MEMS module for the control.
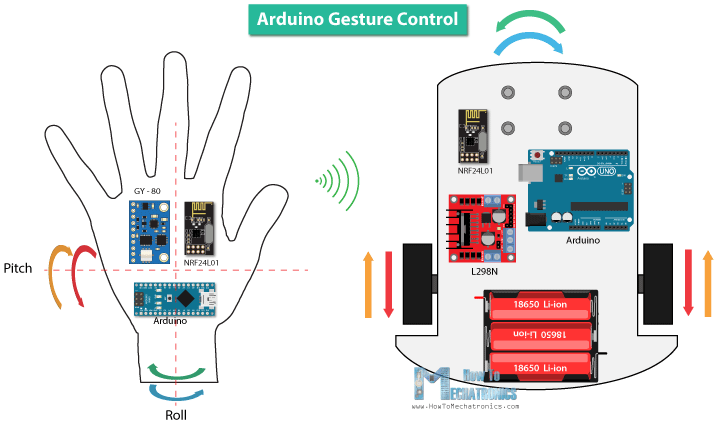
We can use the GY-80 module which features an accelerometer, a gyroscope and a magnetometer. Then the data we are getting from these sensors to control the steering of the robot car. As for the wireless communication we can use the NRF24L01 transceiver modules.
You can also check my Mechatronics Final Year Project where I used a similar method for controlling a 3D model in Matab Simulink.
Difficulty: Advanced
Feel free to ask any question in the comments section below and don’t forget to suggest some more Arduino projects.
I have not found a more comprehensive site for learning how to use an Arduino and make things with them as the brain. I also like that you can “understand what words are coming out of your mouth”(Chris Tucker and Jackie Chan reference). It makes things much simpler for me. I have a hard time understanding what many YouTubers are saying. I want to become a master of the Arduino quickly. I don’t have time to waste on sites with bits and pieces of information and many times with flat-out wrong information.
I am working on a project similar to your Home Automation using Arduino concept but using the HC-12 because the distance between remote units can be 600′ through trees etc. Basically its a property monitoring system rather than a home based system. Driveway monitor, human presence detection, temp in buildings etc. Your site and videos have given me the inspiration and confidence to give it a go. Thanks for the great content 🙂
Nice to hear it, have fun building! 😀
Hi, I am wondering if anyone has made an outdoor batttery powered wind chime “wobbler” to randomly make the chimes chime on windless days. I imaging a motor with a pulley and a sting attached to the paddle of the wind chime to simulate wind. Our neighbour has a really loud air conditioner and is now adding a pool pump. We would love to not listen to these sitting on our patio. I am an older person with no electrical or mechanical experience but am willing to try to learn.
Hello…I’d like to build an animatronic robot, (although it will closely resemble a talking/singing teddy bear). I need to build a control system that allows me to articulate the bear via custom joystick controllers. The signals will operate 12v relay banks which will engage air valves which in turn will operate pneumatic cylinders. Disneyland style, only on a much smaller scale. But I also need to be able to record the signal information in real time, and be able to make multiple passes during recording. (Example: record head tilt, ear wiggle, and eye movement on first pass…start at the begin again. Now as it plays back the movements I just did, I start operating mouth movement, arm and body movements. These would be recorded on another track. When played back…I have a bouncing talking and singing bear that operates on its on auto-pilot. Can Arduino products help me in any of the challenges that lay ahead for me? Thank you for any info. or thoughts you might have.
🛀Dave.
Hey, sure, you could definitely use an Arduino board as a controller. Depending on of the number of inputs and outputs you could use an Arduino UNO, NANO or MEGA. I’m not sure how much knowledge you have in this field, so I would suggest to check some of my tutorials. I have examples for controlling motors and sensors using custom design joystick controllers, so you might find those helpful.
The project would have a lot of work, obviously, but I believe it would be quite interesting. Cheers and so have fun building one!
thanks a lot for share !!! its really amazing and great projects! Im just starting to understand this staff from Arduino I’m just a beginner so I need to ask you something about the different boards that you use:
can I use a board bought in another online store for example aliexpress?
and the other question is
Will work your code with this board from aliexpress?
best regards, and again, thank so much for you help and incredible knowledge
Serba
Thanks! Sure, you could use mostly any board, bought from anywhere, which is Arduino based or compatible for any of these Arduino projects.
Make a dtmf car or drone
Hi,
Firts of all let me thank you for all effort and very good explanation you put in your projects and videos, you already built a radio controller. Is there any future project to build an arduino based drone and control it throughyou RC controller? I guess ot would be very nice.
Thanks again and congratulation for your good work.
Hey, thanks! Well yeah, I will build an Arduino based drone in some of my future videos, but I’m not sure exactly when I will do that. So stay tuned!
I’ve learned a lot from your website especially on how to control a device using a smartphone via bluetooth. Thanks man! You did a great job!
I’m glad to hear this, thanks!
Just want to say, great site, keep up the good work!
Thank you!
Hi Dejan,
very nice work you doing here!
Are you considering to build some battery project with as low power consumption as possible? Weather station would be a great example but you already built that. Maybe ver. 2.0? 😀
Thank you! Yeah, that’s a good suggestion and I definitely will make projects like that in future. A solar panels for charging can also be implemented.
Hi.
First of all i really love this projects.
I want to ask to make CNC machine using old Inkjet Printer Parts, with DC motors and step readers on it..
Thank you. 🙂
Hey, thanks!
Yeah, a CNC machine is already on my TO-DO list and I will definitely make one in future. 🙂
Excellent content and information…
Can you please tell me about the 5 volts external power supply(& how to build an another one for Arduino projects) you’ve used in your arduino projects for powering other actuators & devices
I would recommend to get a DC-DC Buck Converter which can be usually set to voltages from 3 to 35 volts, with inputs from 3 to 35 volts. And depending on your application you need to make sure that your buck converter have enough power, or it can handle the amount of current your project needs. Or of course, you can get a particular voltage DC adapter or power supply.
I would like to ask if you could do a tutorial on how to send strings from an android and print it on the computer via bluetooth module and using arduino.
Well check my Arduino Bluetooth tutorial. There I’ve explained how you can make communication between Android and Bluetooth module, as well as Arduino and PC.
How can I build a small cheap fall detection device that sends an alert to a phone when the wearer falls?
You could try to achieve that using an accelerometer sensor. If a sudden higher acceleration is detected that would mean that the wearer has fallen. Check my MEMS tutorial for this. These sensors are cheap and you might be able to get that effect.
Hey there i’m working on a project on metal detectors anything on the subject?
Hey, sorry at this moment I don’t have anything on that subject.
we are making a project about campus security system..how can we built a system that can lock or unlock door and record our data by scanning smartcard?
You should check my Arduino RFID Tutorial for that purpose. There I explain how to use RFID card to lock and unlock a door, and of course, you could add some more features to it, like recording the date, the time, count the data etc.
You have explained each and every project in detail and simple language. Anybody who knows the basics of electronic science can build the project easily and can enjoy Arduino circuits. Thanks to your team
I got an A in my project. Thanks for such beautifully designed website and arduino skills. Just a beginner at the moment. You rock! : )
That’s awesome! Thanks!
Wondering if your next project should be using a ESP8622, WS2812 strips and a TFT touch display. Many use the adruino webserver to control lights, but why not do it through a TFT to chose the various patterns and effects?
Throw the phone aside and have a all in one to control those light!
Yeah, that would definitely be an interesting project.
i am a student working on my final year project which is to design an automated car jack,will use a hydraulic jack for lifting an automobile and i want to use my android phone to act as the remote control,meaning lift of the automobile will simply be done by just pressing the button in app which will be installed on my phone,kindly asking for some ideas on how i can achieve this and the necessary software/app i can use on my phone?
That’s a cool project idea. The main concern if you would like to build a real life example with lifting a car would probably be the lifting mechanism. Otherwise, if you just want to make the concept working with a simpler mechanism, the software/app part of this project would be easily achievable. For that purpose you can check my detailed tutorials, how to use the Arduino with the HC-05 Bluetooth module and how to make your own Android app for controlling the Arduino.
Hi, Shrikant here ,i was working on a project ,i got a problem in my project, the problem is,i am trying to operate big motors using relays ,contactor relay,operated by arduino. The relays does not operate properly ,the loop does not get completed .The relays are not taking load contactor ,i think so. It completed the loop 3 times only. Do you have any suggestion or hint please reply me.
Check my Arduino Relay Tutorial, it might be helpful.
are the relay coils providing a back emf spike as this may upset the arduino , this occurs when power has been interrupted to the coil the way to stop this is to wire a suitable diode in reverse polarity to the emf supplying the coil when it is to be activated , this may have already been done but I thought I’d mention it just in case
hi shrikant,
jst try to use regulated DC supply. If you are using 9v bat then same problem may occur.
The digital pins may not sink enough current to operate the relays, you may need to use transistors to switch the relays.
Dave is probably right but another way is to use a smaller relay and then pick the large relay with the contacts of the smaller one.
the arduino outlet current is very limmited at most 40m A for all pins toghether,which is means that if you directly connect your relay to arduino, it may damage your whole arduino or the least that pin connected to relay.
its better to use optocoupler or transistor or both of them to seperate your high voltage or high current from your arduino.
for optocoupler you may connect your arduin pin to optocoupler pin1(anode) ans resistor 330 or 470 ohm between them
pin 2(cothode) of optocoupler to gnd
pin 3(collector) to 5 or 12 or any voltage your relay work with
pin 4(emmiter) to relay
dont forget to use flywheel diod for your relay
and for transistor
arduino pin to base pin and a resistor between them
collector to dc voltage
emmiter to relay,
again dont forget to use flyweel diod