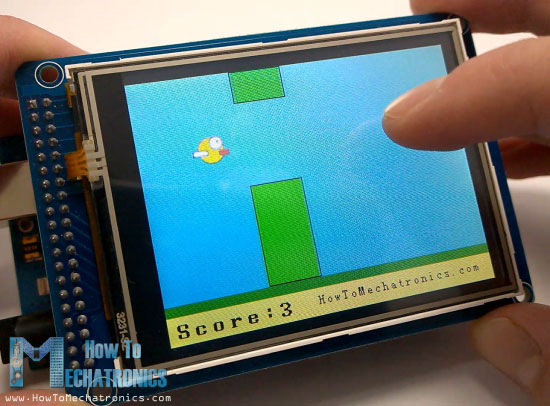
In this Arduino Project we will make a cool Arduino Game, actually a replica of the popular Flappy Bird game for smartphones, using an Arduino and a TFT Touch Screen. You can learn how it works by watching the following video or read the written text below.
Overview
The game is quite simple but interesting and addictive. Using the touch screen we control the bird and try to avoid the moving pillars which speed increase as we progress. Also the game can store your highest score even if you unplug the power.[/column]
In the previous tutorial (Arduino TFT Tutorial) we learned in details how to use TFT Touch Screens with an Arduino and we left the game example to be explained in this tutorial. So now, just like in the previous tutorial, we will step by step explain the code behind this Arduino Game.
Source code
As the code is a bit longer and for better understanding I will post the source code of the program in sections with description for each section. And at the end of this article I will post the complete source code.
We will use the UTFT and URTouch libraries made by Henning Karlsen. You can download these libraries from his website, www.RinkyDinkElectronics.com. Also we will use the EEPROM library for storing the highest score in the EEPROM. The EEPROM is a memory which can store data even when the board is turned off.
After we have included the libraries we need to create the UTFT and URTouch objects as well as define the variables needed for the game. In the setup section we need to initiate the display and the touch, read the highest score from the EEPROM and initiate the game using the initiateGame() custom function.
#include <UTFT.h>
#include <URTouch.h>
#include <EEPROM.h>
//==== Creating Objects
UTFT myGLCD(SSD1289,38,39,40,41); //Parameters should be adjusted to your Display/Schield model
URTouch myTouch( 6, 5, 4, 3, 2);
//==== Defining Fonts
extern uint8_t SmallFont[];
extern uint8_t BigFont[];
extern uint8_t SevenSegNumFont[];
extern unsigned int bird01[0x41A]; // Bird Bitmap
int x, y; // Variables for the coordinates where the display has been pressed
// Floppy Bird
int xP = 319;
int yP = 100;
int yB = 50;
int movingRate = 3;
int fallRateInt = 0;
float fallRate = 0;
int score = 0;
int lastSpeedUpScore = 0;
int highestScore;
boolean screenPressed = false;
boolean gameStarted = false;
void setup() {
// Initiate display
myGLCD.InitLCD();
myGLCD.clrScr();
myTouch.InitTouch();
myTouch.setPrecision(PREC_MEDIUM);
highestScore = EEPROM.read(0); // Read the highest score from the EEPROM
initiateGame(); // Initiate the game
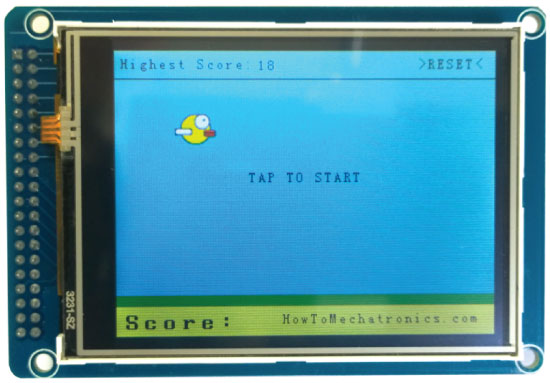
}Code language: PHP (php)So with the initiateGame() custom function we will draw the initial state of the game and here’s how we will do that. First we need to clear the screen, then draw the blue background, draw the bottom section, add the text and call the drawBird() custom function to draw the bird. After this we need a while loop which will prevent the game to start until we tap the screen. So while we are at this state, if we press the upper right corner we can reset the highest score to zero and if we press anywhere else on the screen we will get out of the while loop and get into the main loop of the code which will start the game.
// ===== initiateGame - Custom Function
void initiateGame() {
myGLCD.clrScr();
// Blue background
myGLCD.setColor(114, 198, 206);
myGLCD.fillRect(0,0,319,239);
// Ground
myGLCD.setColor(221,216,148);
myGLCD.fillRect(0, 215, 319, 239);
myGLCD.setColor(47,175,68);
myGLCD.fillRect(0, 205, 319, 214);
// Text
myGLCD.setColor(0, 0, 0);
myGLCD.setBackColor(221, 216, 148);
myGLCD.setFont(BigFont);
myGLCD.print("Score:",5,220);
myGLCD.setFont(SmallFont);
myGLCD.print("HowToMechatronics.com", 140, 220);
myGLCD.setColor(0, 0, 0);
myGLCD.setBackColor(114, 198, 206);
myGLCD.print("Highest Score: ",5,5);
myGLCD.printNumI(highestScore, 120, 6);
myGLCD.print(">RESET<",255,5);
myGLCD.drawLine(0,23,319,23);
myGLCD.print("TAP TO START",CENTER,100);
drawBird(yB); // Draws the bird
// Wait until we tap the sreen
while (!gameStarted) {
if (myTouch.dataAvailable()) {
myTouch.read();
x=myTouch.getX();
y=myTouch.getY();
// Reset higest score
if ((x>=250) && (x<=319) &&(y>=0) && (y<=28)) {
highestScore = 0;
myGLCD.setColor(114, 198, 206);
myGLCD.fillRect(120, 0, 150, 22);
myGLCD.setColor(0, 0, 0);
myGLCD.printNumI(highestScore, 120, 5);
}
if ((x>=0) && (x<=319) &&(y>=30) && (y<=239)) {
gameStarted = true;
myGLCD.setColor(114, 198, 206);
myGLCD.fillRect(0, 0, 319, 32);
}
}
}
// Clears the text "TAP TO START" before the game start
myGLCD.setColor(114, 198, 206);
myGLCD.fillRect(85, 100, 235, 116);
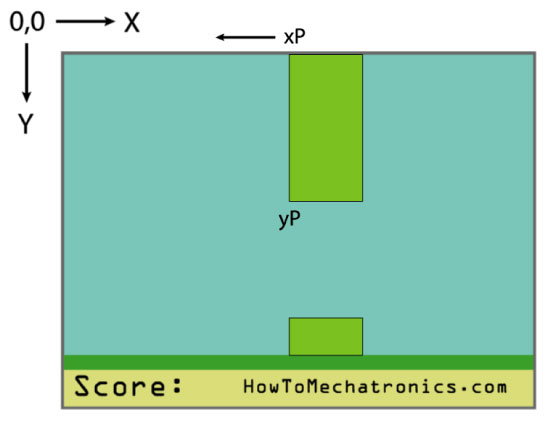
}Code language: PHP (php)In the main loop section we have the xP variable which is used for drawing the pillars, as well as the yP variable. At the beginning, the xP variable has the value of 319 as the size of the screen and the yP variable has the value of 100 which is the height of the first pillar. Each iteration the value of the xP variable is decreased by the value of the movingRate variable which at the beginning has the value of 3 and as we progress the game it increases.
// The Main Loop Section
void loop() {
    xP=xP-movingRate; // xP - x coordinate of the pilars; range: 319 - (-51)
    drawPilars(xP, yP); // Draws the pillars

    // yB - y coordinate of the bird which depends on value of the fallingRate variable
    yB+=fallRateInt;
    fallRate=fallRate+0.4; // Each inetration the fall rate increase so that we can the effect of acceleration/ gravity
    fallRateInt= int(fallRate);

    // Checks for collision
    if(yB>=180 || yB<=0){ // top and bottom
      gameOver();
    }
    if((xP<=85) && (xP>=5) && (yB<=yP-2)){ // upper pillar
      gameOver();
    }
    if((xP<=85) && (xP>=5) && (yB>=yP+60)){ // lower pillar
      gameOver();
    }

    // Draws the bird
    drawBird(yB);

    // After the pillar has passed through the screen
    if (xP<=-51){
      xP=319; // Resets xP to 319
      yP = rand() % 100+20; // Random number for the pillars height
      score++; // Increase score by one
    }
    //==== Controlling the bird
    if (myTouch.dataAvailable()&& !screenPressed) {
       fallRate=-6; // Setting the fallRate negative will make the bird jump
       screenPressed = true;
    }
    // Doesn't allow holding the screen / you must tap it
    else if ( !myTouch.dataAvailable() && screenPressed){
      screenPressed = false;
    }

    // After each five points, increases the moving rate of the pillars
    if ((score - lastSpeedUpScore) == 5) {
      lastSpeedUpScore = score;
      movingRate++;
    }
}Code language: PHP (php)
Here’s the working principle of game: we have 50 pixels wide pillars which move from right to left and every next pillar has a different random height. In order to make them moving, logically, after each iteration we need to clear the screen and redraw the graphic with the pillars at their new position. However, we cannot do that because of the low refresh rate of the screen, which would cause flickering of the graphics. In order to activate all of its pixels the screen needs a bit more time so therefore we will have to improvise and redraw just those things that are moving.
So let’s take a look how the drawPilars() custom function will do that. It takes the xP and yP variables and using them and the fillRect() function it will draw the pillars. So each iteration it draws the pillars at their new location with additional blue rectangles from their left and right side which clear the previous drawn pillar and in that way we actually do the improvisation of just redrawing the moving pillars. The if statements here are an additional improvisation because for some reason the fillRect() function didn’t work if its ‘x2’ parameter had a value out of the screen size. Also, at the end of this custom function we need to print the value of reached score.
// ===== drawPlillars - Custom Function
void drawPilars(int x, int y) {
    if (x>=270){
      myGLCD.setColor(0, 200, 20);
      myGLCD.fillRect(318, 0, x, y-1);
      myGLCD.setColor(0, 0, 0);
      myGLCD.drawRect(319, 0, x-1, y);

      myGLCD.setColor(0, 200, 20);
      myGLCD.fillRect(318, y+81, x, 203);
      myGLCD.setColor(0, 0, 0);
      myGLCD.drawRect(319, y+80, x-1, 204);
    }
    else if( x<=268) {
      // Draws blue rectangle right of the pillar
      myGLCD.setColor(114, 198, 206);
      myGLCD.fillRect(x+51, 0, x+60, y);
      // Draws the pillar
      myGLCD.setColor(0, 200, 20);
      myGLCD.fillRect(x+49, 1, x+1, y-1);
      // Draws the black frame of the pillar
      myGLCD.setColor(0, 0, 0);
      myGLCD.drawRect(x+50, 0, x, y);
      // Draws the blue rectangle left of the pillar
      myGLCD.setColor(114, 198, 206);
      myGLCD.fillRect(x-1, 0, x-3, y);

      // The bottom pillar
      myGLCD.setColor(114, 198, 206);
      myGLCD.fillRect(x+51, y+80, x+60, 204);
      myGLCD.setColor(0, 200, 20);
      myGLCD.fillRect(x+49, y+81, x+1, 203);
      myGLCD.setColor(0, 0, 0);
      myGLCD.drawRect(x+50, y+80, x, 204);
      myGLCD.setColor(114, 198, 206);
      myGLCD.fillRect(x-1, y+80, x-3, 204);
  }
  // Draws the score
  myGLCD.setColor(0, 0, 0);
  myGLCD.setBackColor(221, 216, 148);
  myGLCD.setFont(BigFont);
  myGLCD.printNumI(score, 100, 220);
}Code language: JavaScript (javascript)
Back in the loop section we have the yB variable which is the y position of the bird and it depends on the falling rate which after each iteration is increased and in that way we get the effect of acceleration or gravity. Also, here we check for collisions and use the if statements to confine the bird so that if it hit the top, the ground or the pillars the game will over.
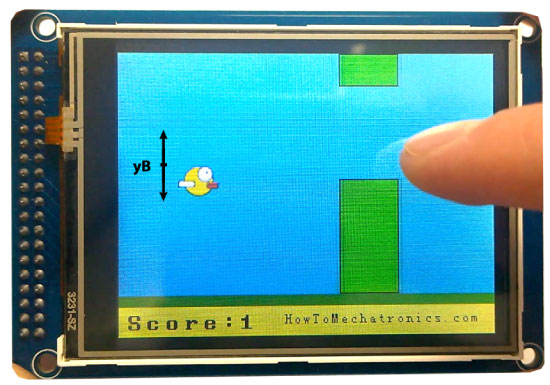
Next is the drawBird() custom function and let’s see how it works. The bird is actually a photo which is converted into a bitmap using the ImageConverter565 tool made by Henning Karlsen. The “.c” file which is created using the tool needs to be included in the directory so that it load when launching the sketch. Also we have to define the bitmap like this and using the drawBitmap() function we will draw the photo on the screen. The bird has a fixed X – coordinate and the yB variable as Y – coordinate. Similar to the pillars we will clear the previous state of the bird by drawing two blue rectangles above and under the bird.
//====== drawBird() - Custom Function
void drawBird(int y) {
  // Draws the bird - bitmap
  myGLCD.drawBitmap (50, y, 35, 30, bird01);
  // Draws blue rectangles above and below the bird in order to clear its previus state
  myGLCD.setColor(114, 198, 206);
  myGLCD.fillRoundRect(50,y,85,y-6);
  myGLCD.fillRoundRect(50,y+30,85,y+36);
}Code language: JavaScript (javascript)
Back in the loop we can see that after the pillar has passed through the screen the xP variable will be reset to 319, yP will get new random value from 20 to 100 for the height of the pillars and the score will increase by one. With the next if statement we control the bird. If we tap the screen we will set the falling rate to negative what will make the bird jump and the else if statement will not allow to happen that if we just hold the screen. The last if statement is for the difficulty of the game and it increase the moving rate of the pillars after each fine points.
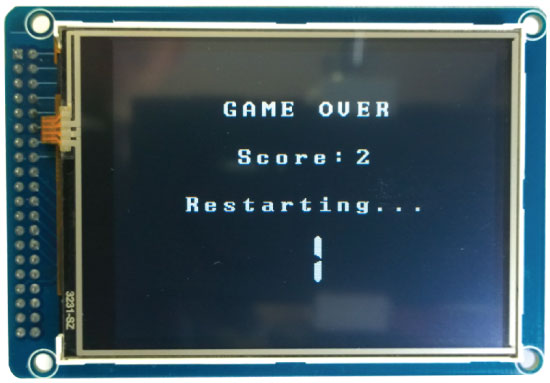
Ok what’s left now is to see how the gameOver() custom function works. After a delay of one second it will clear the screen, print the score and some text, if score is higher than the highest score it will write it down into the EEPROM, it will reset all variables to their starting position values and at the end it will call the initiateGame() custom function to restart the game.
//======== gameOver() - Custom Function
void gameOver() {
  delay(1000); // 1 second
  // Clears the screen and prints the text
  myGLCD.clrScr();
  myGLCD.setColor(255, 255, 255);
  myGLCD.setBackColor(0, 0, 0);
  myGLCD.setFont(BigFont);
  myGLCD.print("GAME OVER", CENTER, 40);
  myGLCD.print("Score:", 100, 80);
  myGLCD.printNumI(score,200, 80);
  myGLCD.print("Restarting...", CENTER, 120);
  myGLCD.setFont(SevenSegNumFont);
  myGLCD.printNumI(2,CENTER, 150);
  delay(1000);
  myGLCD.printNumI(1,CENTER, 150);
  delay(1000);

  // Writes the highest score in the EEPROM
  if (score > highestScore) {
    highestScore = score;
    EEPROM.write(0,highestScore);
  }
  // Resets the variables to start position values
  xP=319;
  yB=50;
  fallRate=0;
  score = 0;
  lastSpeedUpScore = 0;
  movingRate = 3;
  gameStarted = false;
  // Restart game
  initiateGame();
}Code language: PHP (php)
That’s all and I hope the explanation of the code was clear enough. If you have any question, feel free to ask in the comments section below.
Here’s the complete code of the game:
/*  Arduino Game Proejct
 *  Program made by Dejan Nedelkovski,
 *  www.HowToMechatronics.com
 */

/*  This program uses the UTFT and URTouch libraries
 *  made by Henning Karlsen.
 *  You can find and download them at:
 *  www.RinkyDinkElectronics.com
 */

#include <UTFT.h>
#include <URTouch.h>
#include <EEPROM.h>

//==== Creating Objects
UTFT    myGLCD(SSD1289,38,39,40,41); //Parameters should be adjusted to your Display/Schield model
URTouch  myTouch( 6, 5, 4, 3, 2);

//==== Defining Fonts
extern uint8_t SmallFont[];
extern uint8_t BigFont[];
extern uint8_t SevenSegNumFont[];

extern unsigned int bird01[0x41A]; // Bird Bitmap

int x, y; // Variables for the coordinates where the display has been pressed

// Floppy Bird
int xP = 319;
int yP = 100;
int yB = 50;
int movingRate = 3;
int fallRateInt = 0;
float fallRate = 0;
int score = 0;
int lastSpeedUpScore = 0;
int highestScore;
boolean screenPressed = false;
boolean gameStarted = false;

void setup() {
  // Initiate display
  myGLCD.InitLCD();
  myGLCD.clrScr();
  myTouch.InitTouch();
  myTouch.setPrecision(PREC_MEDIUM);

  highestScore = EEPROM.read(0); // Read the highest score from the EEPROM

  initiateGame(); // Initiate the game
}

void loop() {
    xP=xP-movingRate; // xP - x coordinate of the pilars; range: 319 - (-51)
    drawPilars(xP, yP); // Draws the pillars

    // yB - y coordinate of the bird which depends on value of the fallingRate variable
    yB+=fallRateInt;
    fallRate=fallRate+0.4; // Each inetration the fall rate increase so that we can the effect of acceleration/ gravity
    fallRateInt= int(fallRate);

    // Checks for collision
    if(yB>=180 || yB<=0){ // top and bottom
      gameOver();
    }
    if((xP<=85) && (xP>=5) && (yB<=yP-2)){ // upper pillar
      gameOver();
    }
    if((xP<=85) && (xP>=5) && (yB>=yP+60)){ // lower pillar
      gameOver();
    }

    // Draws the bird
    drawBird(yB);

    // After the pillar has passed through the screen
    if (xP<=-51){
      xP=319; // Resets xP to 319
      yP = rand() % 100+20; // Random number for the pillars height
      score++; // Increase score by one
    }
    //==== Controlling the bird
    if (myTouch.dataAvailable()&& !screenPressed) {
       fallRate=-6; // Setting the fallRate negative will make the bird jump
       screenPressed = true;
    }
    // Doesn't allow holding the screen / you must tap it
    else if ( !myTouch.dataAvailable() && screenPressed){
      screenPressed = false;
    }

    // After each five points, increases the moving rate of the pillars
    if ((score - lastSpeedUpScore) == 5) {
      lastSpeedUpScore = score;
      movingRate++;
    }
}
// ===== initiateGame - Custom Function
void initiateGame() {
  myGLCD.clrScr();
  // Blue background
  myGLCD.setColor(114, 198, 206);
  myGLCD.fillRect(0,0,319,239);
  // Ground
  myGLCD.setColor(221,216,148);
  myGLCD.fillRect(0, 215, 319, 239);
  myGLCD.setColor(47,175,68);
  myGLCD.fillRect(0, 205, 319, 214);
  // Text
  myGLCD.setColor(0, 0, 0);
  myGLCD.setBackColor(221, 216, 148);
  myGLCD.setFont(BigFont);
  myGLCD.print("Score:",5,220);
  myGLCD.setFont(SmallFont);
  myGLCD.print("HowToMechatronics.com", 140, 220);
  myGLCD.setColor(0, 0, 0);
  myGLCD.setBackColor(114, 198, 206);
  myGLCD.print("Highest Score: ",5,5);
  myGLCD.printNumI(highestScore, 120, 6);
  myGLCD.print(">RESET<",255,5);
  myGLCD.drawLine(0,23,319,23);
  myGLCD.print("TAP TO START",CENTER,100);

  drawBird(yB); // Draws the bird

  // Wait until we tap the sreen
  while (!gameStarted) {
    if (myTouch.dataAvailable()) {
    myTouch.read();
    x=myTouch.getX();
    y=myTouch.getY();
    // Reset higest score
    if ((x>=250) && (x<=319) &&(y>=0) && (y<=28)) {
    highestScore = 0;
    myGLCD.setColor(114, 198, 206);
    myGLCD.fillRect(120, 0, 150, 22);
    myGLCD.setColor(0, 0, 0);
    myGLCD.printNumI(highestScore, 120, 5);
    }
    if ((x>=0) && (x<=319) &&(y>=30) && (y<=239)) {
    gameStarted = true;
    myGLCD.setColor(114, 198, 206);
    myGLCD.fillRect(0, 0, 319, 32);
    }
  }
  }
  // Clears the text "TAP TO START" before the game start
  myGLCD.setColor(114, 198, 206);
  myGLCD.fillRect(85, 100, 235, 116);

}
// ===== drawPlillars - Custom Function
void drawPilars(int x, int y) {
    if (x>=270){
      myGLCD.setColor(0, 200, 20);
      myGLCD.fillRect(318, 0, x, y-1);
      myGLCD.setColor(0, 0, 0);
      myGLCD.drawRect(319, 0, x-1, y);

      myGLCD.setColor(0, 200, 20);
      myGLCD.fillRect(318, y+81, x, 203);
      myGLCD.setColor(0, 0, 0);
      myGLCD.drawRect(319, y+80, x-1, 204);
    }
    else if( x<=268) {
      // Draws blue rectangle right of the pillar
      myGLCD.setColor(114, 198, 206);
      myGLCD.fillRect(x+51, 0, x+60, y);
      // Draws the pillar
      myGLCD.setColor(0, 200, 20);
      myGLCD.fillRect(x+49, 1, x+1, y-1);
      // Draws the black frame of the pillar
      myGLCD.setColor(0, 0, 0);
      myGLCD.drawRect(x+50, 0, x, y);
      // Draws the blue rectangle left of the pillar
      myGLCD.setColor(114, 198, 206);
      myGLCD.fillRect(x-1, 0, x-3, y);

      // The bottom pillar
      myGLCD.setColor(114, 198, 206);
      myGLCD.fillRect(x+51, y+80, x+60, 204);
      myGLCD.setColor(0, 200, 20);
      myGLCD.fillRect(x+49, y+81, x+1, 203);
      myGLCD.setColor(0, 0, 0);
      myGLCD.drawRect(x+50, y+80, x, 204);
      myGLCD.setColor(114, 198, 206);
      myGLCD.fillRect(x-1, y+80, x-3, 204);
  }
  // Draws the score
  myGLCD.setColor(0, 0, 0);
  myGLCD.setBackColor(221, 216, 148);
  myGLCD.setFont(BigFont);
  myGLCD.printNumI(score, 100, 220);
}

//====== drawBird() - Custom Function
void drawBird(int y) {
  // Draws the bird - bitmap
  myGLCD.drawBitmap (50, y, 35, 30, bird01);
  // Draws blue rectangles above and below the bird in order to clear its previus state
  myGLCD.setColor(114, 198, 206);
  myGLCD.fillRoundRect(50,y,85,y-6);
  myGLCD.fillRoundRect(50,y+30,85,y+36);
}
//======== gameOver() - Custom Function
void gameOver() {
  delay(3000); // 1 second
  // Clears the screen and prints the text
  myGLCD.clrScr();
  myGLCD.setColor(255, 255, 255);
  myGLCD.setBackColor(0, 0, 0);
  myGLCD.setFont(BigFont);
  myGLCD.print("GAME OVER", CENTER, 40);
  myGLCD.print("Score:", 100, 80);
  myGLCD.printNumI(score,200, 80);
  myGLCD.print("Restarting...", CENTER, 120);
  myGLCD.setFont(SevenSegNumFont);
  myGLCD.printNumI(2,CENTER, 150);
  delay(1000);
  myGLCD.printNumI(1,CENTER, 150);
  delay(1000);

  // Writes the highest score in the EEPROM
  if (score > highestScore) {
    highestScore = score;
    EEPROM.write(0,highestScore);
  }
  // Resets the variables to start position values
  xP=319;
  yB=50;
  fallRate=0;
  score = 0;
  lastSpeedUpScore = 0;
  movingRate = 3;
  gameStarted = false;
  // Restart game
  initiateGame();
}Code language: PHP (php)
Here’s a download file with the Arduino sketck, the bird image and the bitmap file for the bird.
Hi,
Thank you for your fun game~
Actually, I had a problem and I found a solution.
I don’t know why exactly.^^;;
I used arduino due + 3.2″ TFT LCD(320QVT_9341).
When I ran code, there is an error like below
. error message :
exit status 1
no matching function for call to ‘UTFT::drawBitmap(int, int&, int, int, unsigned int [1050])’
So, I try to solve this error, finally I solved like below.
I had to change like this : extern unsigned int bird01[0x41A] –>extern unsigned short bird01[0x41A]
plz, explain why?
Hi, that’s amazing.
I am brand new in programming a micro controller (but i did program on computers of course). I have compiled the program with the game and uploaded it successfully. But the display is only glowing in grey. Do i have to connect something else than the shield and the display? Like some kind of button to start the program? I guess i have exactly the same hardware like you, bought it from here:
[link removed]
Or do I need to change the parameters at the beginning of the program?
Can’t wait to play a game on my arduino =) I hope you can help me find the error. Thanks a lot for the shearing of the source code and the explanations on the video.
Kind regards,
Sandra
Thanks.
Well check whether your display controller is compatible with the TFT library. You can check the supported display controllers in the documentation of the library.
Can I use the code and libraries for other band with same pinout, like Freescale KL25Z?
Thanks.
You should check the libraries documentation for that. It has a list of all supported displays/controllers.
I ran the code again and got this error this time;
(file in sketch) Blink.o: In function `drawBird(int)’:
Blink.cpp:(.text._Z8drawBirdi+0x2a): undefined reference to `bird01′
Blink.cpp:(.text._Z8drawBirdi+0x2e): undefined reference to `bird01′
Blink.cpp:(.text._Z8drawBirdi+0x8e): undefined reference to `bird01′
Blink.cpp:(.text._Z8drawBirdi+0x92): undefined reference to `bird01′
Do you have all the files in the same folder directory as the sketch?
Sir can u tell me the circuit diagram
and the components required
Check the related Arduino TFT Tutorial.
hi, when I add bird01.c file which is you provide in download link. Im getting sketch is too big error. sketch uses 40.484 bytes maximum is 32.256 bytes … says. how can I solve that problem. thanks
Make sure in your Arduino IDE options you have selected the Arduino Mega Board.
Hi!
I get these errors when I try to upload the game to the board:
Users/sindrehodneland/Documents/Arduino/sketch_bird/sketch_bird.ino: In function ‘void initiateGame()’:
/Users/sindrehodneland/Documents/Arduino/sketch_bird/sketch_bird.ino:107:30: warning: deprecated conversion from string constant to ‘char*’ [-Wwrite-strings]
myGLCD.print(“Score:”,5,220);
^
/Users/sindrehodneland/Documents/Arduino/sketch_bird/sketch_bird.ino:109:49: warning: deprecated conversion from string constant to ‘char*’ [-Wwrite-strings]
myGLCD.print(“HowToMechatronics.com”, 140, 220);
^
/Users/sindrehodneland/Documents/Arduino/sketch_bird/sketch_bird.ino:112:37: warning: deprecated conversion from string constant to ‘char*’ [-Wwrite-strings]
myGLCD.print(“Highest Score: “,5,5);
^
/Users/sindrehodneland/Documents/Arduino/sketch_bird/sketch_bird.ino:114:31: warning: deprecated conversion from string constant to ‘char*’ [-Wwrite-strings]
myGLCD.print(“>RESET<",255,5);
^
/Users/sindrehodneland/Documents/Arduino/sketch_bird/sketch_bird.ino:116:41: warning: deprecated conversion from string constant to 'char*' [-Wwrite-strings]
myGLCD.print("TAP TO START",CENTER,100);
^
/Users/sindrehodneland/Documents/Arduino/sketch_bird/sketch_bird.ino: In function 'void gameOver()':
/Users/sindrehodneland/Documents/Arduino/sketch_bird/sketch_bird.ino:204:39: warning: deprecated conversion from string constant to 'char*' [-Wwrite-strings]
myGLCD.print("GAME OVER", CENTER, 40);
^
/Users/sindrehodneland/Documents/Arduino/sketch_bird/sketch_bird.ino:205:33: warning: deprecated conversion from string constant to 'char*' [-Wwrite-strings]
myGLCD.print("Score:", 100, 80);
^
/Users/sindrehodneland/Documents/Arduino/sketch_bird/sketch_bird.ino:207:44: warning: deprecated conversion from string constant to 'char*' [-Wwrite-strings]
myGLCD.print("Restarting…", CENTER, 120);
^
sketch/sketch_bird.ino.cpp.o: In function `drawBird(int)':
/Users/sindrehodneland/Documents/Arduino/sketch_bird/sketch_bird.ino:190: undefined reference to `bird01'
/Users/sindrehodneland/Documents/Arduino/sketch_bird/sketch_bird.ino:190: undefined reference to `bird01'
collect2: error: ld returned 1 exit status
exit status 1
Do you know what it means and how to fix it?
Did you followed all the steps correctly and did you check the Arduino TFT LCD Tutorial. It looks some of the functions don’t work for you. Did you try the demo examples of the libraries?
hi this code is not working. im using the 1.6.5 arduino IDE but its not working. the #include does not work. the arduino warning bar is saying that there is no such thing. please help. and also the
#include has the same problem.
I’m using the same version ant the program is working perfectly. You got to be doing something wrong. Recheck the code.
UTFT myGLCD(SSD1289,38,39,40,41); //Parameters should be adjusted to your Display/Schield
I can find SDA (20) and SCL(21) on my Mega 2560 but not CS and RTS :s any idea?
I dont have any shield for my TFT LCD screen ili9488 3.95″. (you told me in a earlier comment that i didn’t need it for my screen)