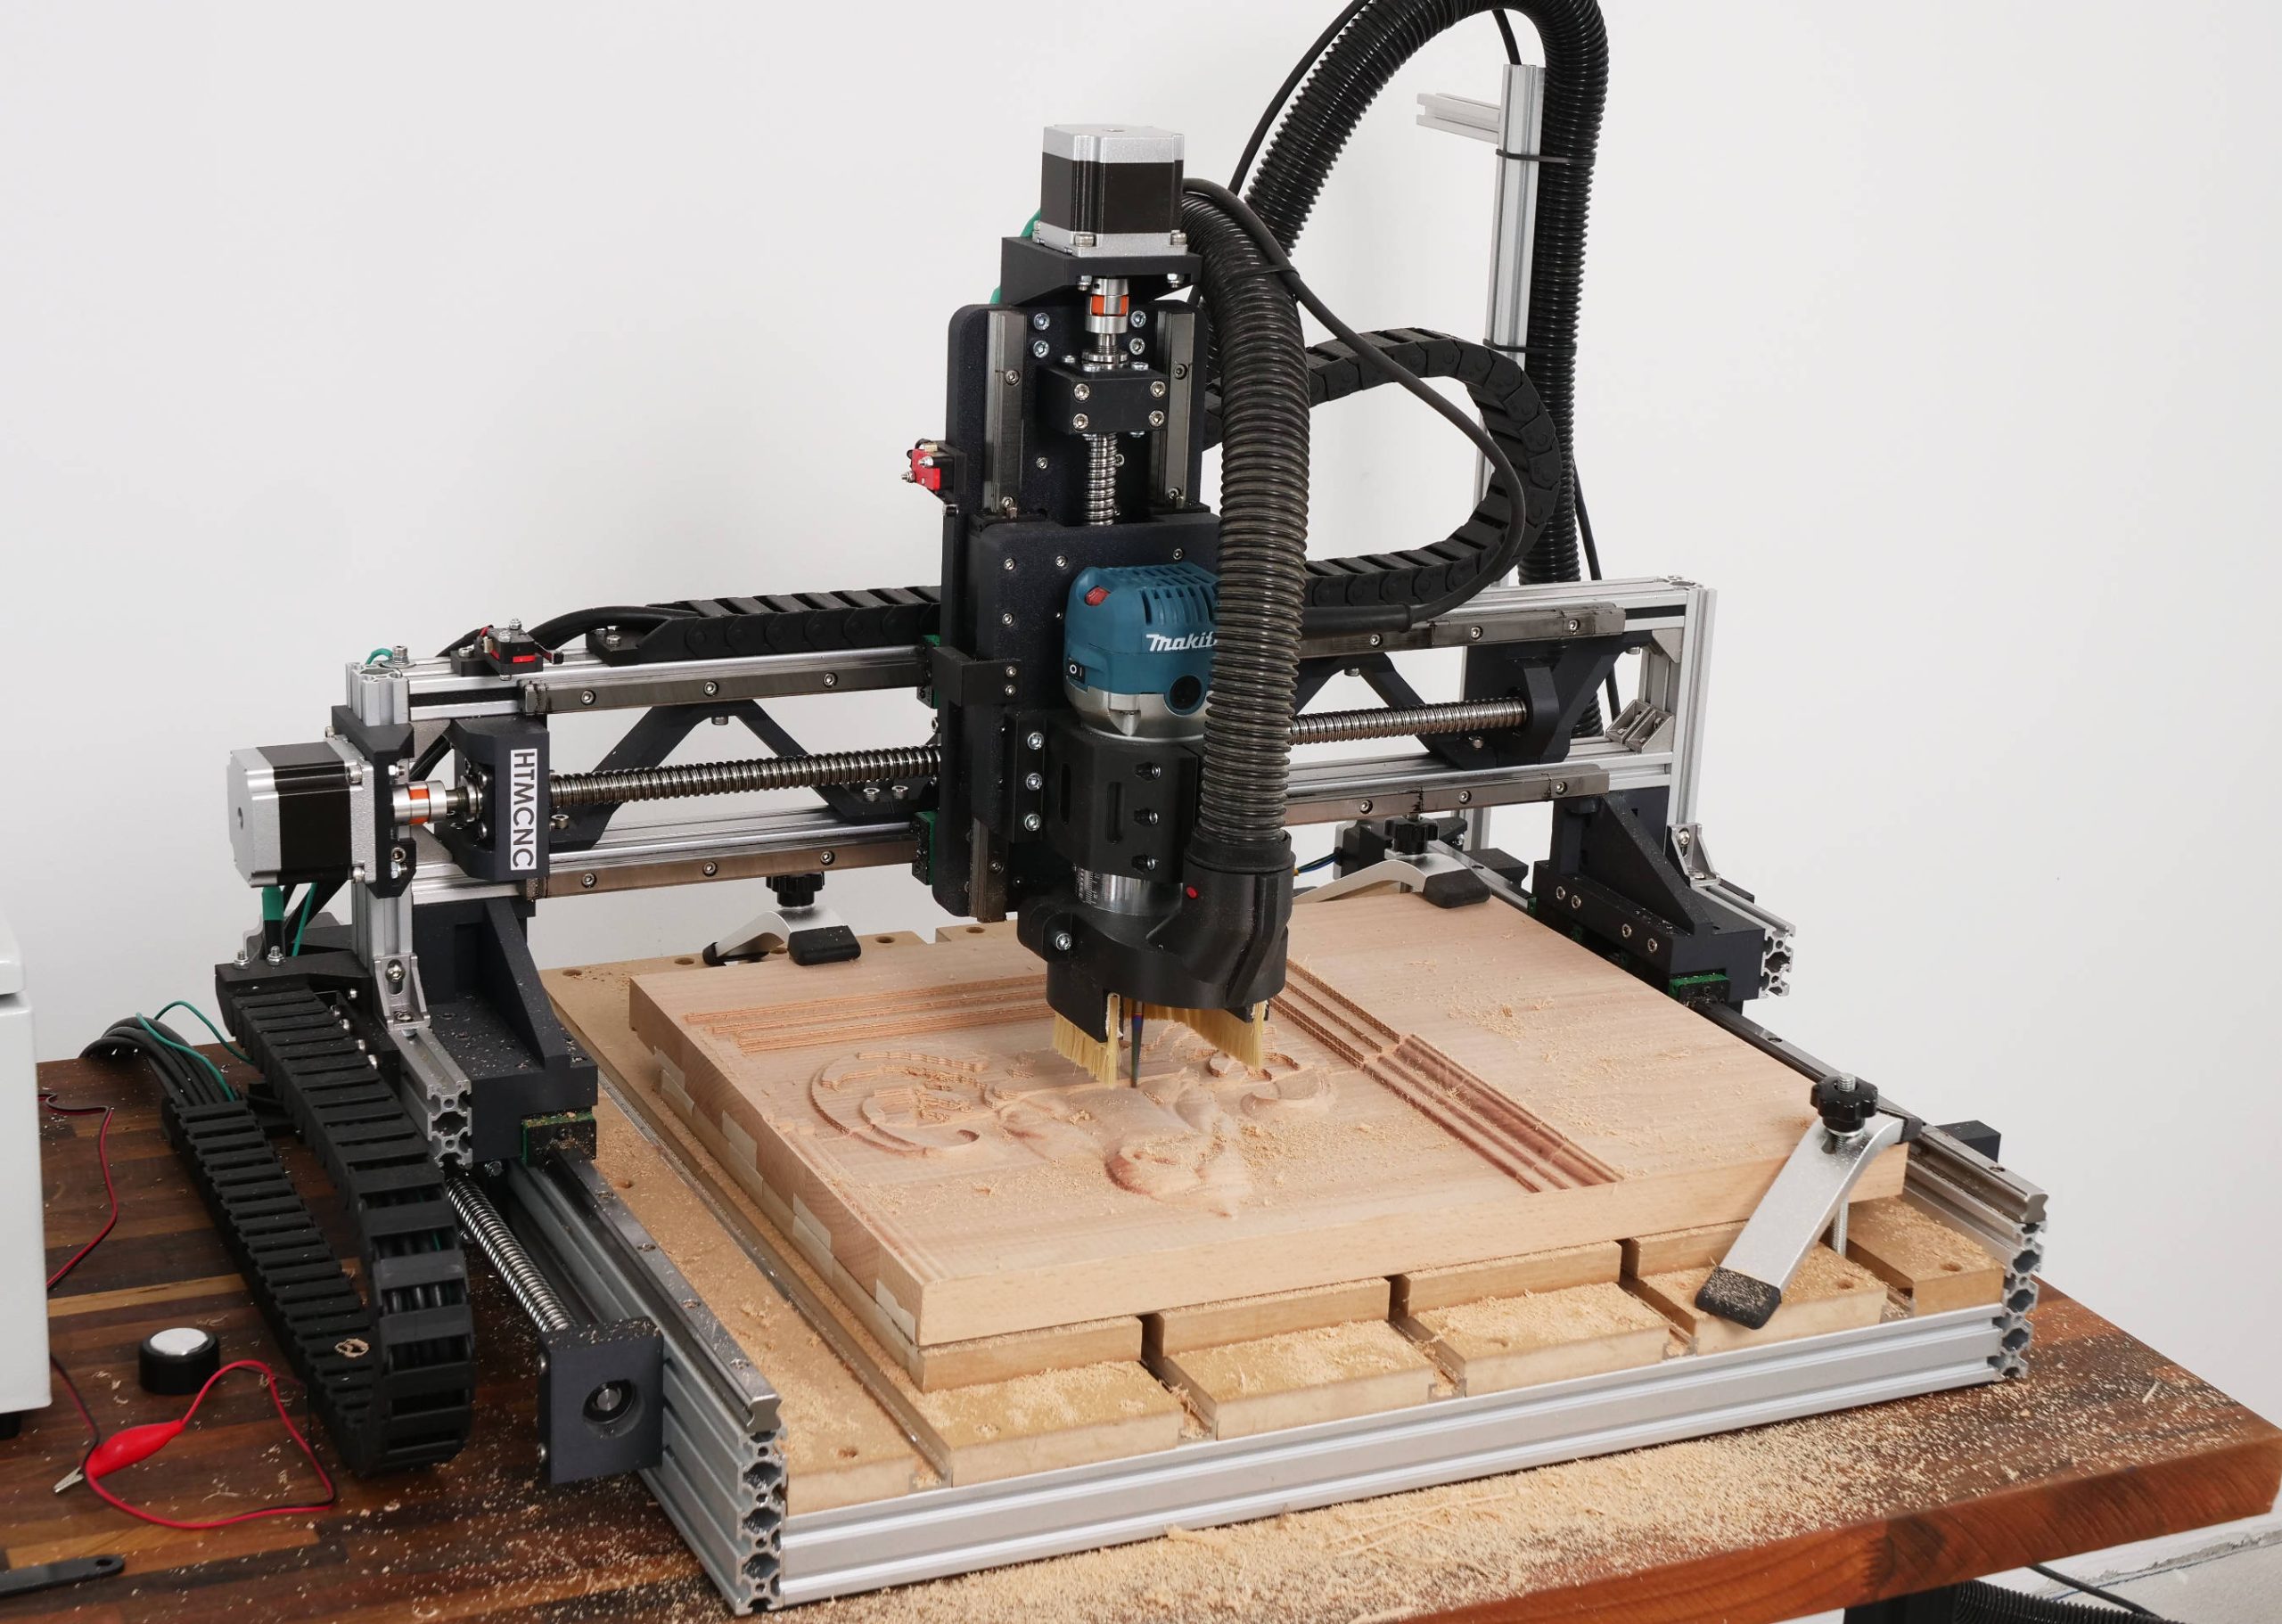
In this tutorial we will learn how to build a CNC machine with a step-by-step guide so you can easily build one on your own.
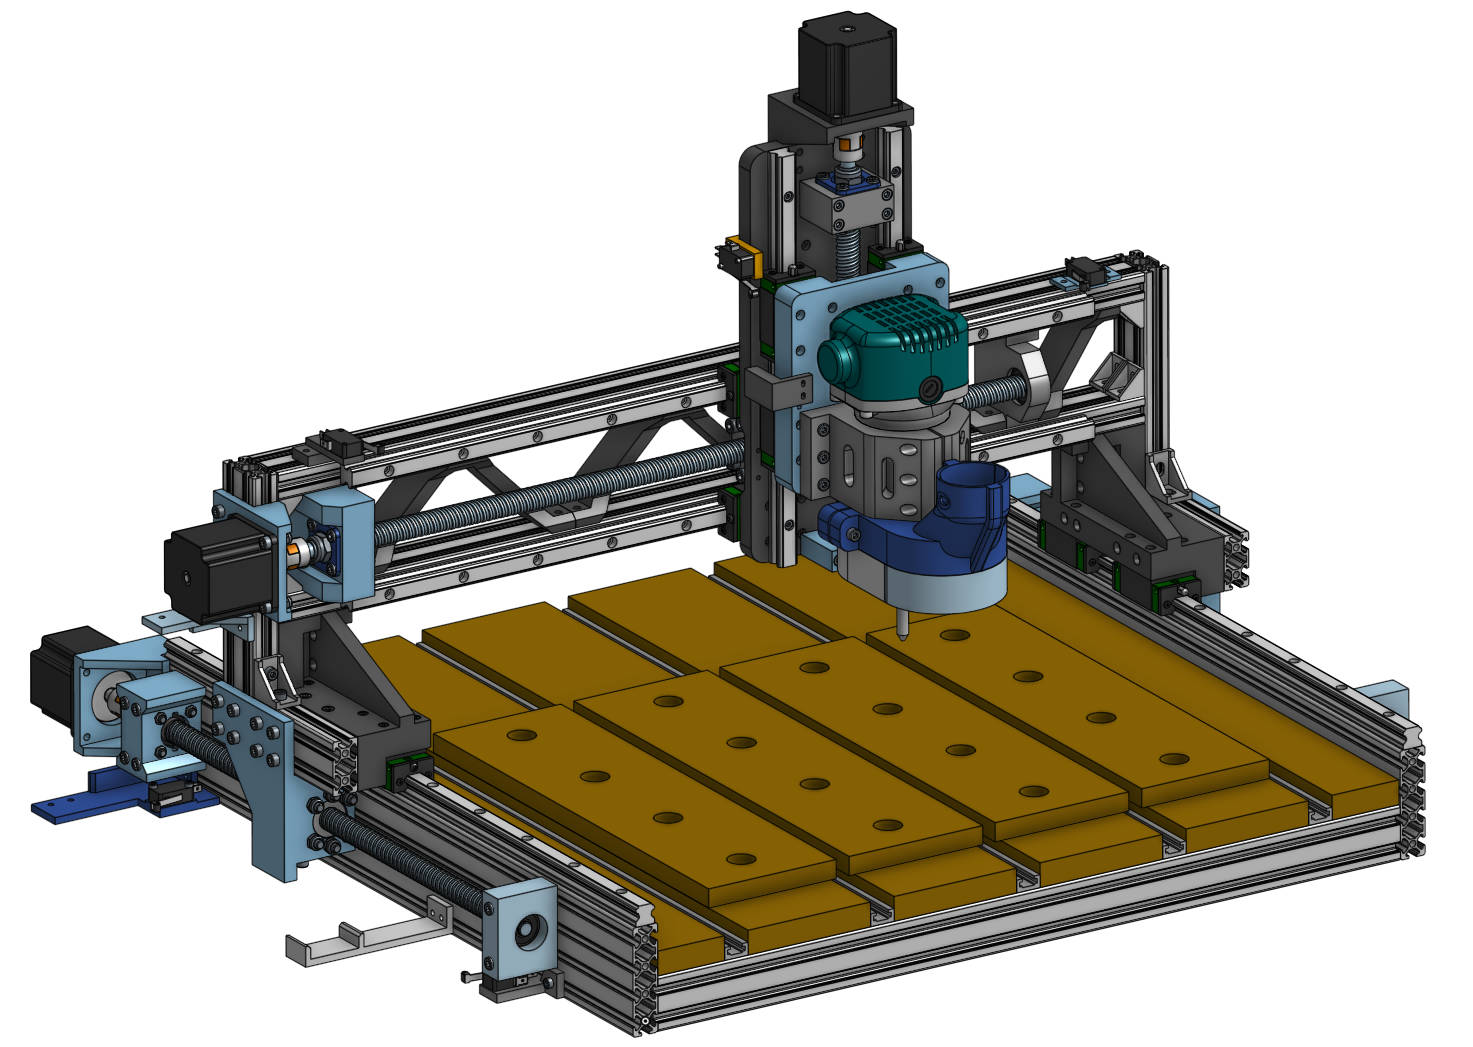
This is a Fully 3D Printed CNC machine or a CNC router that I designed with two specific goals in mind, to be as rigid as possible, and to be as simple as possible to build.
Overview
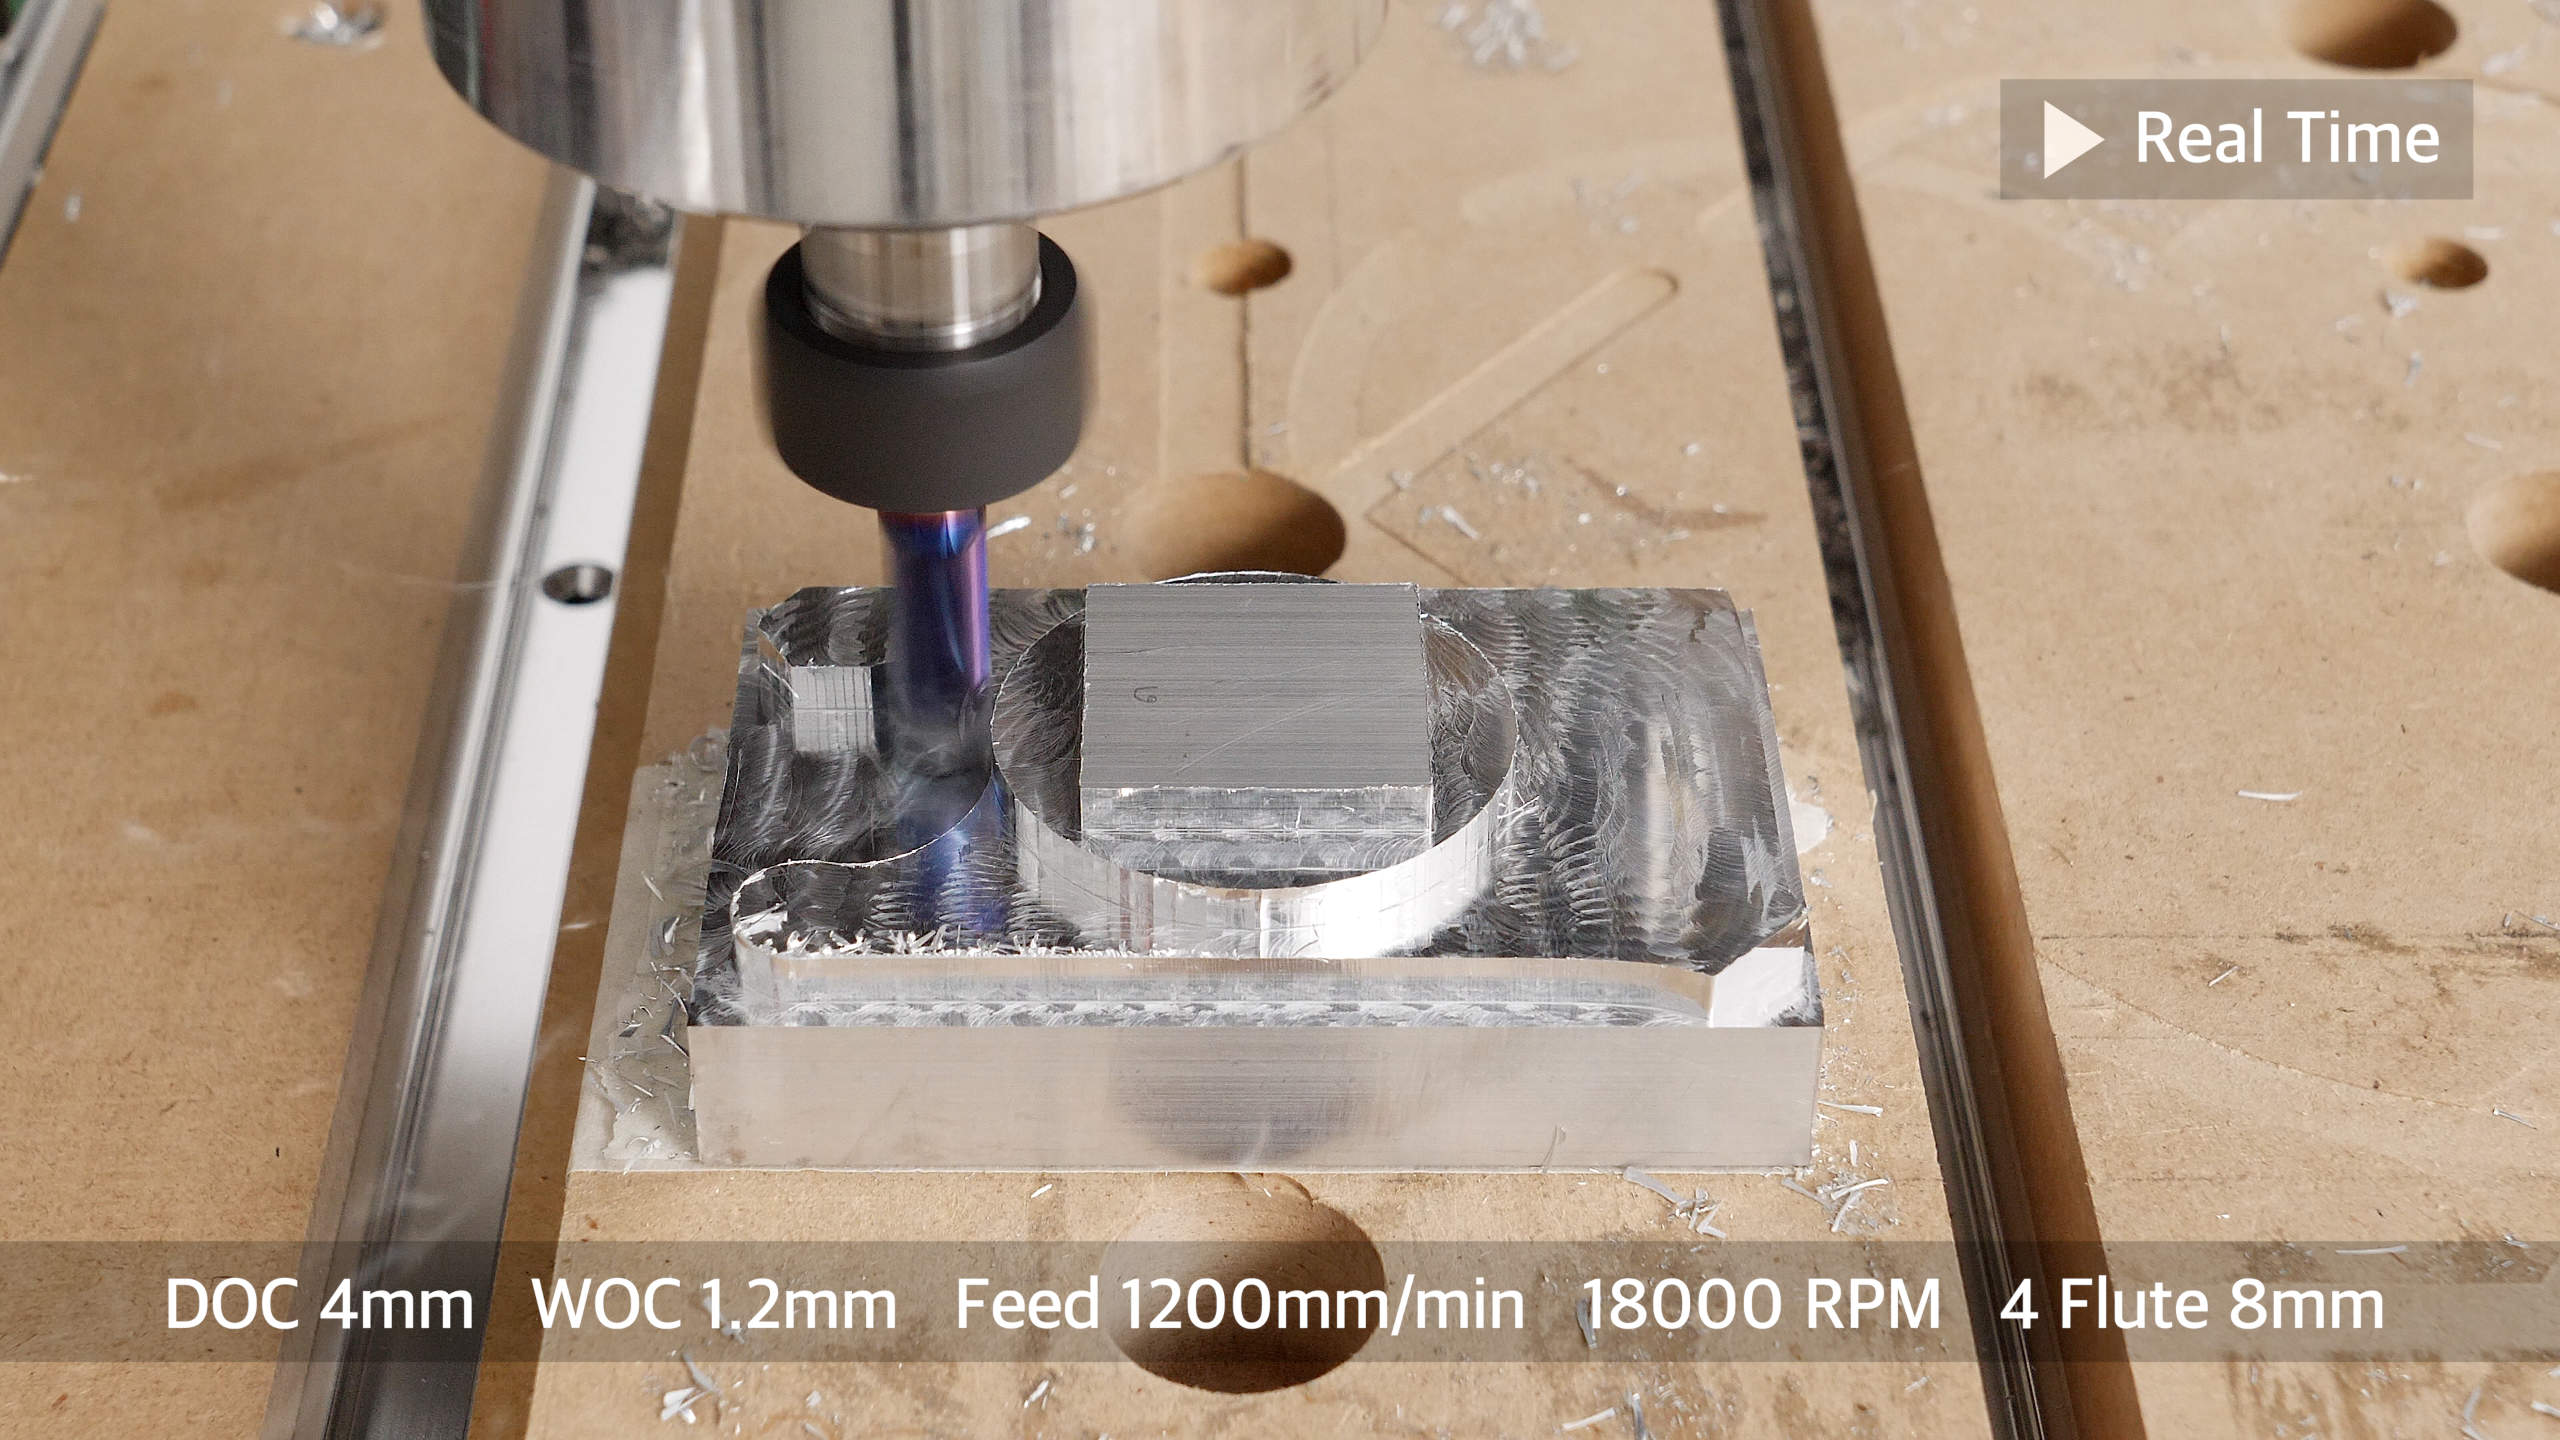
Being rigid directly affects the performance of the machine and besides engraving and cutting wood, I wanted this CNC router to be capable of engraving and cutting aluminum. It turned out it can do that quite confidently.
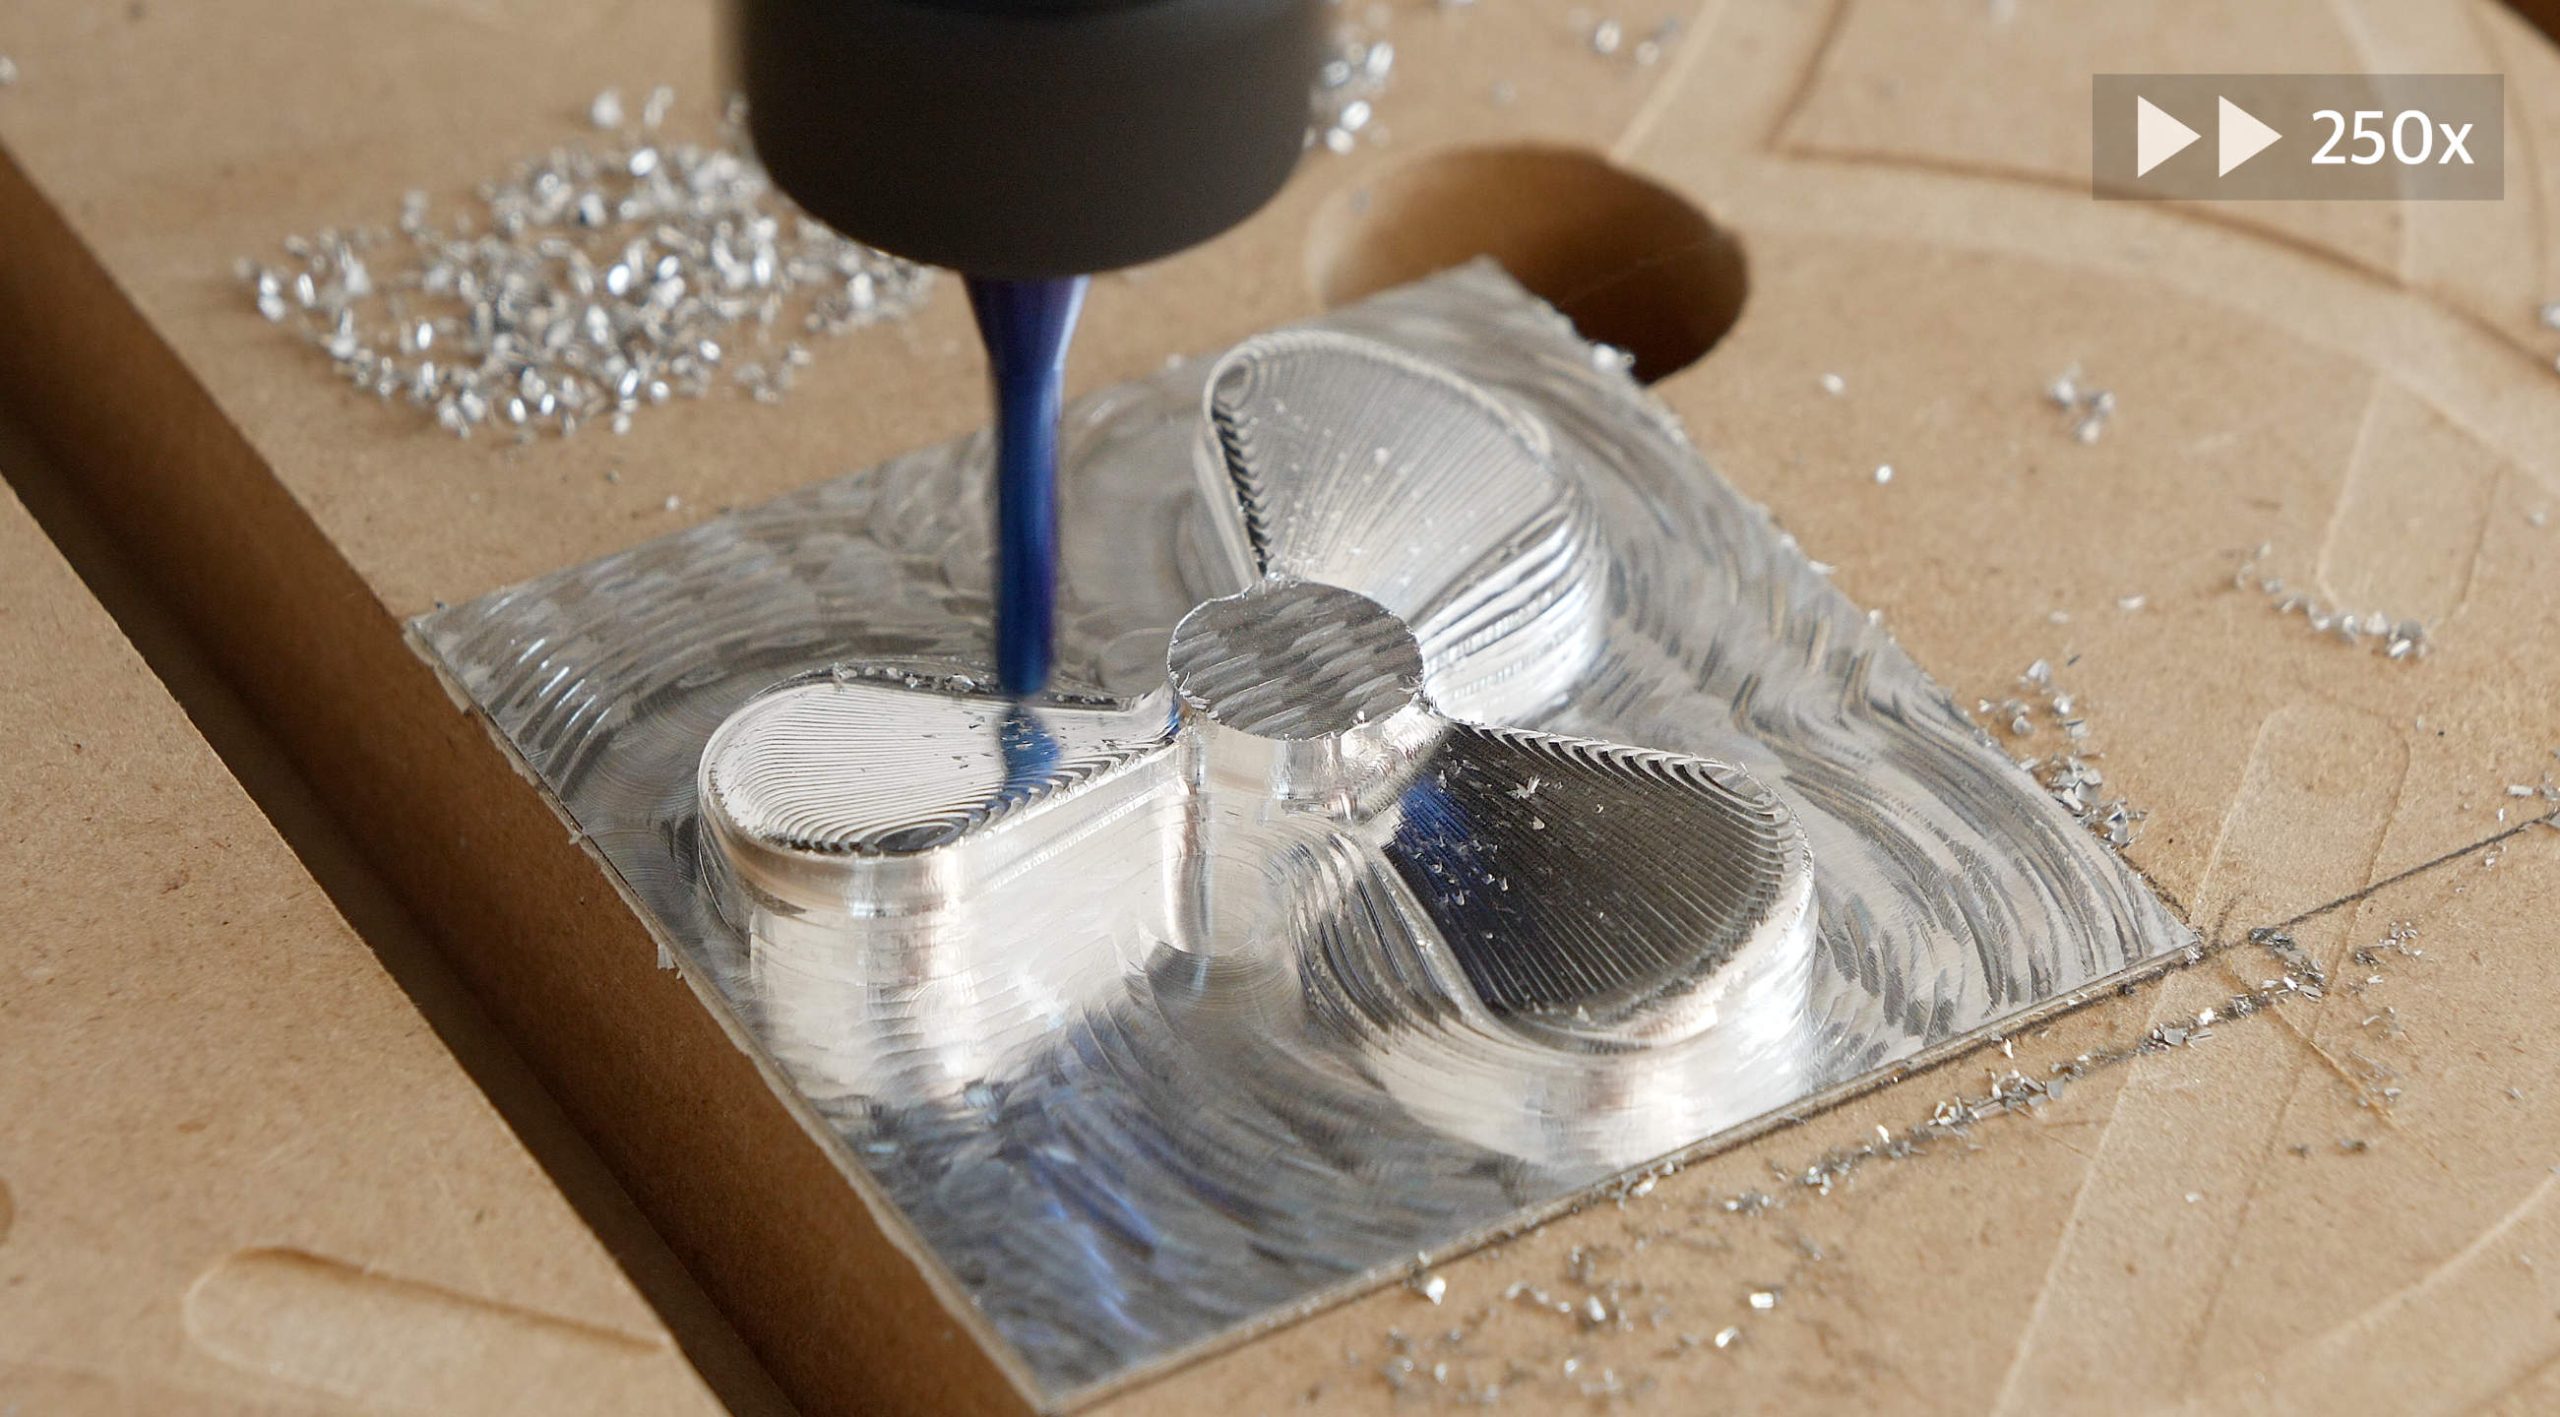
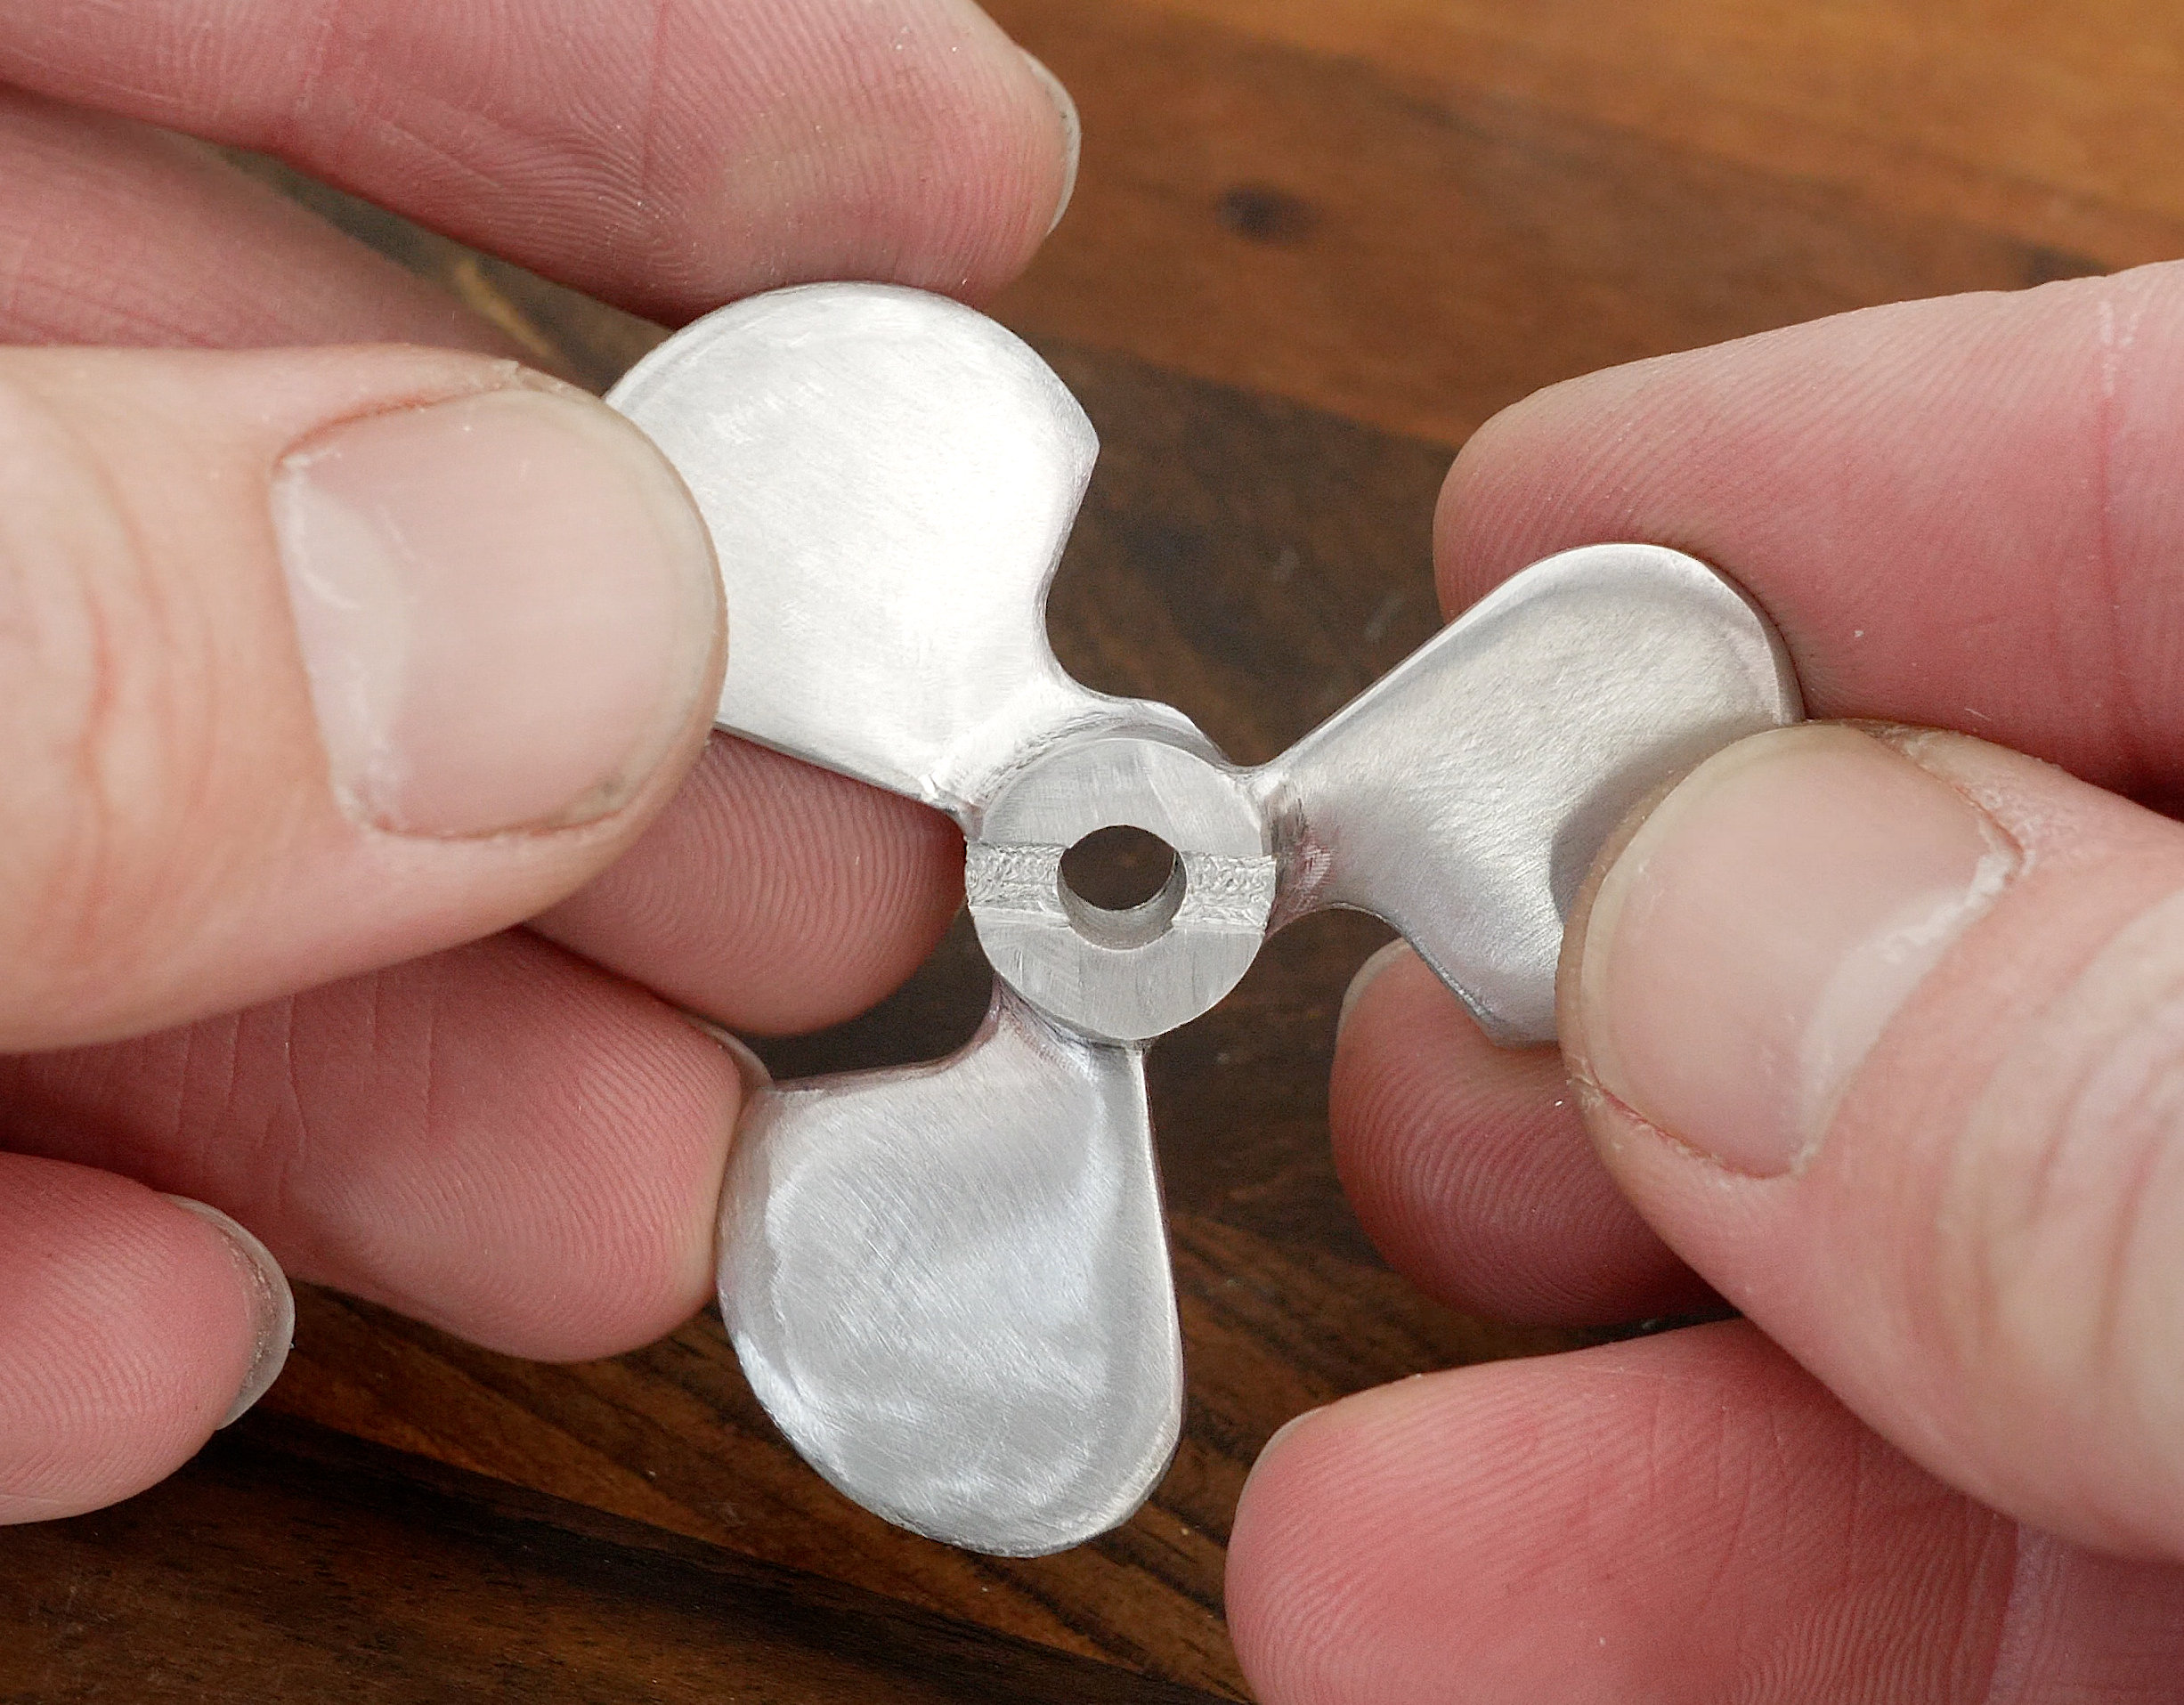
Here’s an example of machining a propeller out of aluminum. With just a little bit of sanding the propeller surface finished turned out super smooth.
I also did some accuracy tests by cutting various shapes out of aluminum. If we use appropriate feeds and speeds, we can get the aluminum parts within 0.05mm accuracy.
I think that’s a descent accuracy considering it’s a 3D printed CNC machine, using a trimmer router, and an Arduino UNO and GRBL for the motion-control.
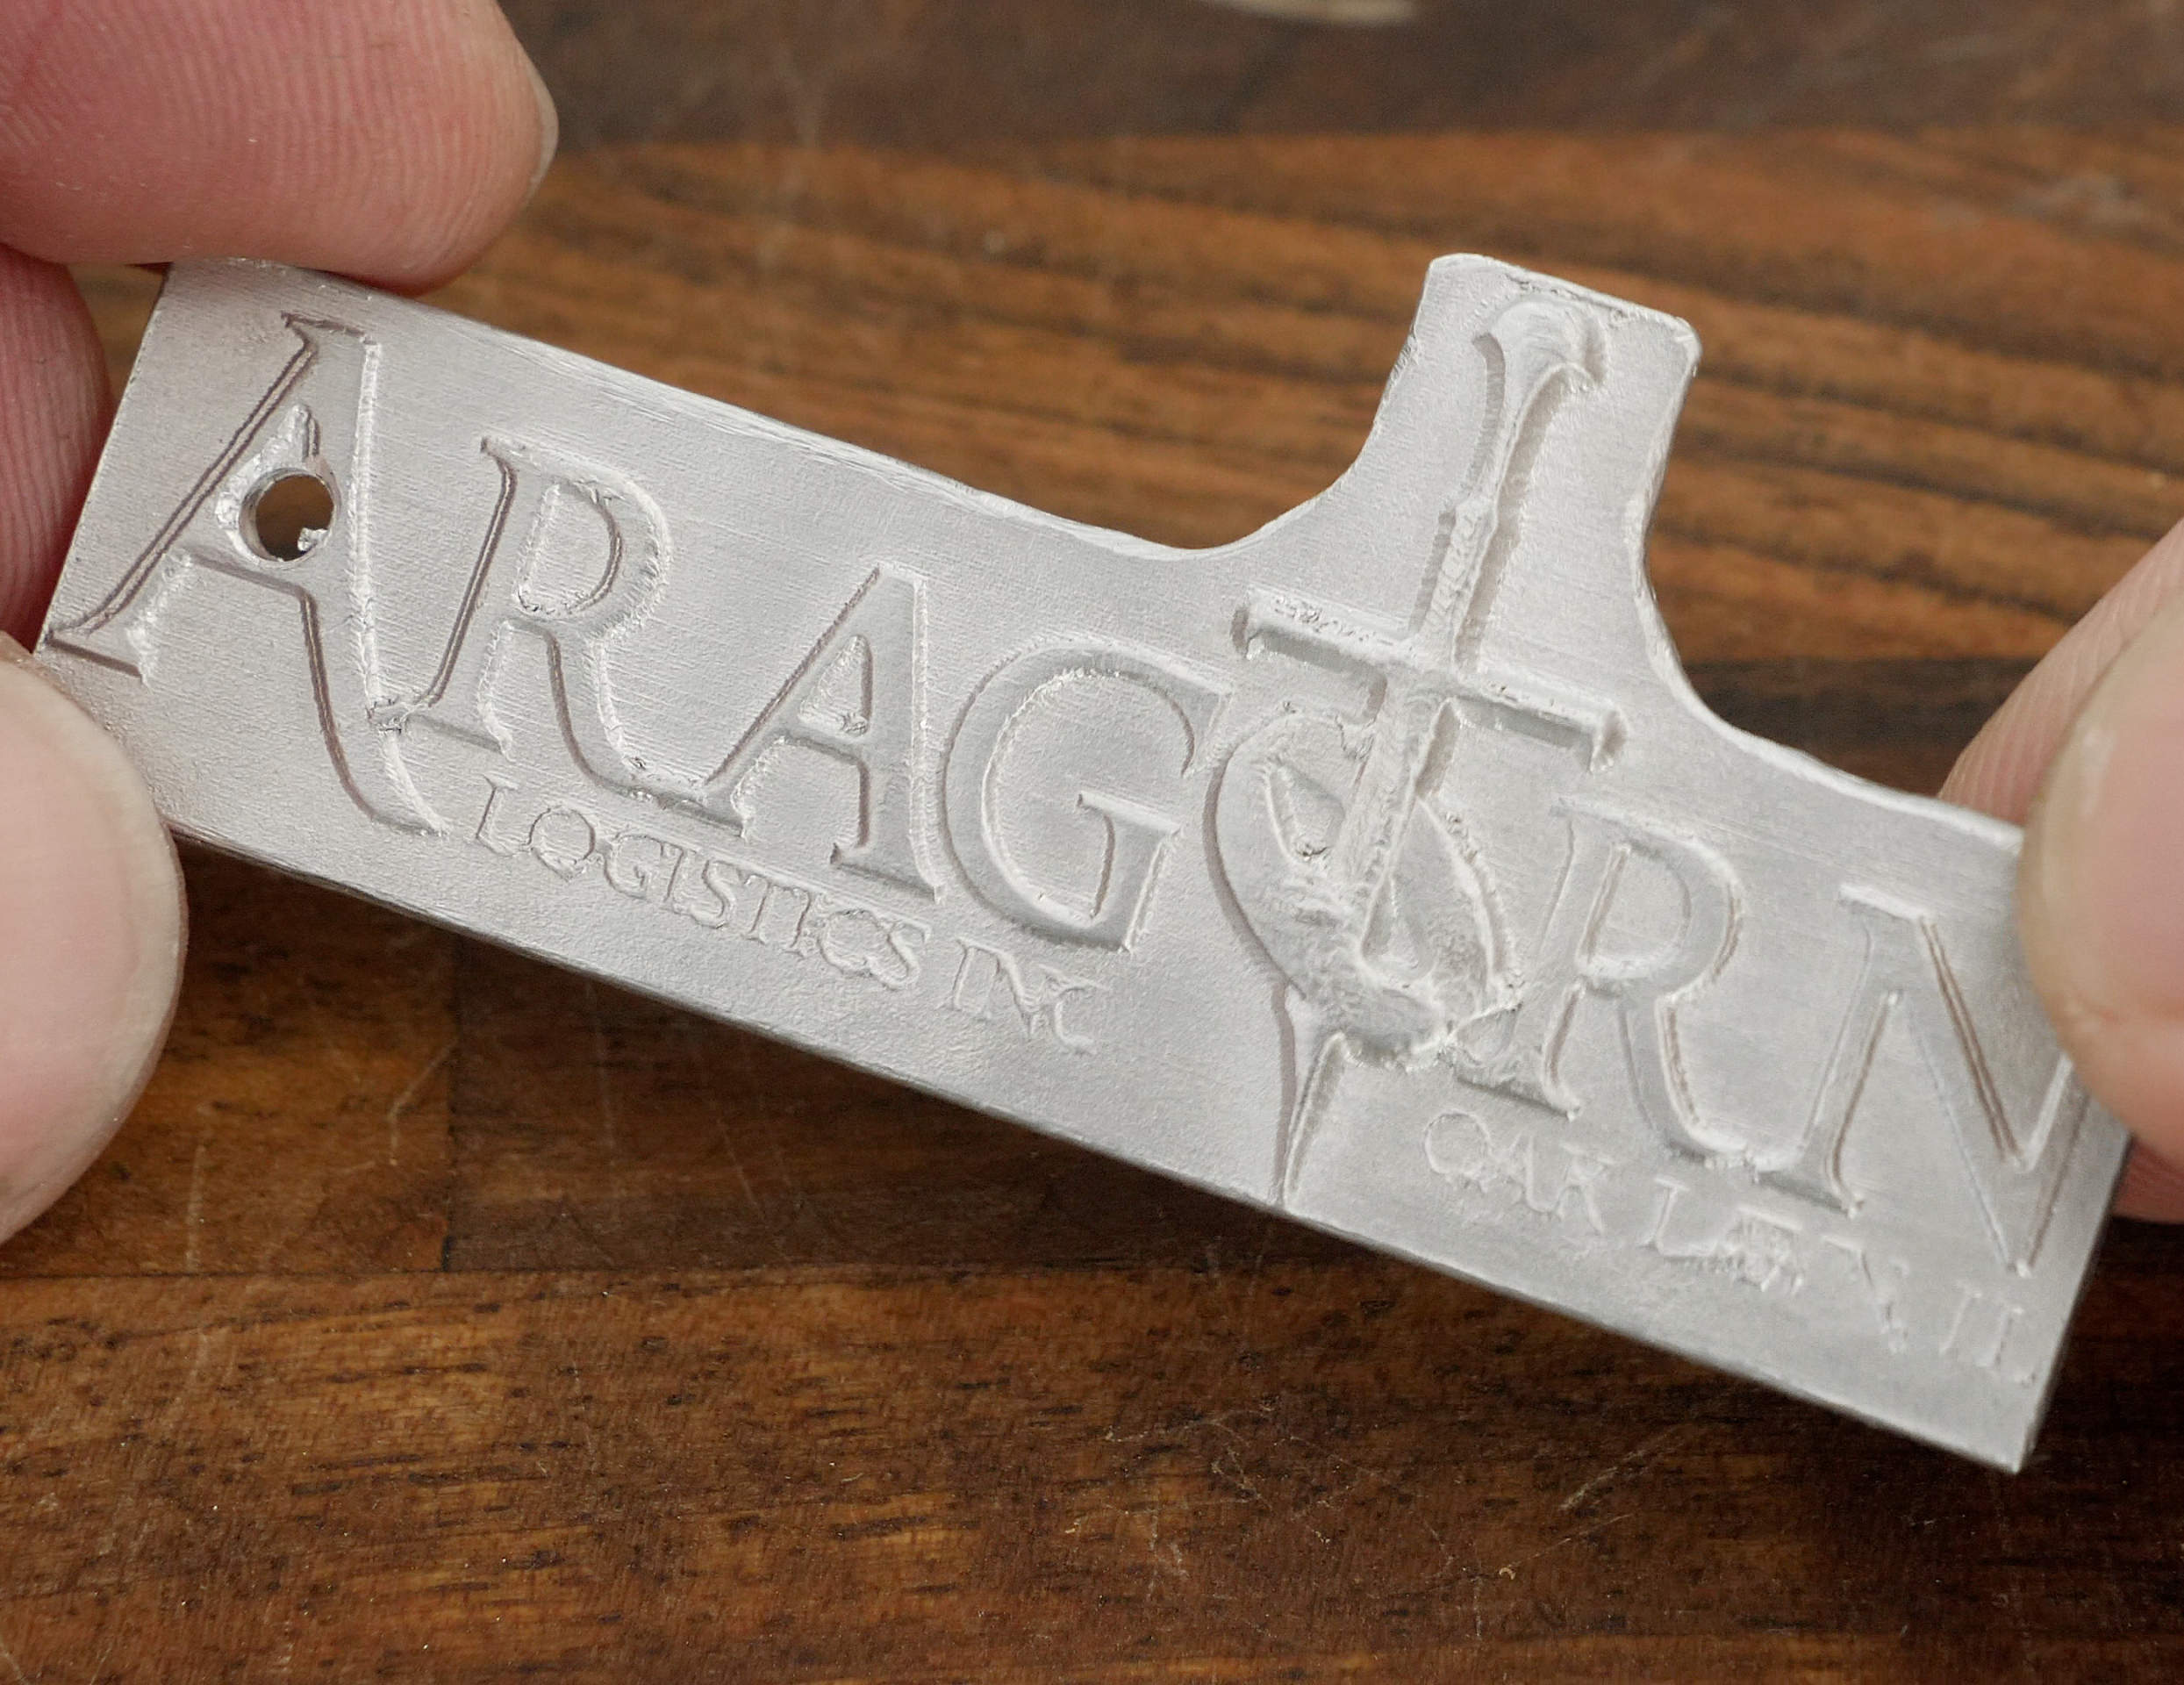
Engraving aluminum is a breeze. I did a few keychains engravings with very small details under 1mm, and they came out great.

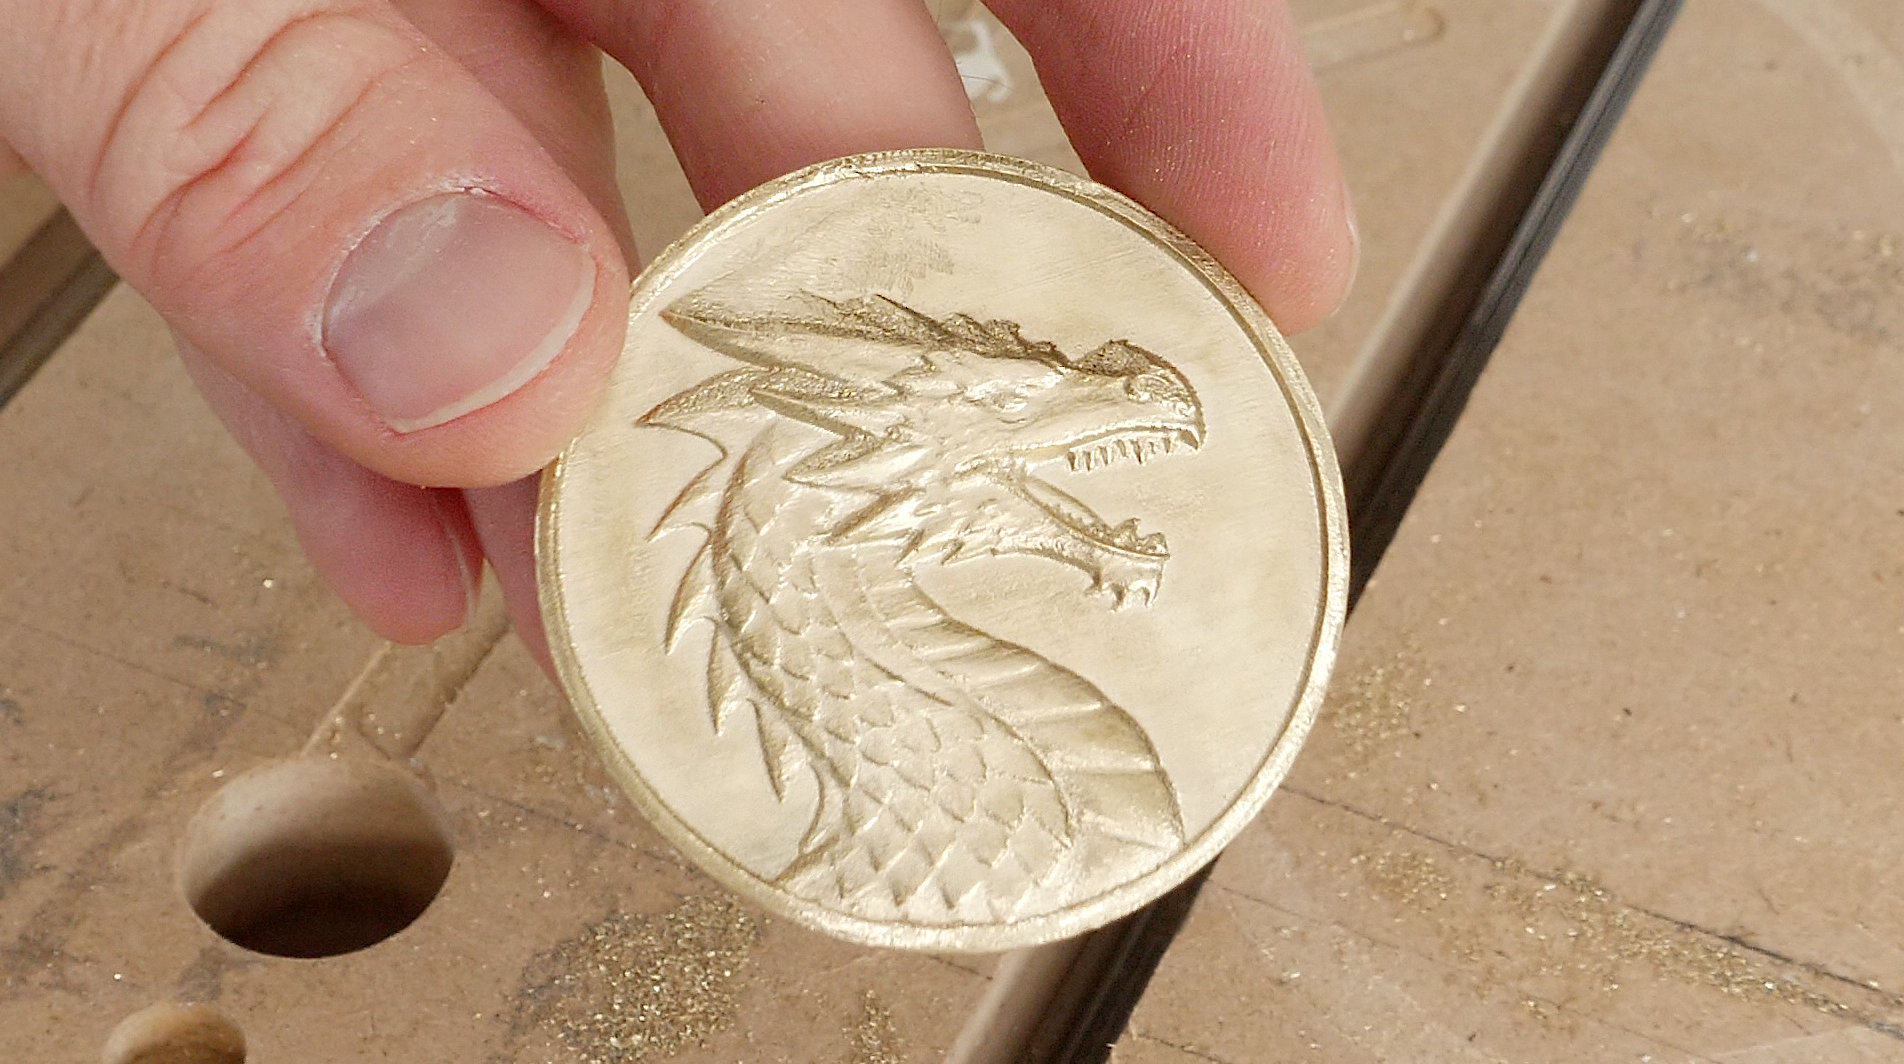
I also tried engraving brass which also turned out great.

This 3D printed CNC router is even capable of cutting steel.

My second goal for this CNC machine was to be as simple as possible to build, which meant that I didn’t want to use any power tool for making the machine, no cutting aluminum extrusions with a saw, no drilling, no tapping…. Nothing.
Literary, you can build this CNC machine with just a set of Allen keys, because I specifically designed it to utilize just standard components that can be easily sourced from sites like Amazon, AliExpress or any other store of your choice. So, it’s almost like a DIY kit that you just have to assemble it. Below you can find the complete list of components needed for this CNC build.
Though (there is a caveat of course), you need a 3D printer in order to make this CNC machine, but I don’t think it’s a big deal, as if you don’t have one, nowadays there are so many 3D printing services from where you can easily get the 3D printed parts for it.
I’m calling it a fully 3D printed CNC machine, as the entire CNC structure is based on 3D printed parts, including the X and Z-axis plates, the router mount and even the ball screw bearing blocks are 3D printed.
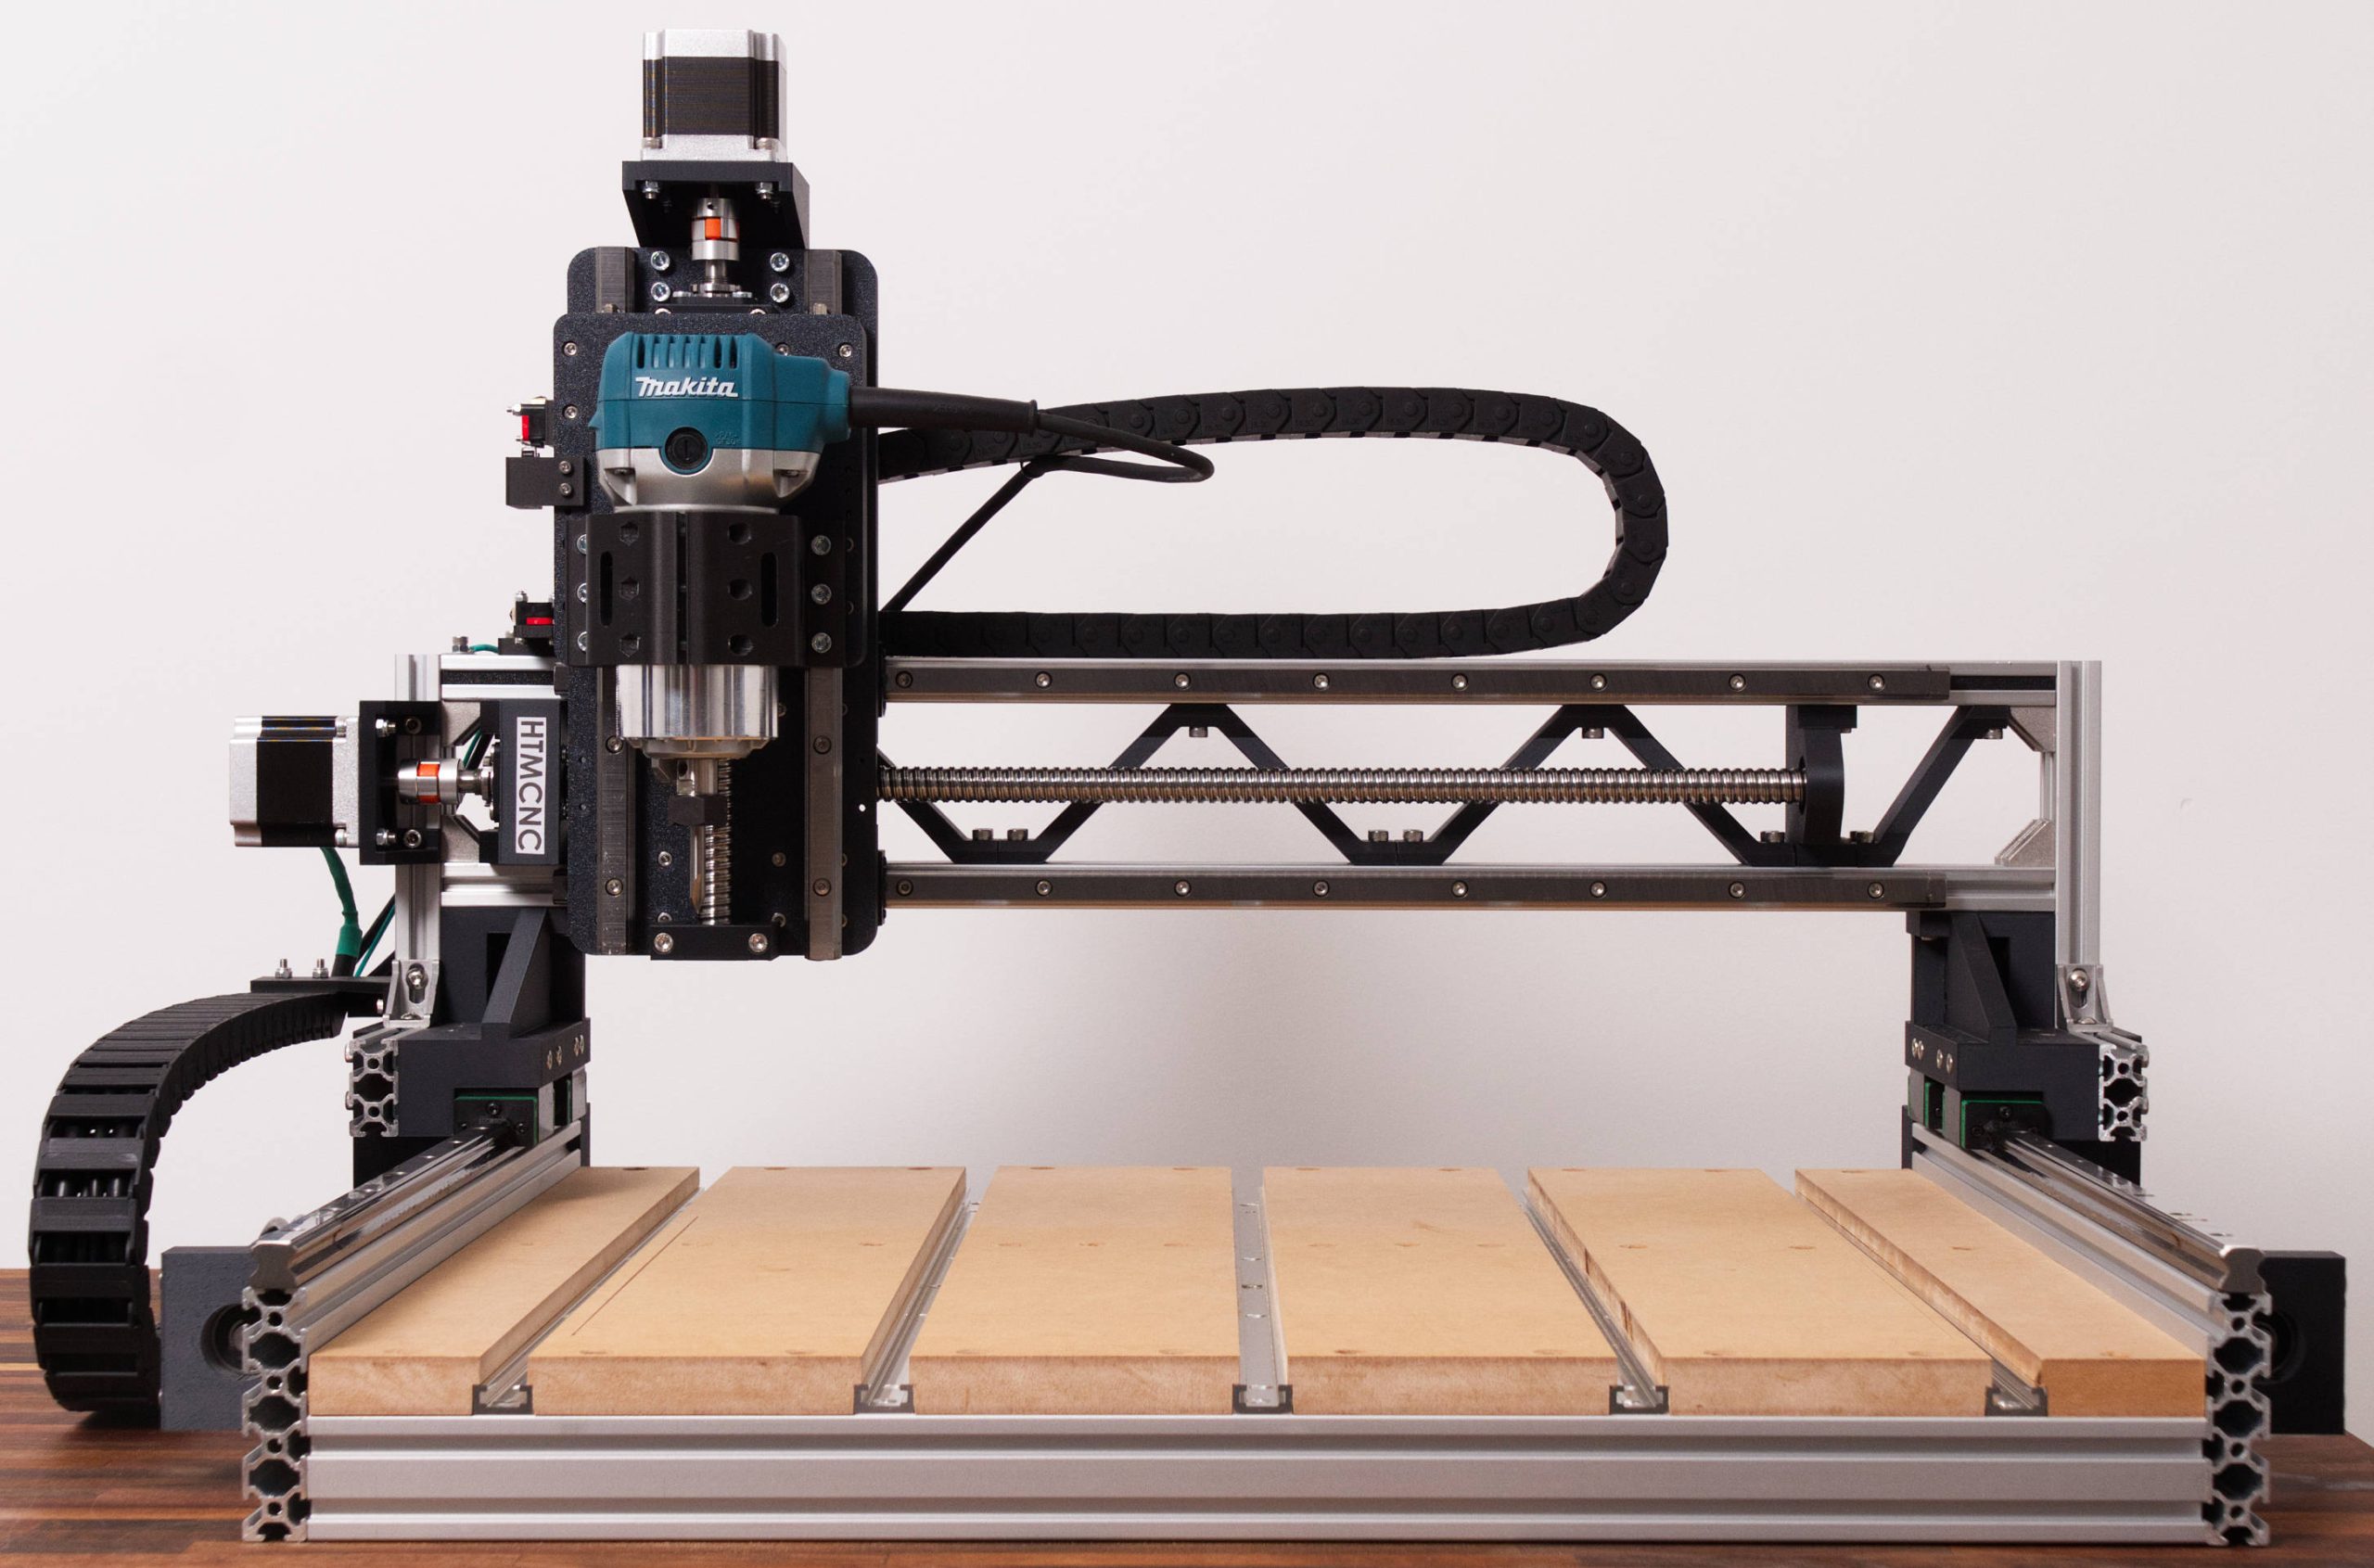
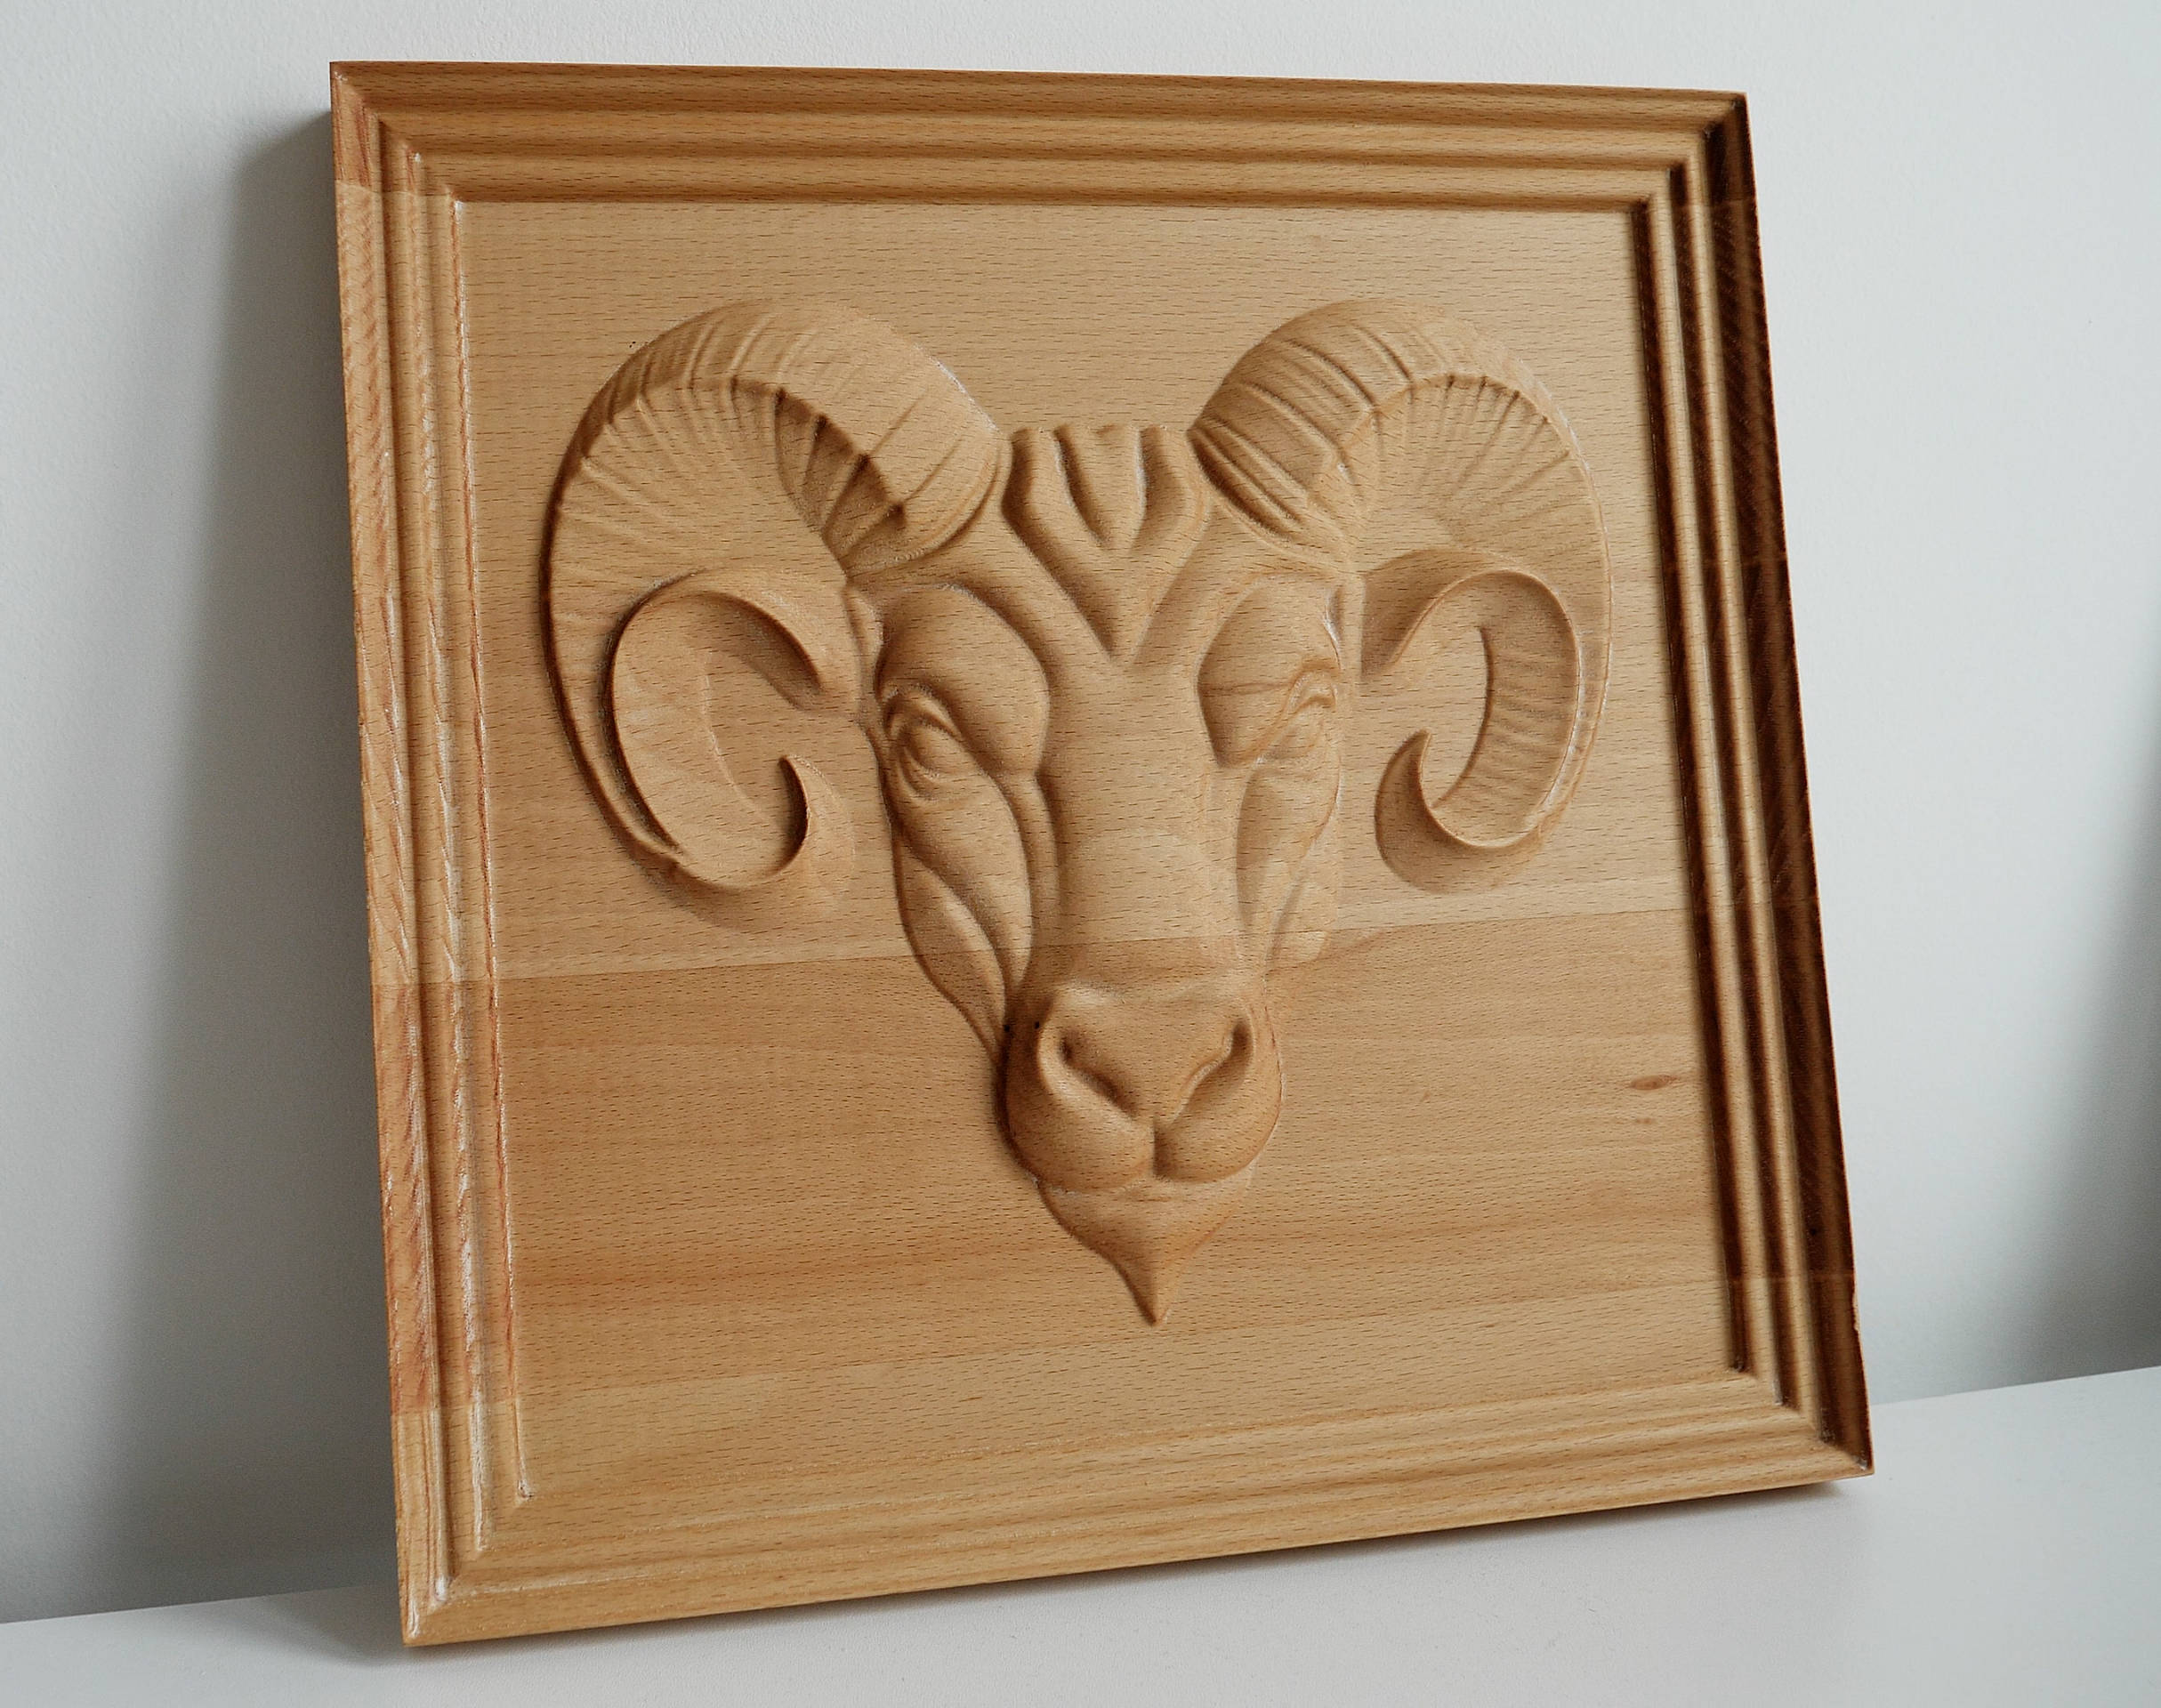
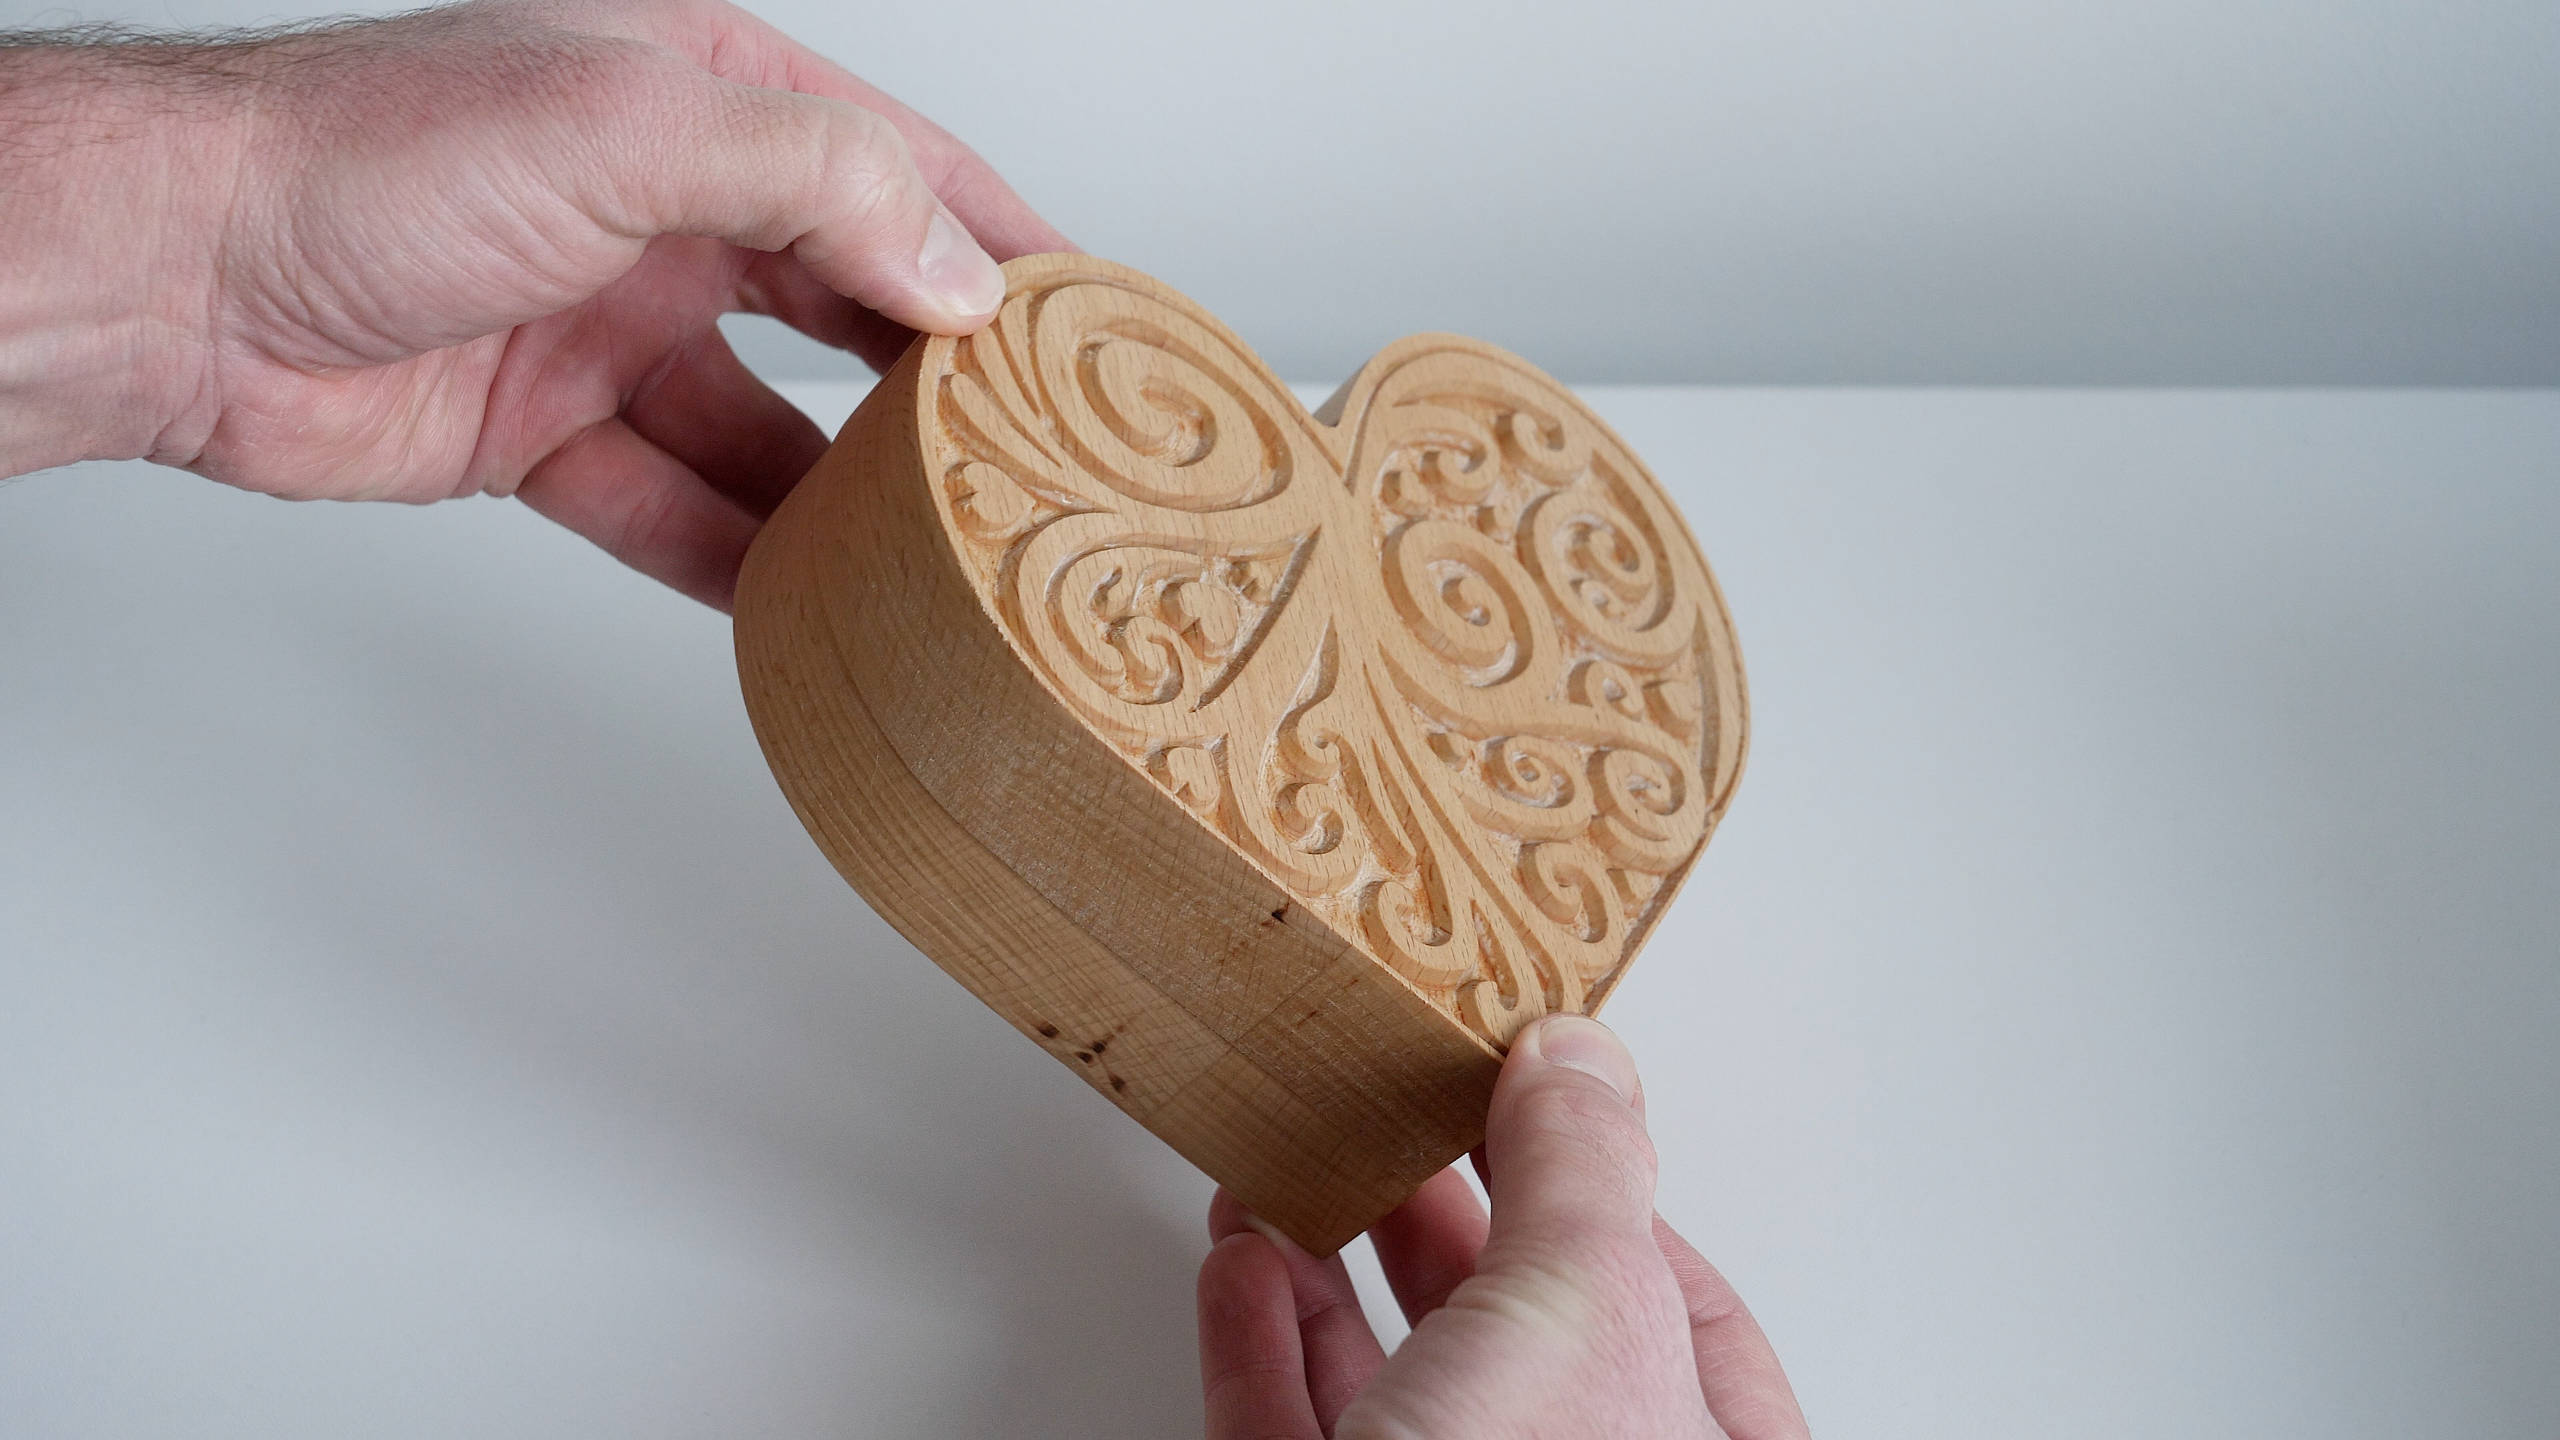
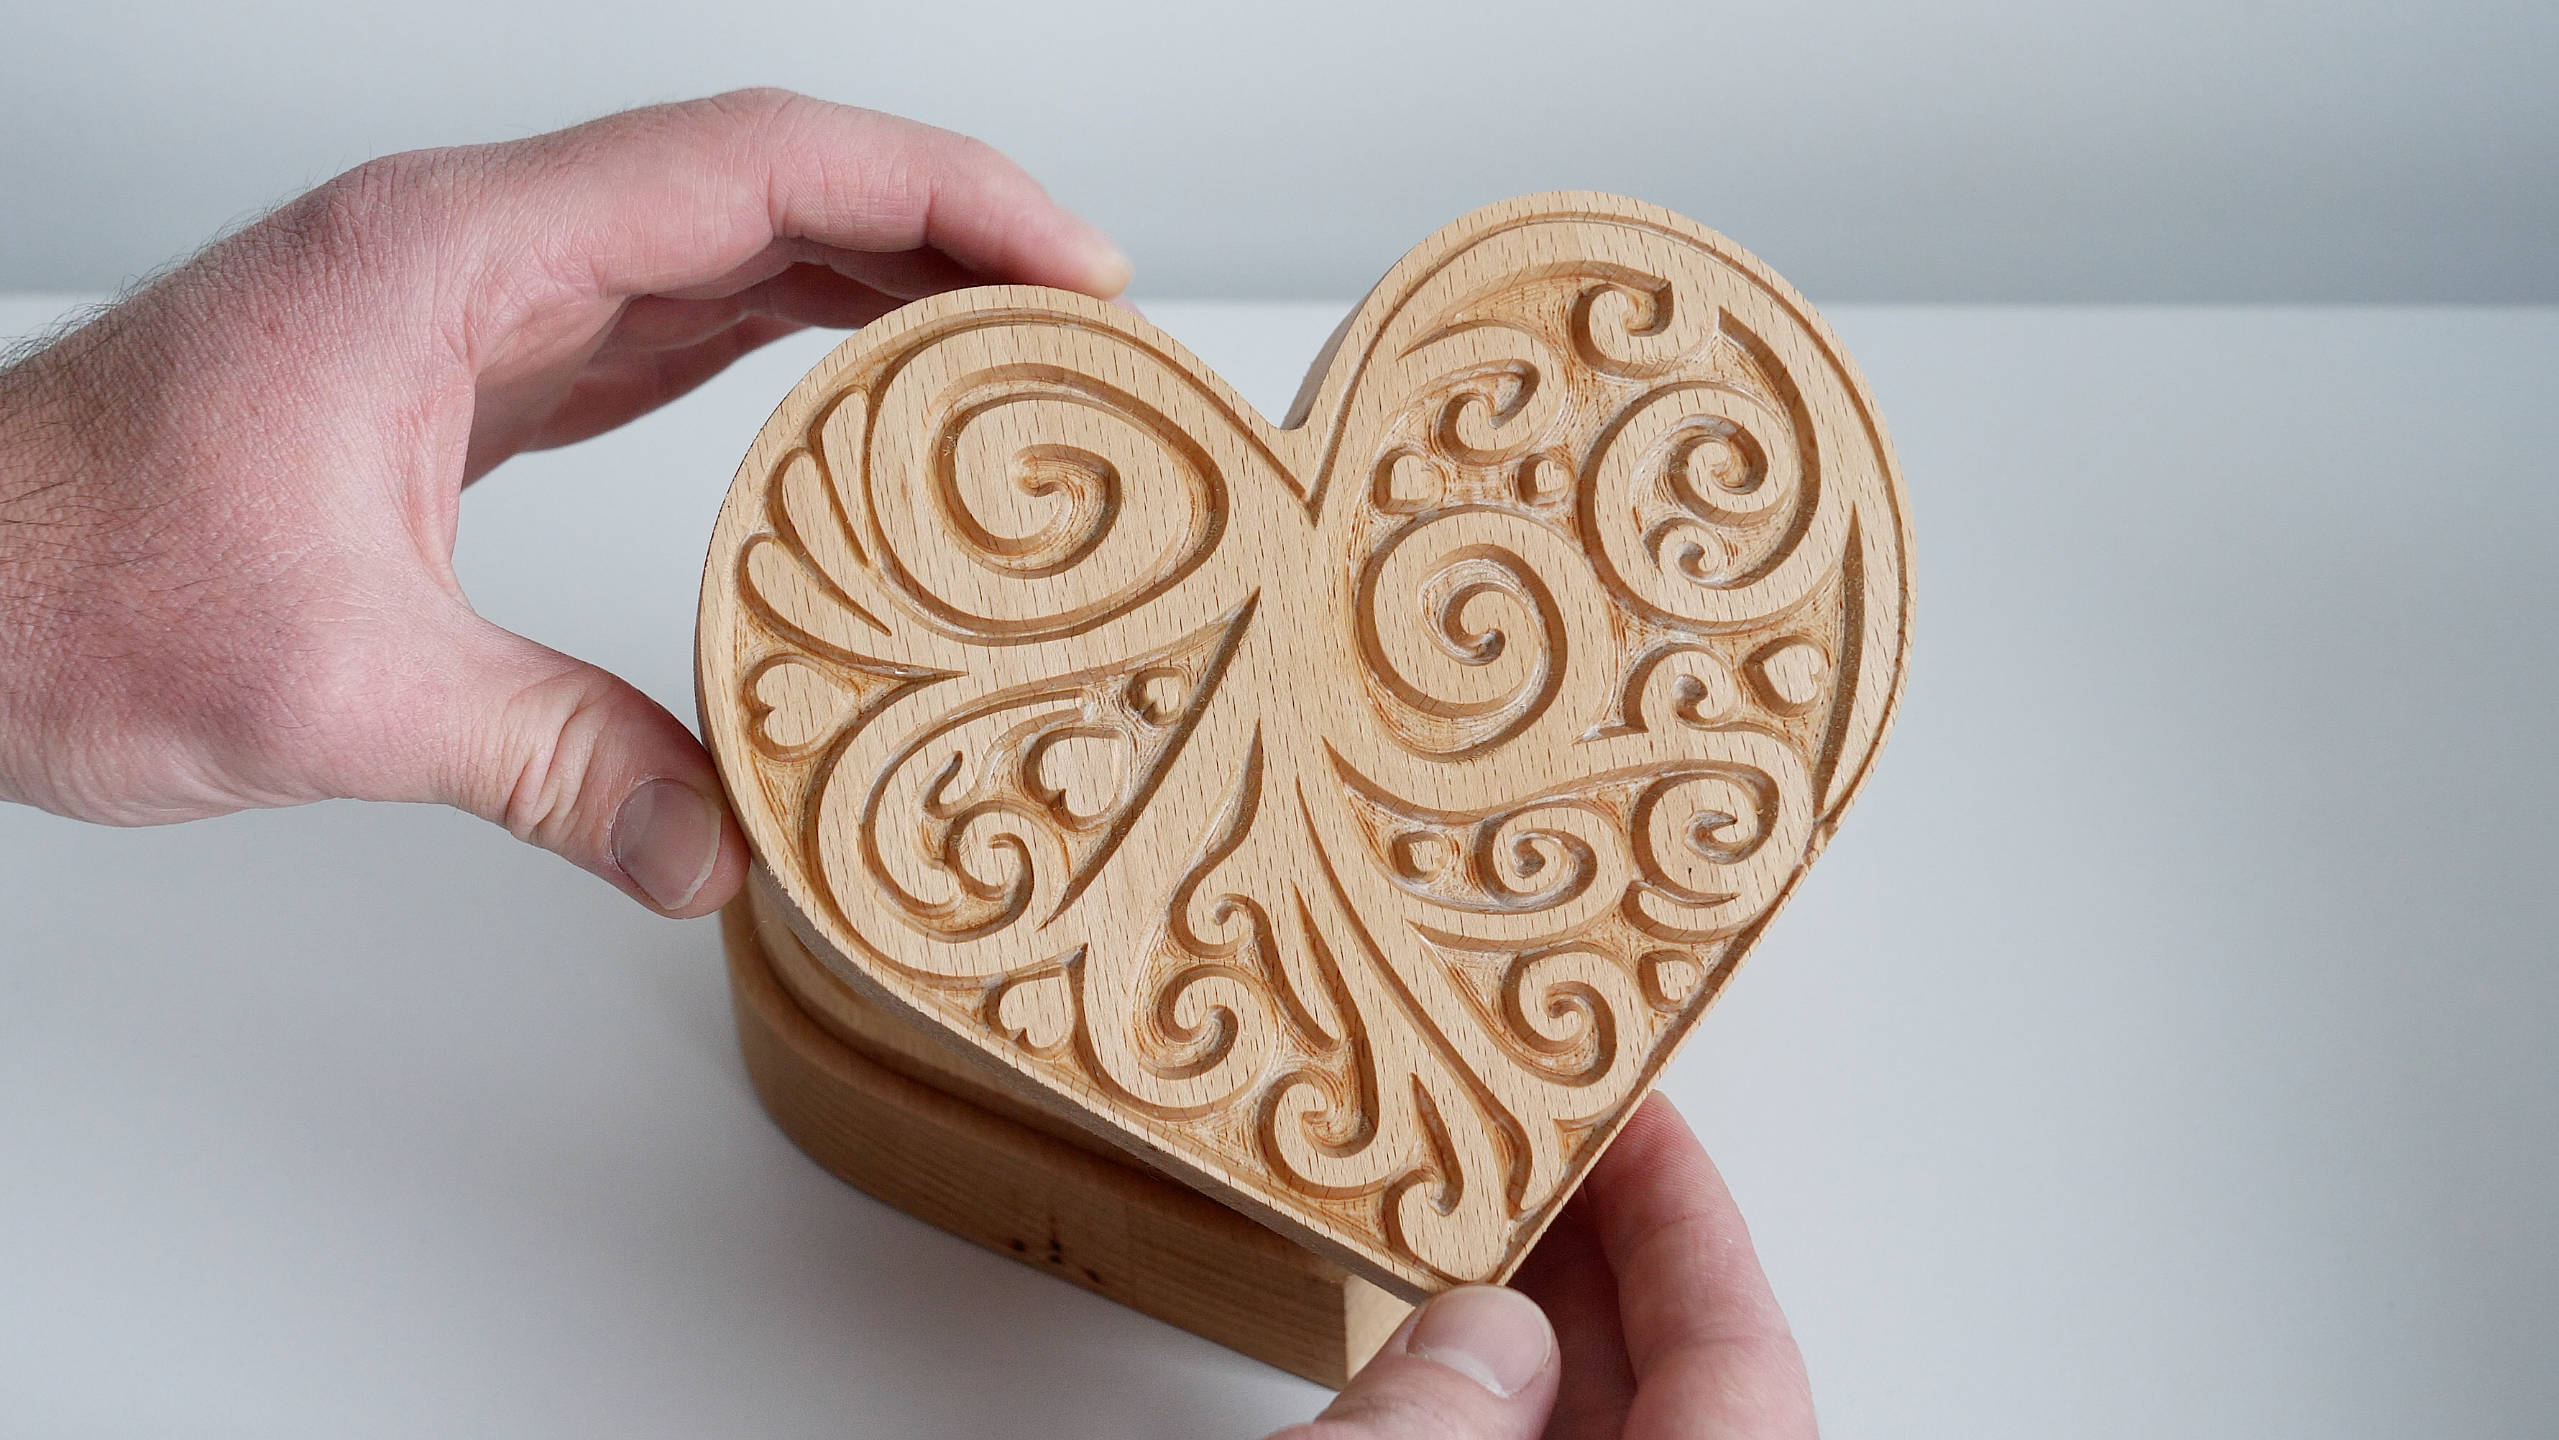
The design was optimized to get the most out of the fact that we can easily print complex parts with a 3D printer. In combination with some 20x40mm aluminum extrusions, 15mm linear rails, and 16mm ball screws, I think I managed to get a decent performance out of it. It’s capable of engraving and even precision parts out of aluminum, and the wood projects are a breeze; it can easily cut any hardwood, and the wood engravings are just perfect. Just take a look at this 340x340mm 3D relief in beech hardwood. It looks stunning.
The work area is 450x350x110mm, but the coolest part is that we can easily scale this CNC machine.
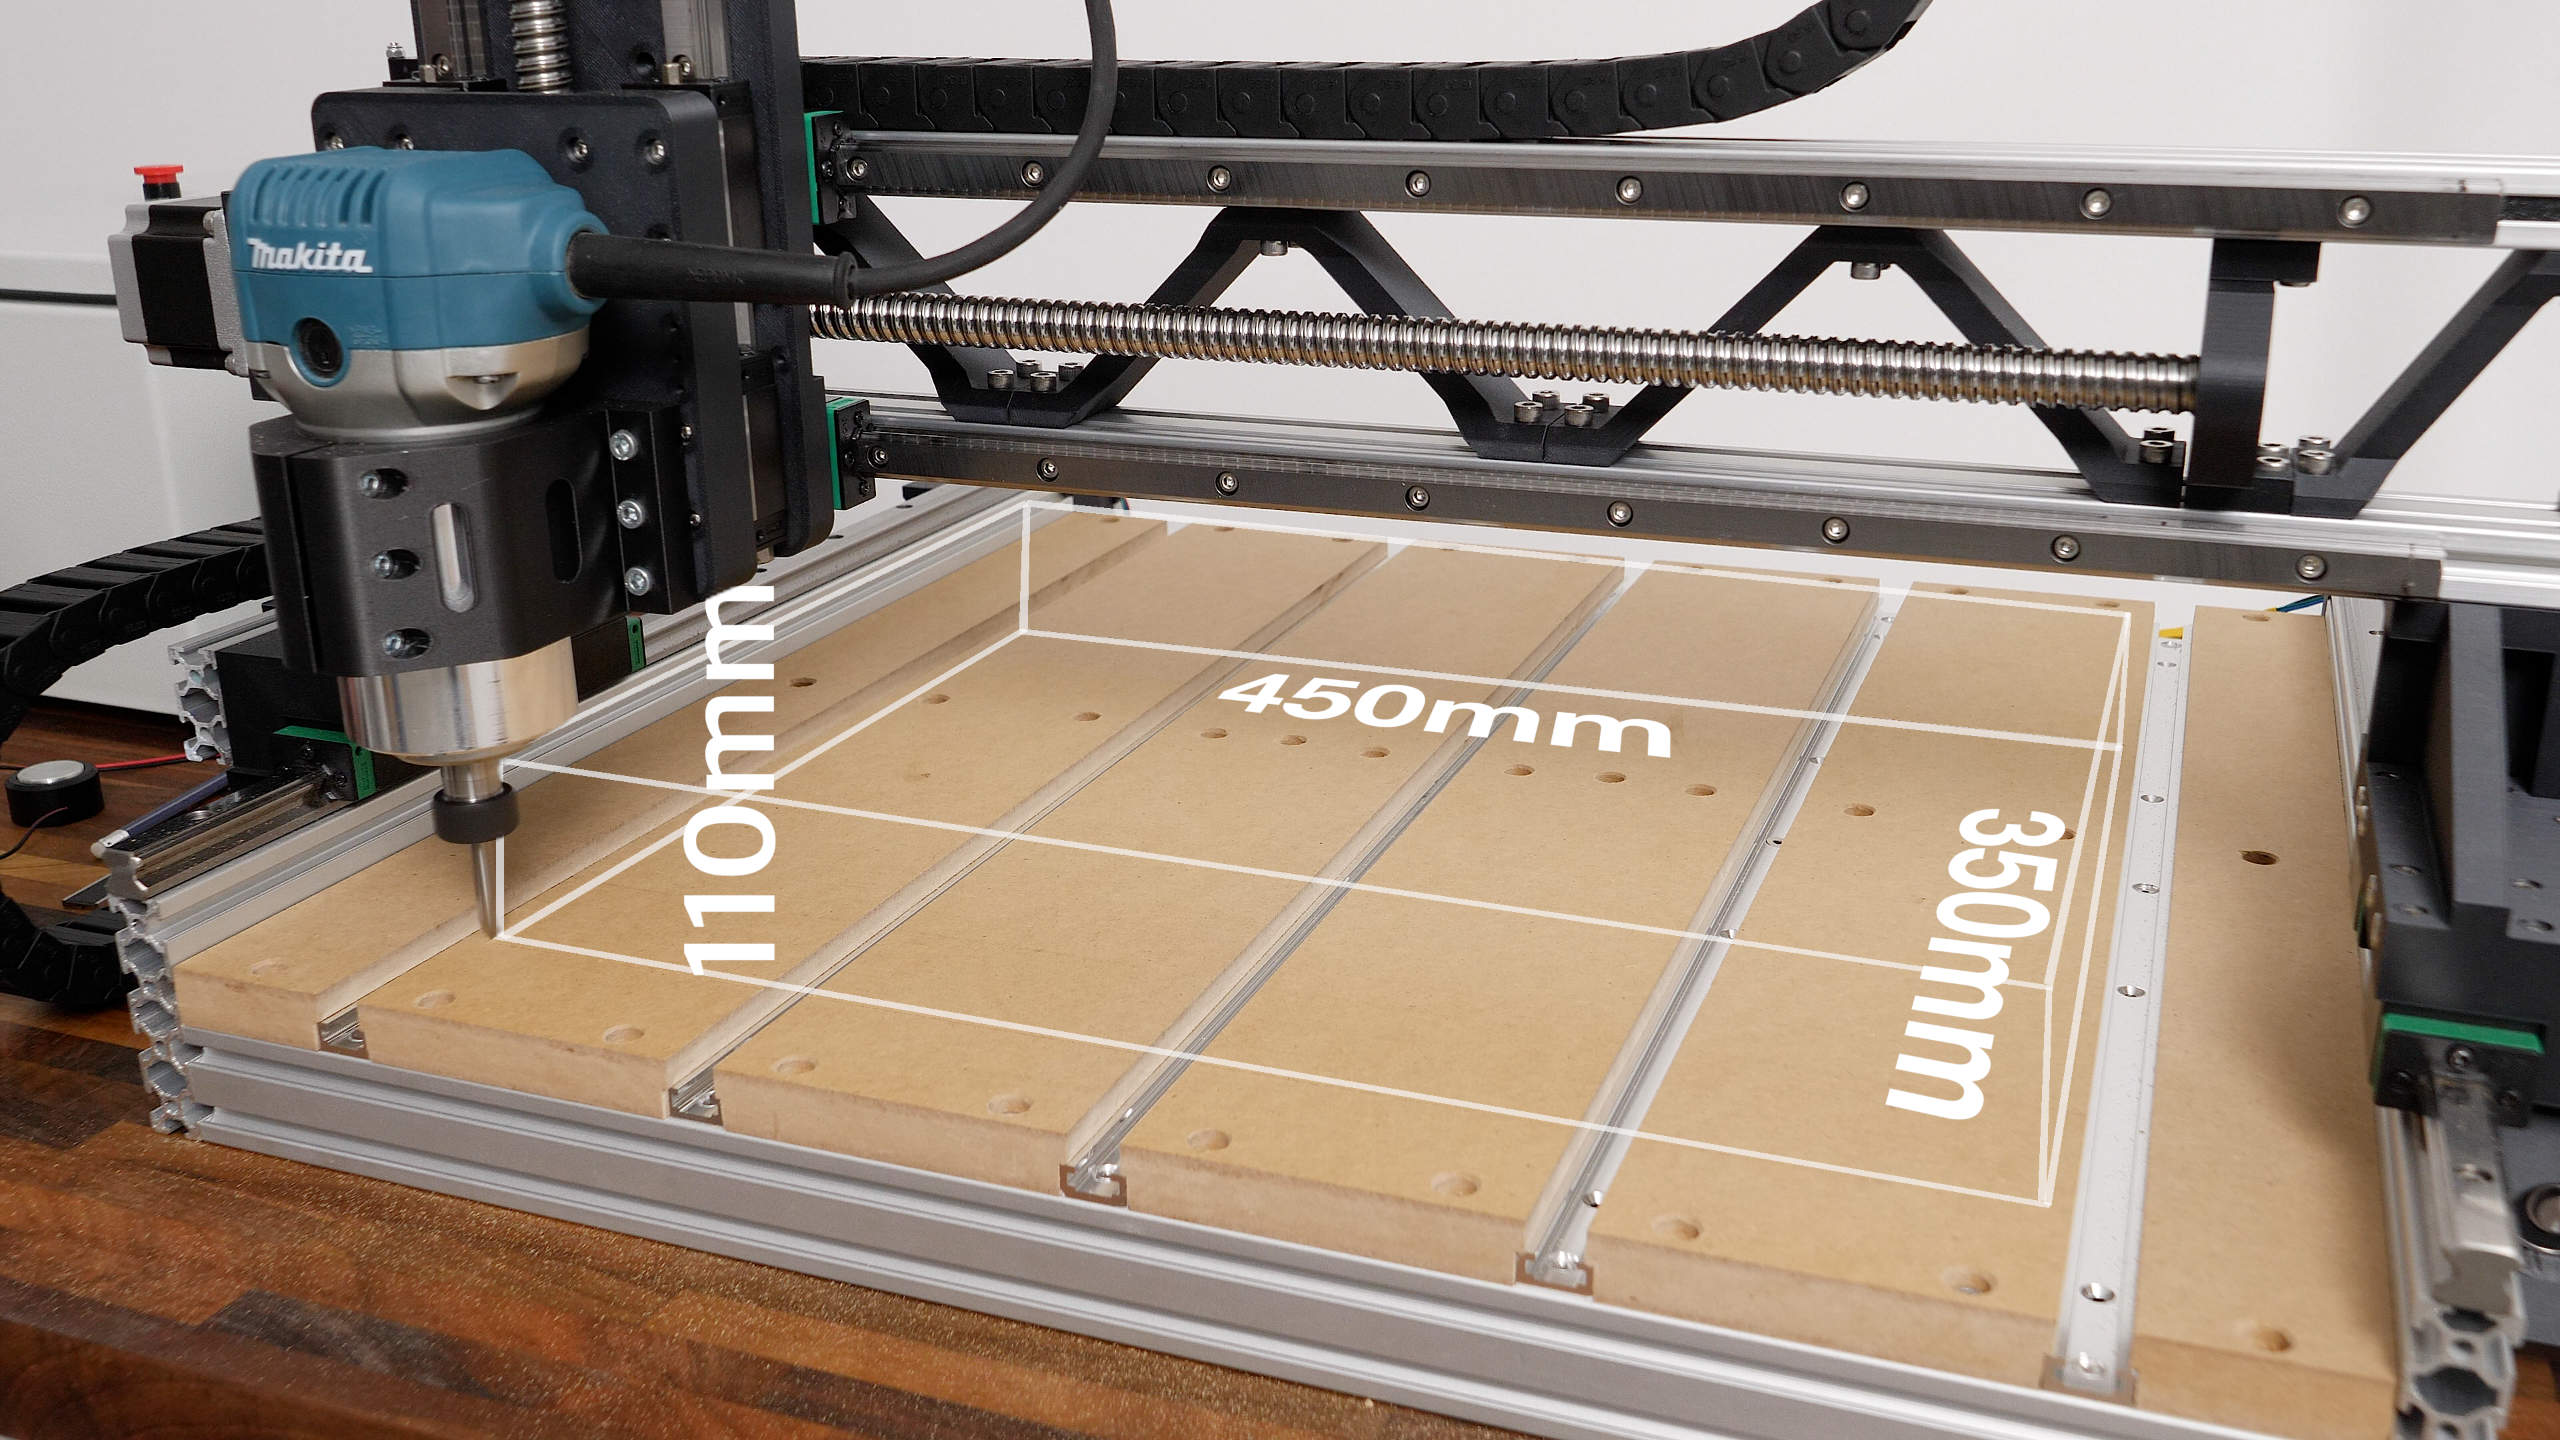
We can simply use longer components for some of the aluminum extrusions, the linear rails and the ball screws, and we instantly get larger work area while all other components and the assembly process itself remain the same.
Below can find details about which components define the work area of the machine, so you can get your desired work area by choosing the right components.
Related projects:
3D Model and STL Download Files
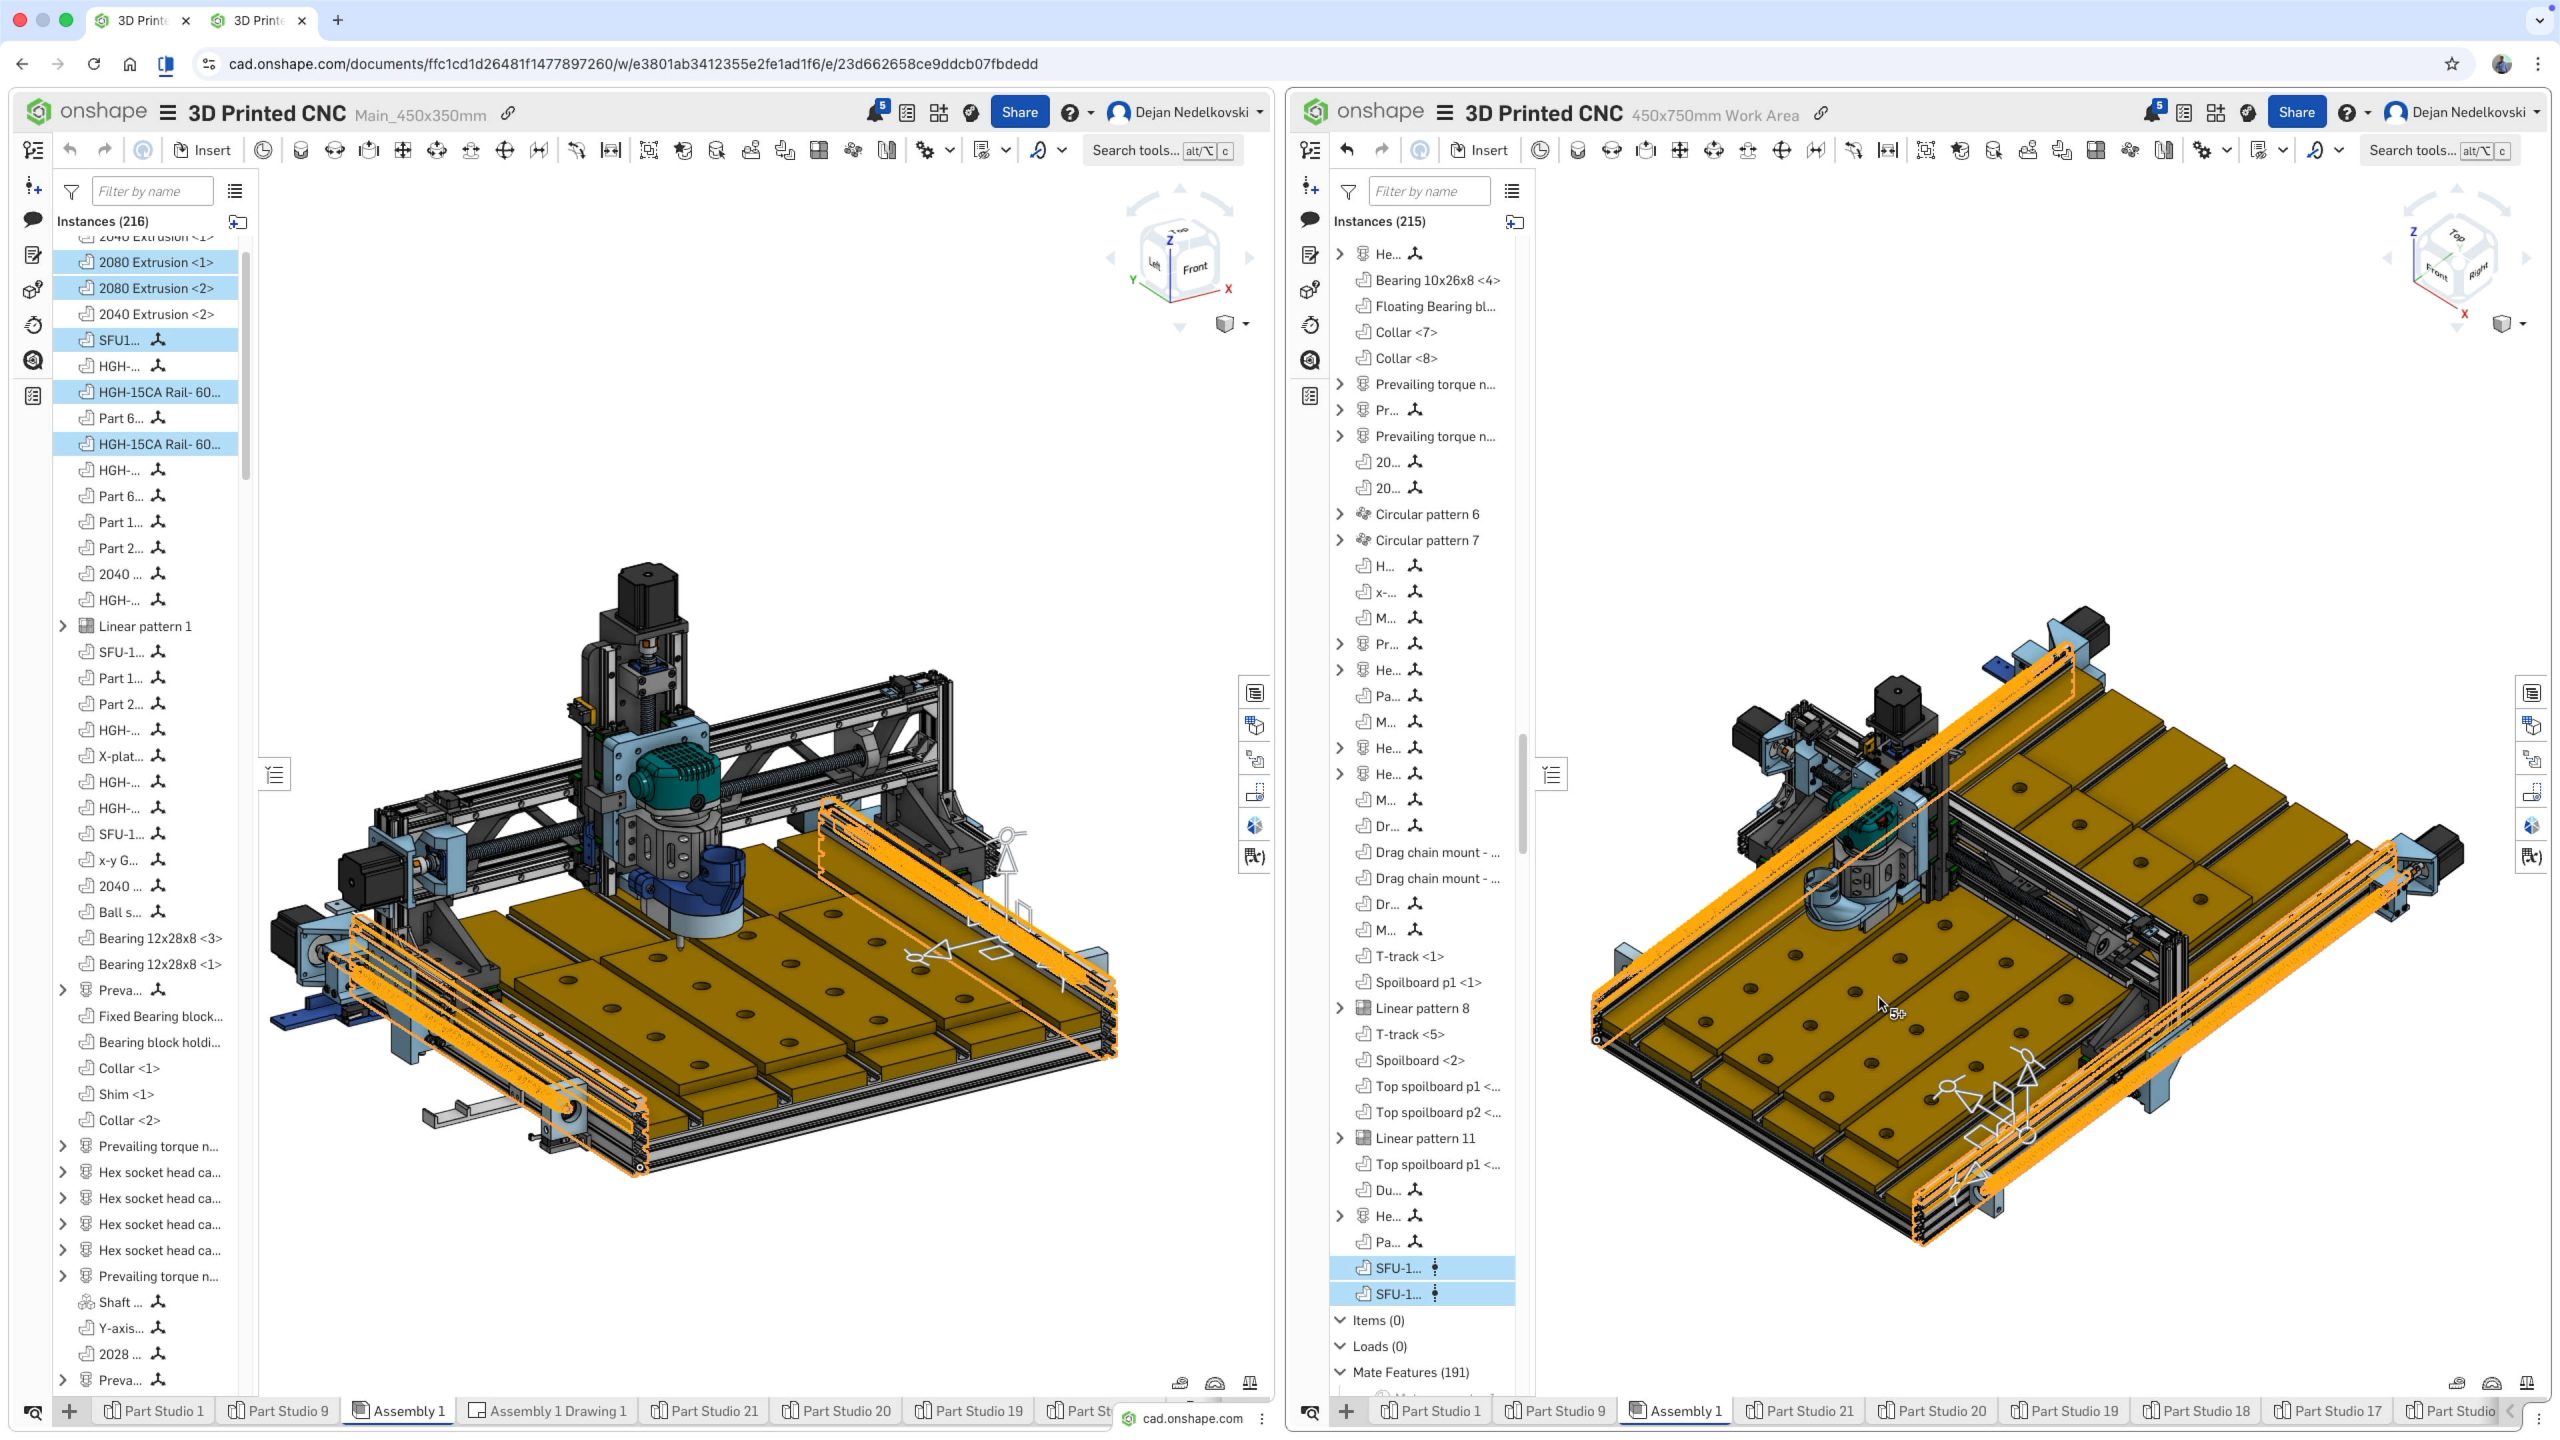
You can view the 3D model of this DIY CNC Machine directly on your web-browser with Onshape.
You can get the 3D model of this DIY CNC Machine, as well as the STL files for 3D Printing from Cults3D.
Bill of Materials
Below is the complete list of components needed for this DIY CNC build.
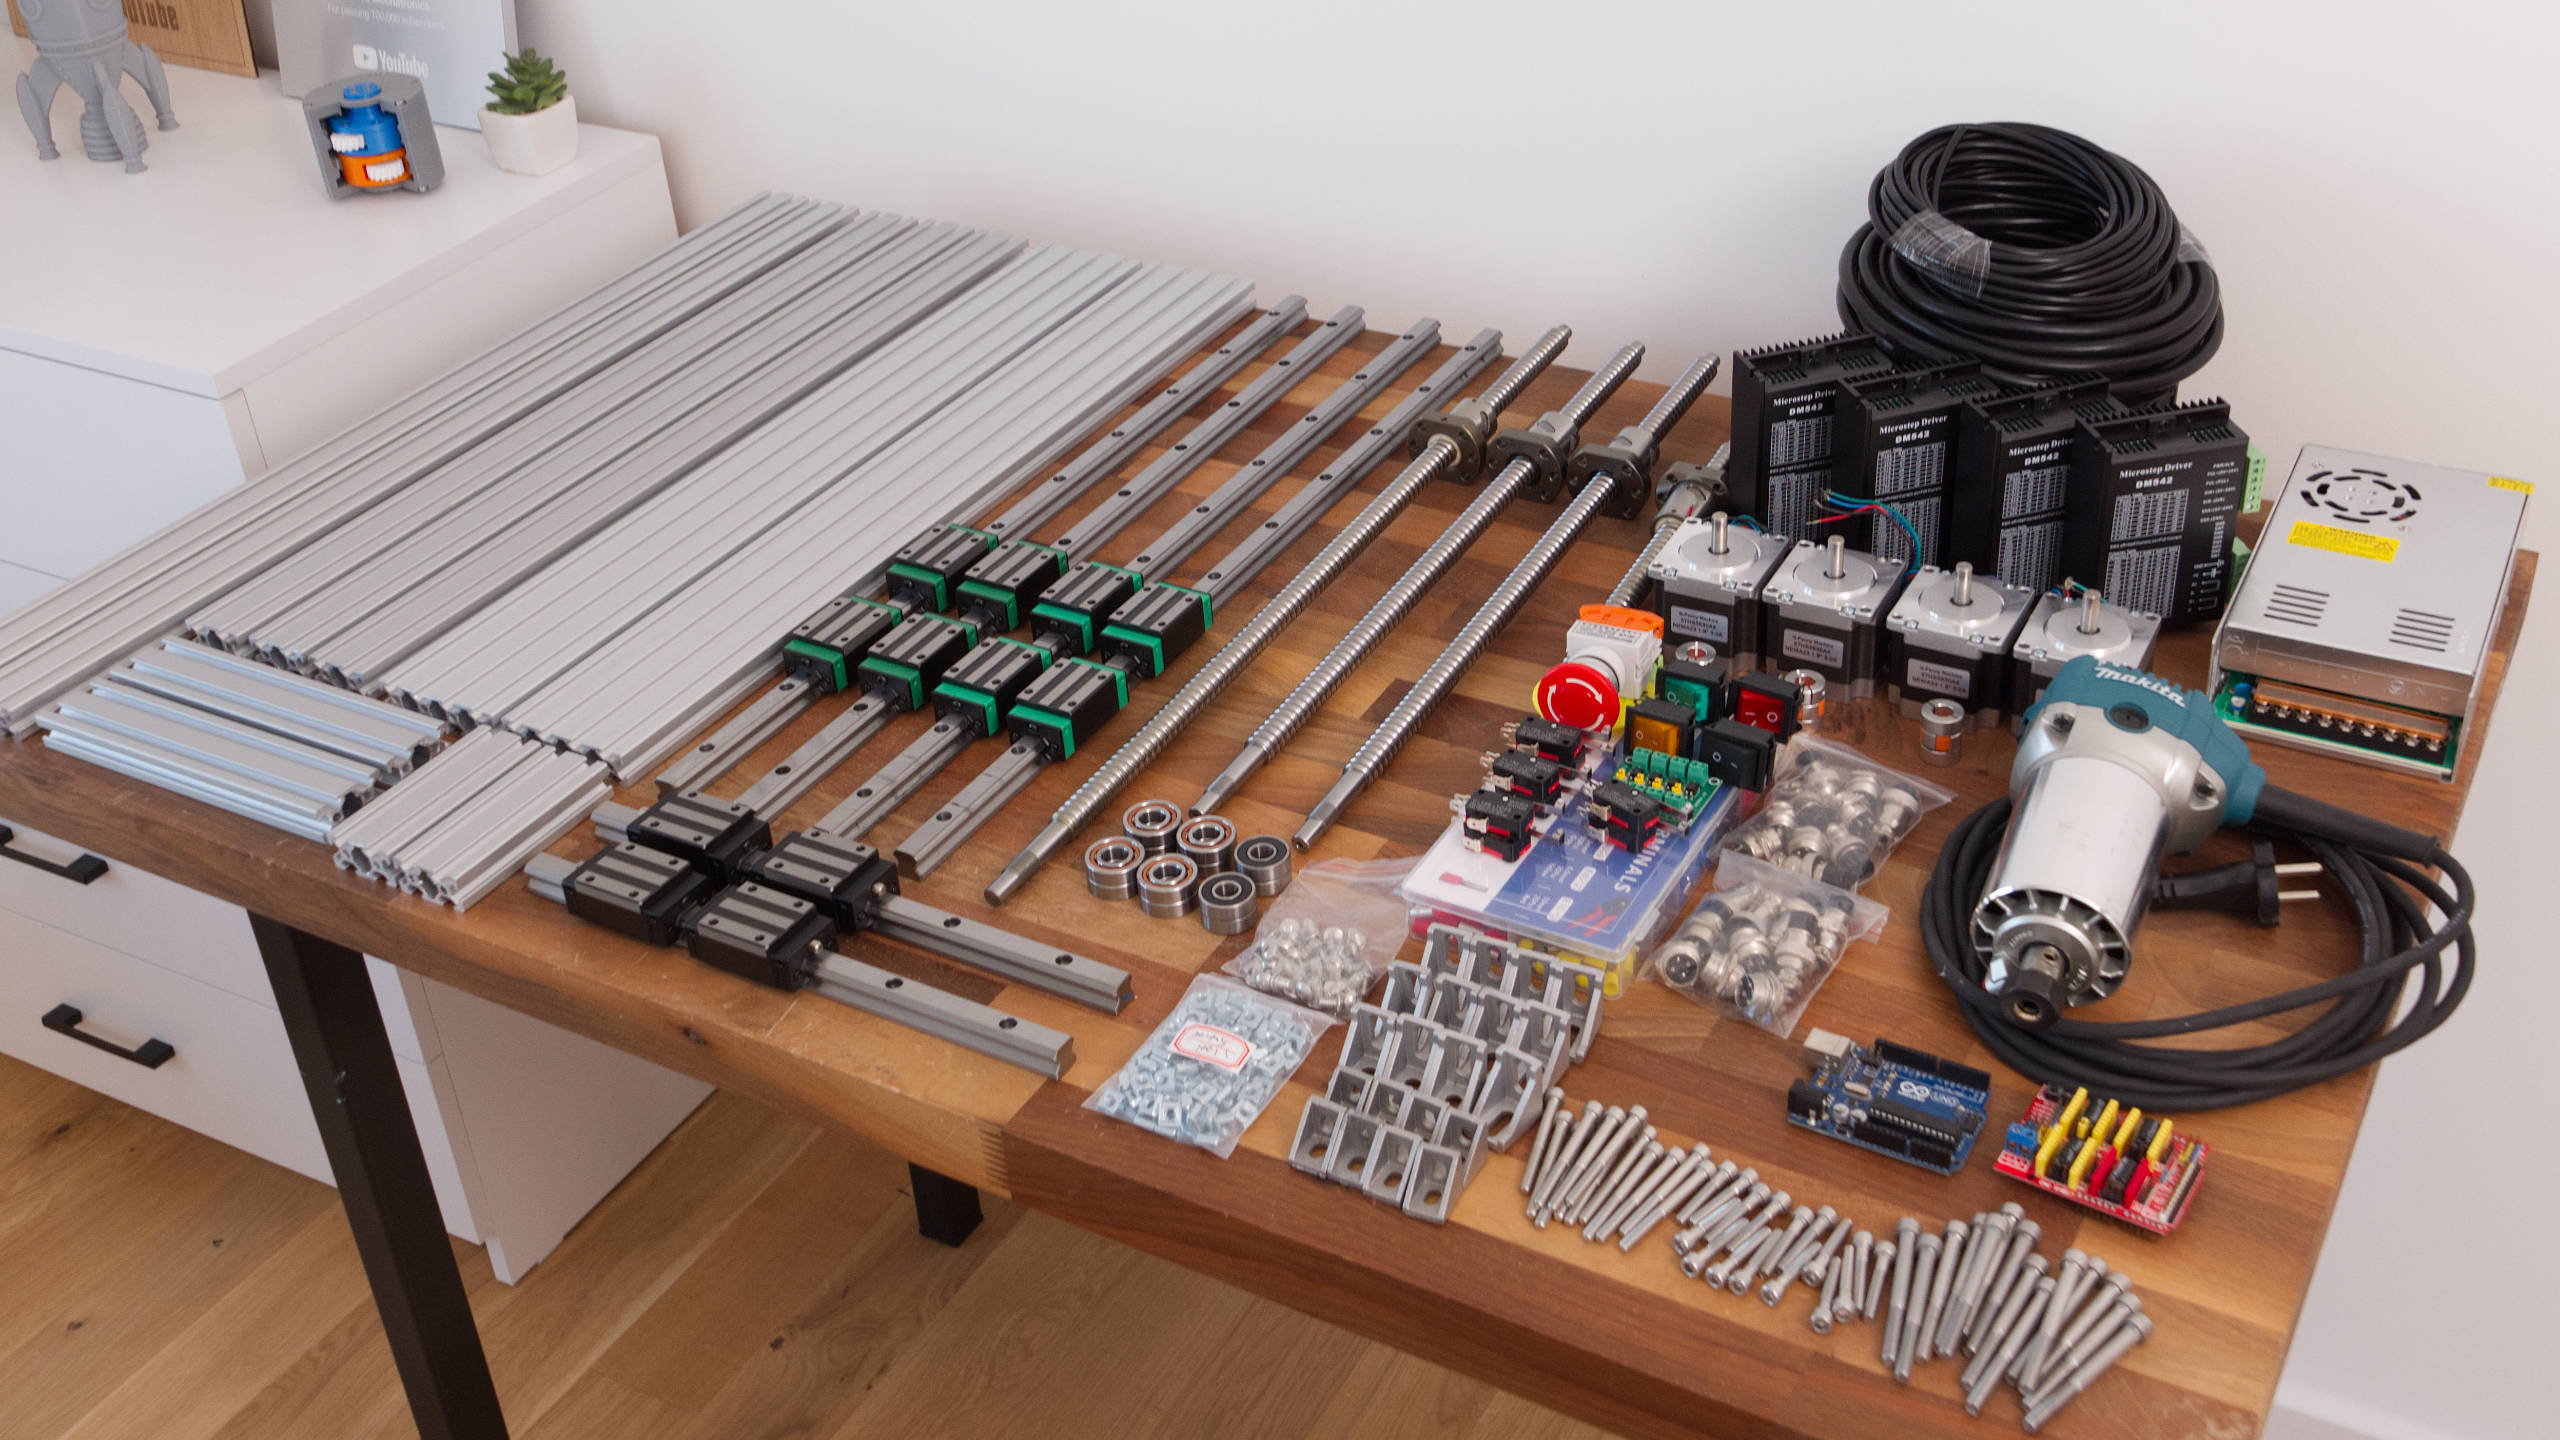
The given dimensions are for the exact same size as the CNC I demonstrated building with 450x350mm work area.
| Component | Quantity | Purchase Links |
|---|---|---|
| Aluminum Extrusion 2080 – 600mm (Y-axis, Custom Length) | 2 | Amazon | AliExpress |
| Aluminum Extrusion 2040 – 600mm (X-axis Base, Custom Length) | 3 | Amazon | AliExpress |
| Aluminum Extrusion 2040 – 700mm (X-axis Gantry, Custom Length) | 2 | Amazon | AliExpress |
| Aluminum Extrusion 2040 – 200mm | 2 | Amazon | AliExpress |
| Aluminum Extrusion 2040 – 100mm | 2 | Amazon | AliExpress |
| Linear Rail HGR15 – 600mm (Y-axis, Custom Length) & (X-axis, Custom Length) | 4 | Amazon | AliExpress |
| Linear Rail HGR15 – 300mm (Z-axis) | 2 | Amazon | AliExpress |
| Ball Screw SFU1605 – 500mm (Y-axis, Custom Length) | 2 | Amazon | AliExpress |
| Ball Screw SFU1605 – 600mm (X-axis, Custom Length) | 1 | Amazon | AliExpress |
| Ball Screw SFU1605 – 300mm (Z-axis) | 1 | Amazon | AliExpress |
| Shaft Coupler 8mm to 10mm | 4 | Amazon |AliExpress |
| Angular Contact Bearings – 7001 P5-DB A-Pair | (4 pairs) | Amazon | AliExpress |
| M12x1mm Locknut | 4 | Amazon | AliExpress |
| Radial Ball Bearing – 6000 – 2RS | 4 | Amazon | AliExpress |
| Corner Bracket 28x20x28mm (with suitable T-slot nuts and M5 Bolts) | 18 | Amazon | AliExpress |
| Corner Bracket 20x20x20mm (with suitable T-slot nuts and M5 Bolts) | 8 | Amazon | AliExpress |
| M5 Sliding T-nut | 100 | Amazon | AliExpress |
| M5 Hammer Head T-nut | 100 | Amazon | AliExpress |
| M4 Sliding T-nut | 50 | Amazon | AliExpress |
| M4 Hammer Head T-nut | 50 | Amazon | AliExpress |
| Stepper Motor NEMA23 | 4 | Amazon | AliExpress |
| Bolts Socket Head M3x12mm – 10 M3x16mm – 5 M3x30mm – 5 M4x10mm – 5 M4x12mm – 5 M4x14mm – 60 M4x25mm – 10 M5x12mm – 50 M5x16mm – 40 M5x20mm – 40 M5x30mm – 40 M5x50mm – 25 M5x60mm – 35 M5x70mm – 5 | / | Amazon | AliExpress |
Disclosure: These are affiliate links. As an Amazon Associate I earn from qualifying purchases.
Scaling the CNC – Custom Work Area Size
If you would like to increase the work area of the CNC you could just increase the size of the aluminum extrusions, the linear rails and the ball screws for the particular axis.
For example, in order to increase work area in the Y-axis, from 450x350mm to 450x750mm, we need to increase the length of the Y-axis aluminum extrusion, linear rail and ball screw. The difference is 750-350=400mm, so we need to add 300mm to the base lengths of this CNC machine for the Y-axis parts. That would be:
- Aluminum Extrusion 2080 – 600mm + 400mm = 1000mm
- Linear Rail HGR15 – 600mm + 400mm = 1000mm
- Ball Screw SFU1605 – 500mm + 400mm = 900mm
The same principle is used for scaling the work area of the machine in the X-axis. Though, there is one difference here as we would increase the gantry size, we would need to add another truss structure element.
Please note that increasing the size of the machine in the X-axis or the gantry would result in reduction of the rigidity of the whole machine, compared to the increase of the size in the Y-axis which almost doesn’t affect the rigidity of the whole machine.
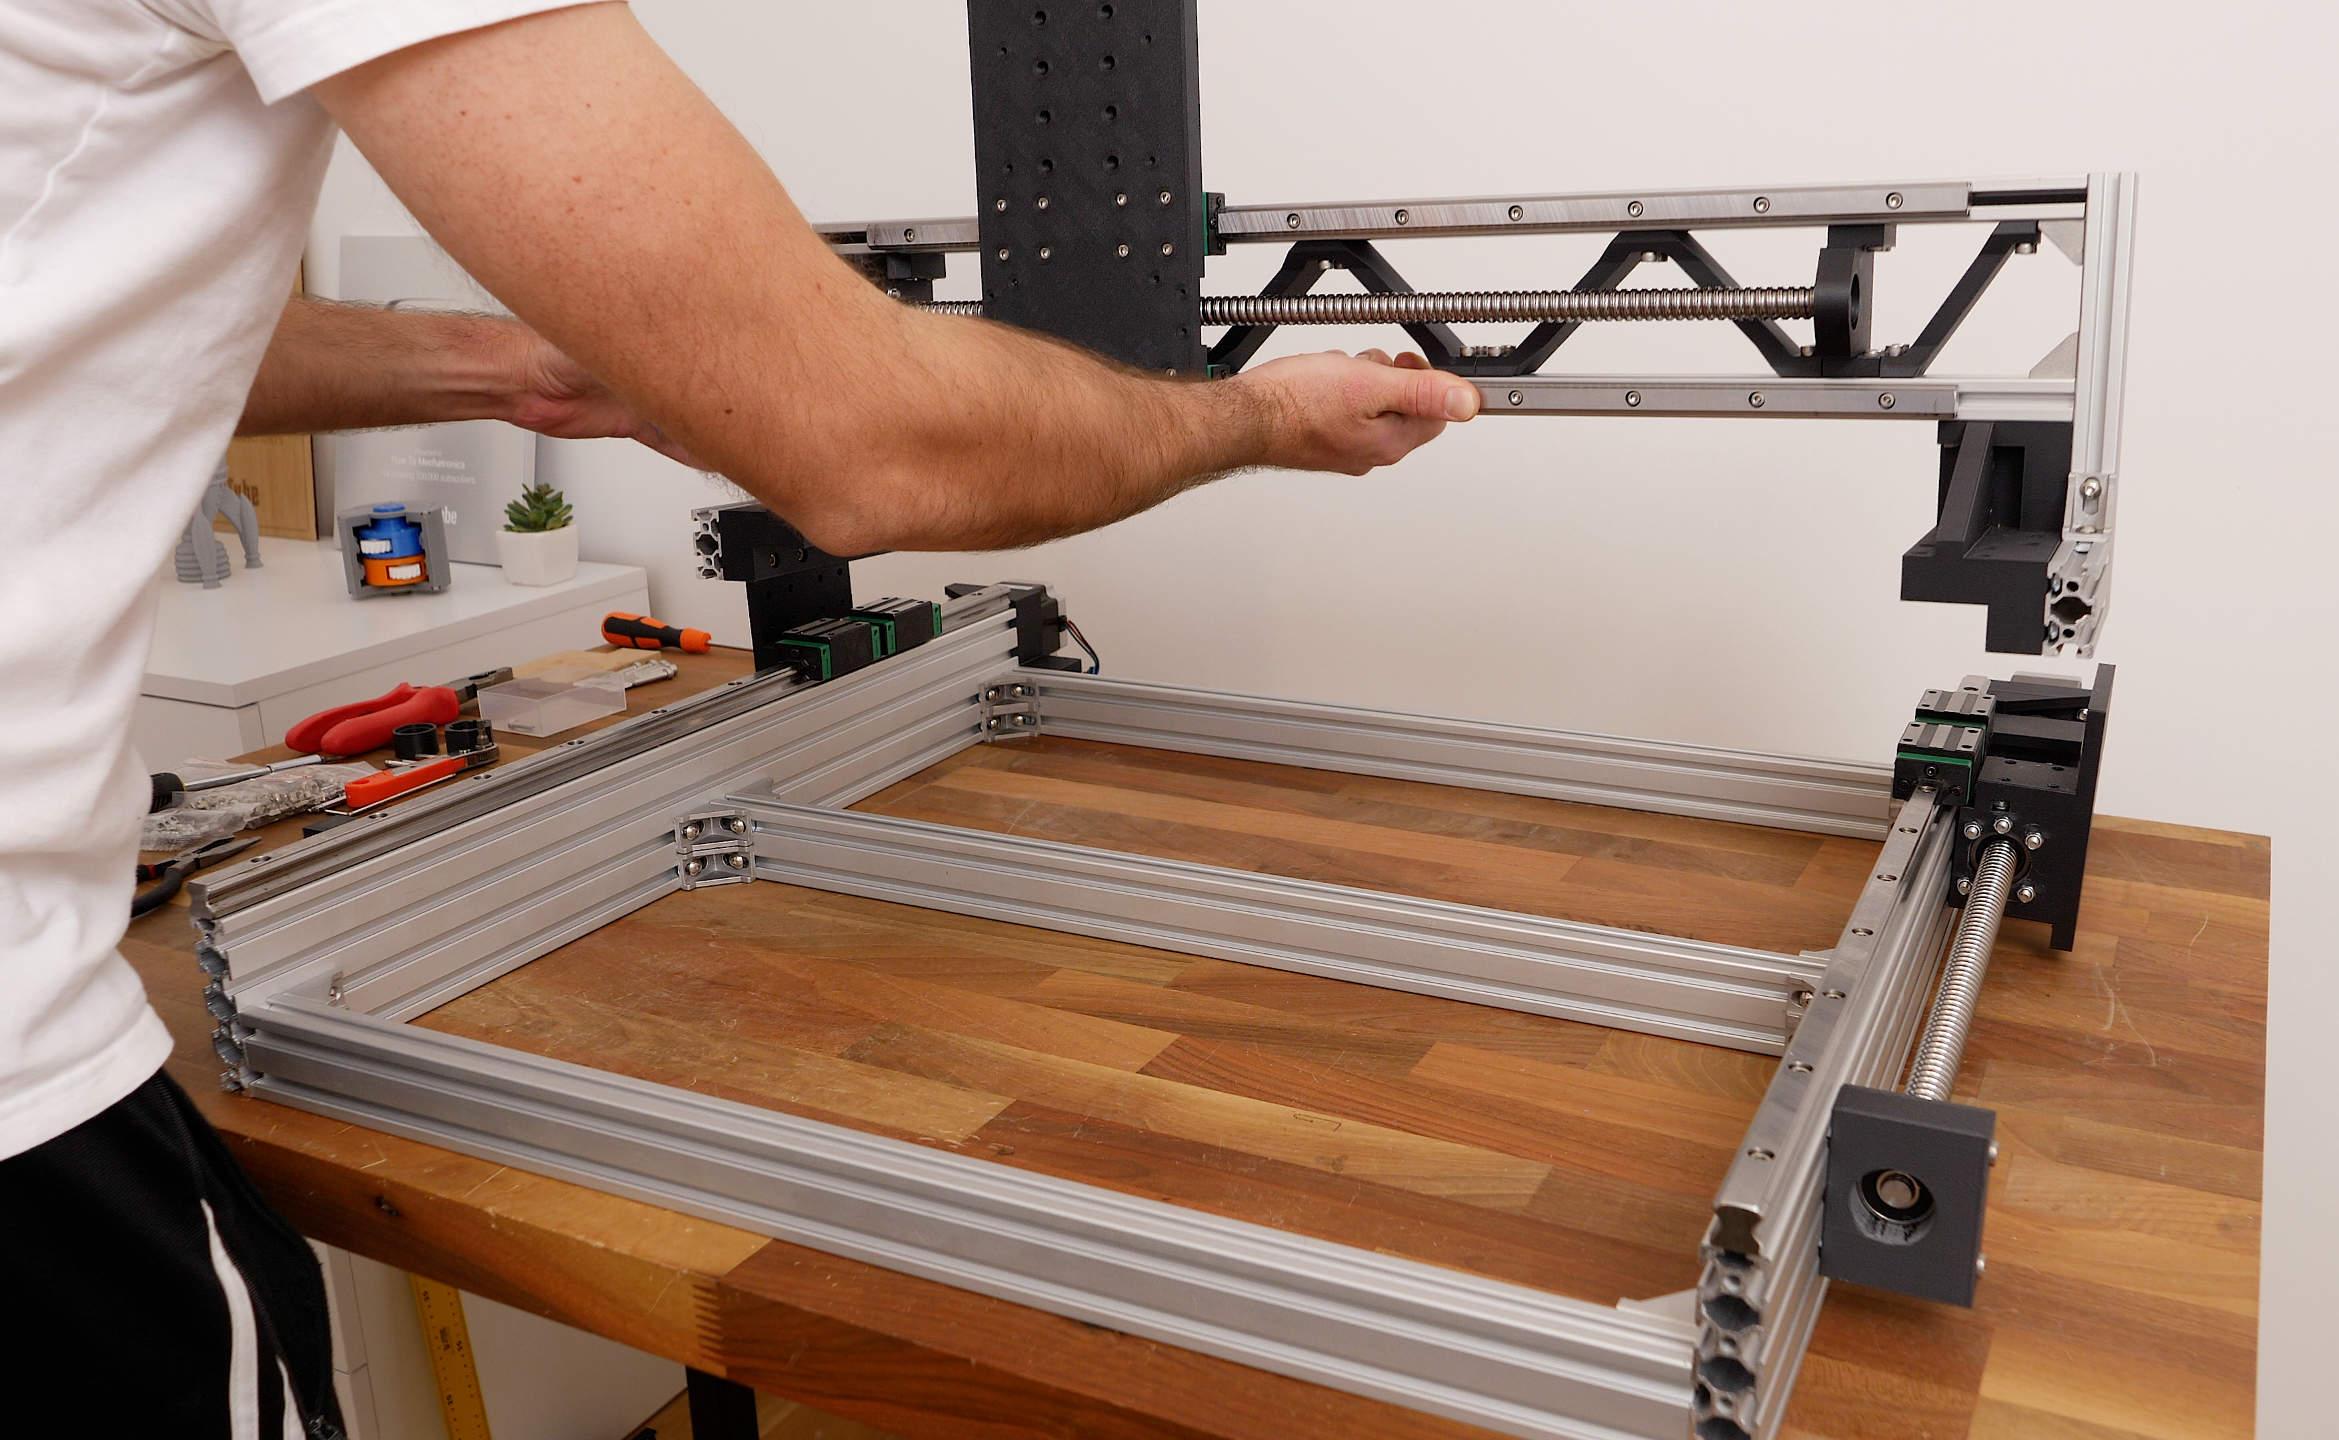
Assembly
You can follow the following video for a complete step-by-step guide on how to build this DIY 3D Printed CNC machine.
Electronics Overview
I decided to split up this CNC build guide, and explain the electronic and how to make the wiring and the control box of this CNC machine, as well as how to setup the machine and do your first cuts with it, in my next video.
Real quick, this CNC machine is based on Arduino and GRBL. I used an Arduino UNO in combination with a CNC shield for easily connecting everything and for driving the NEMA23 stepper motors, I used DM542 stepper drivers.
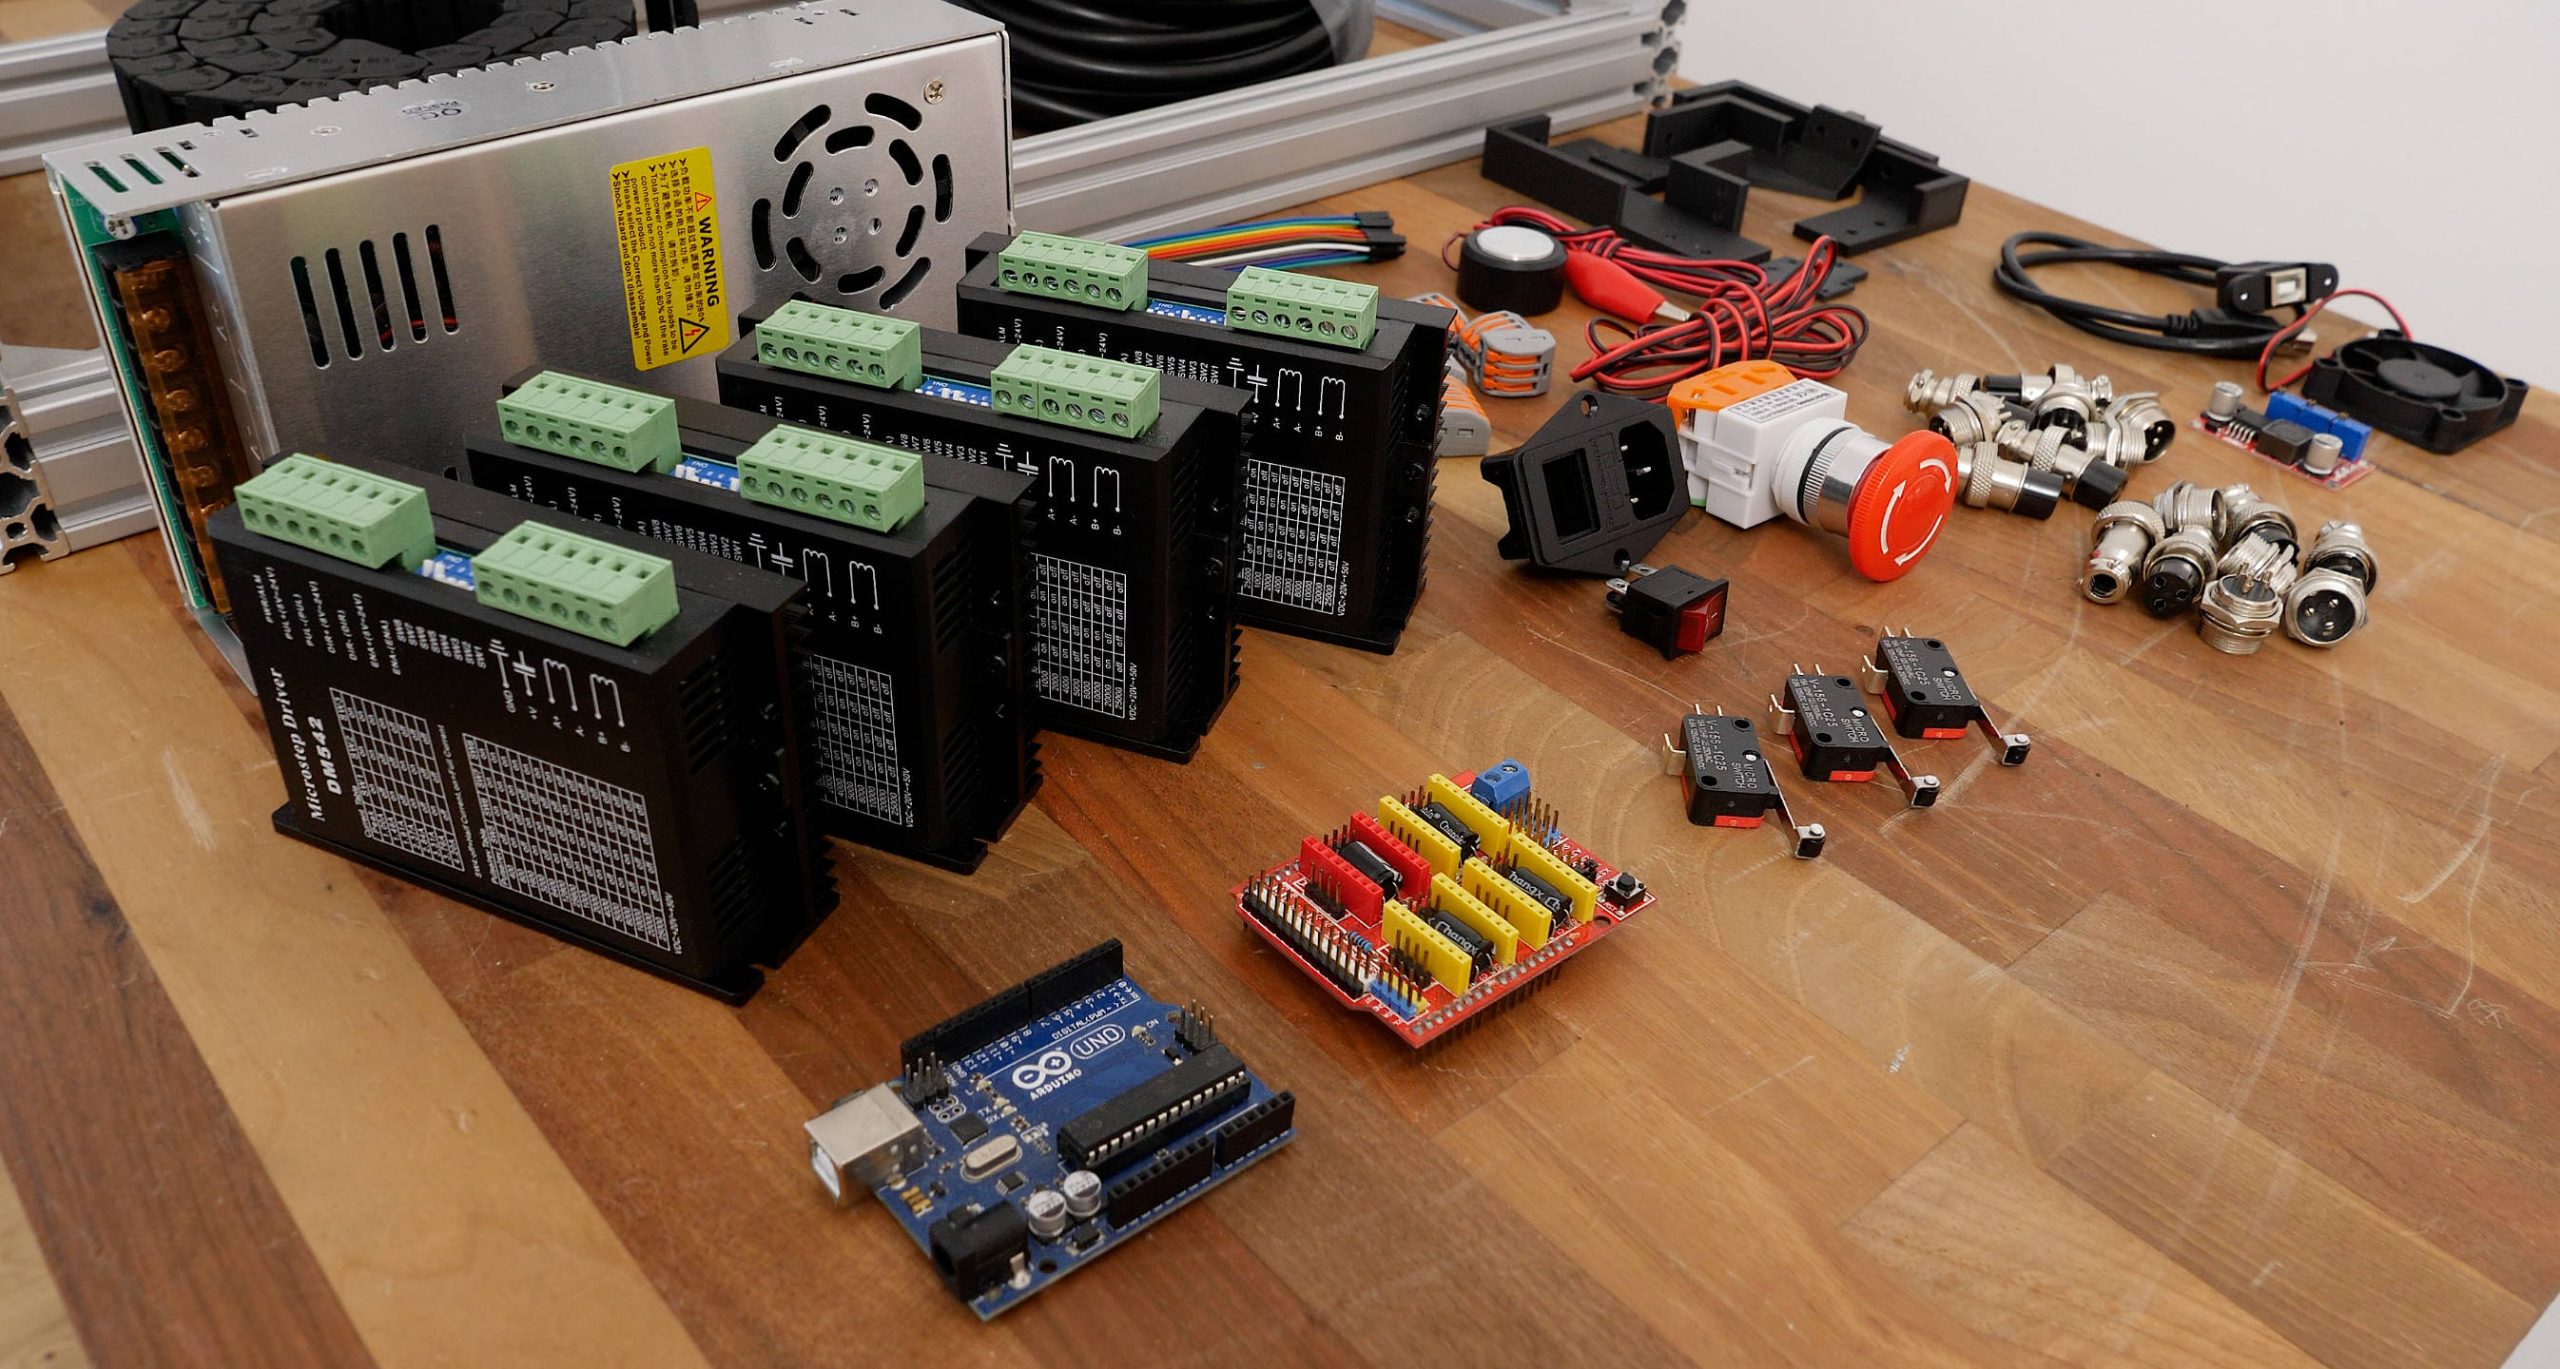
The motion control firmware is GRBL, and for controlling the machine and sending G-codes to it I used the Universal G-code sender, they are both open-source.
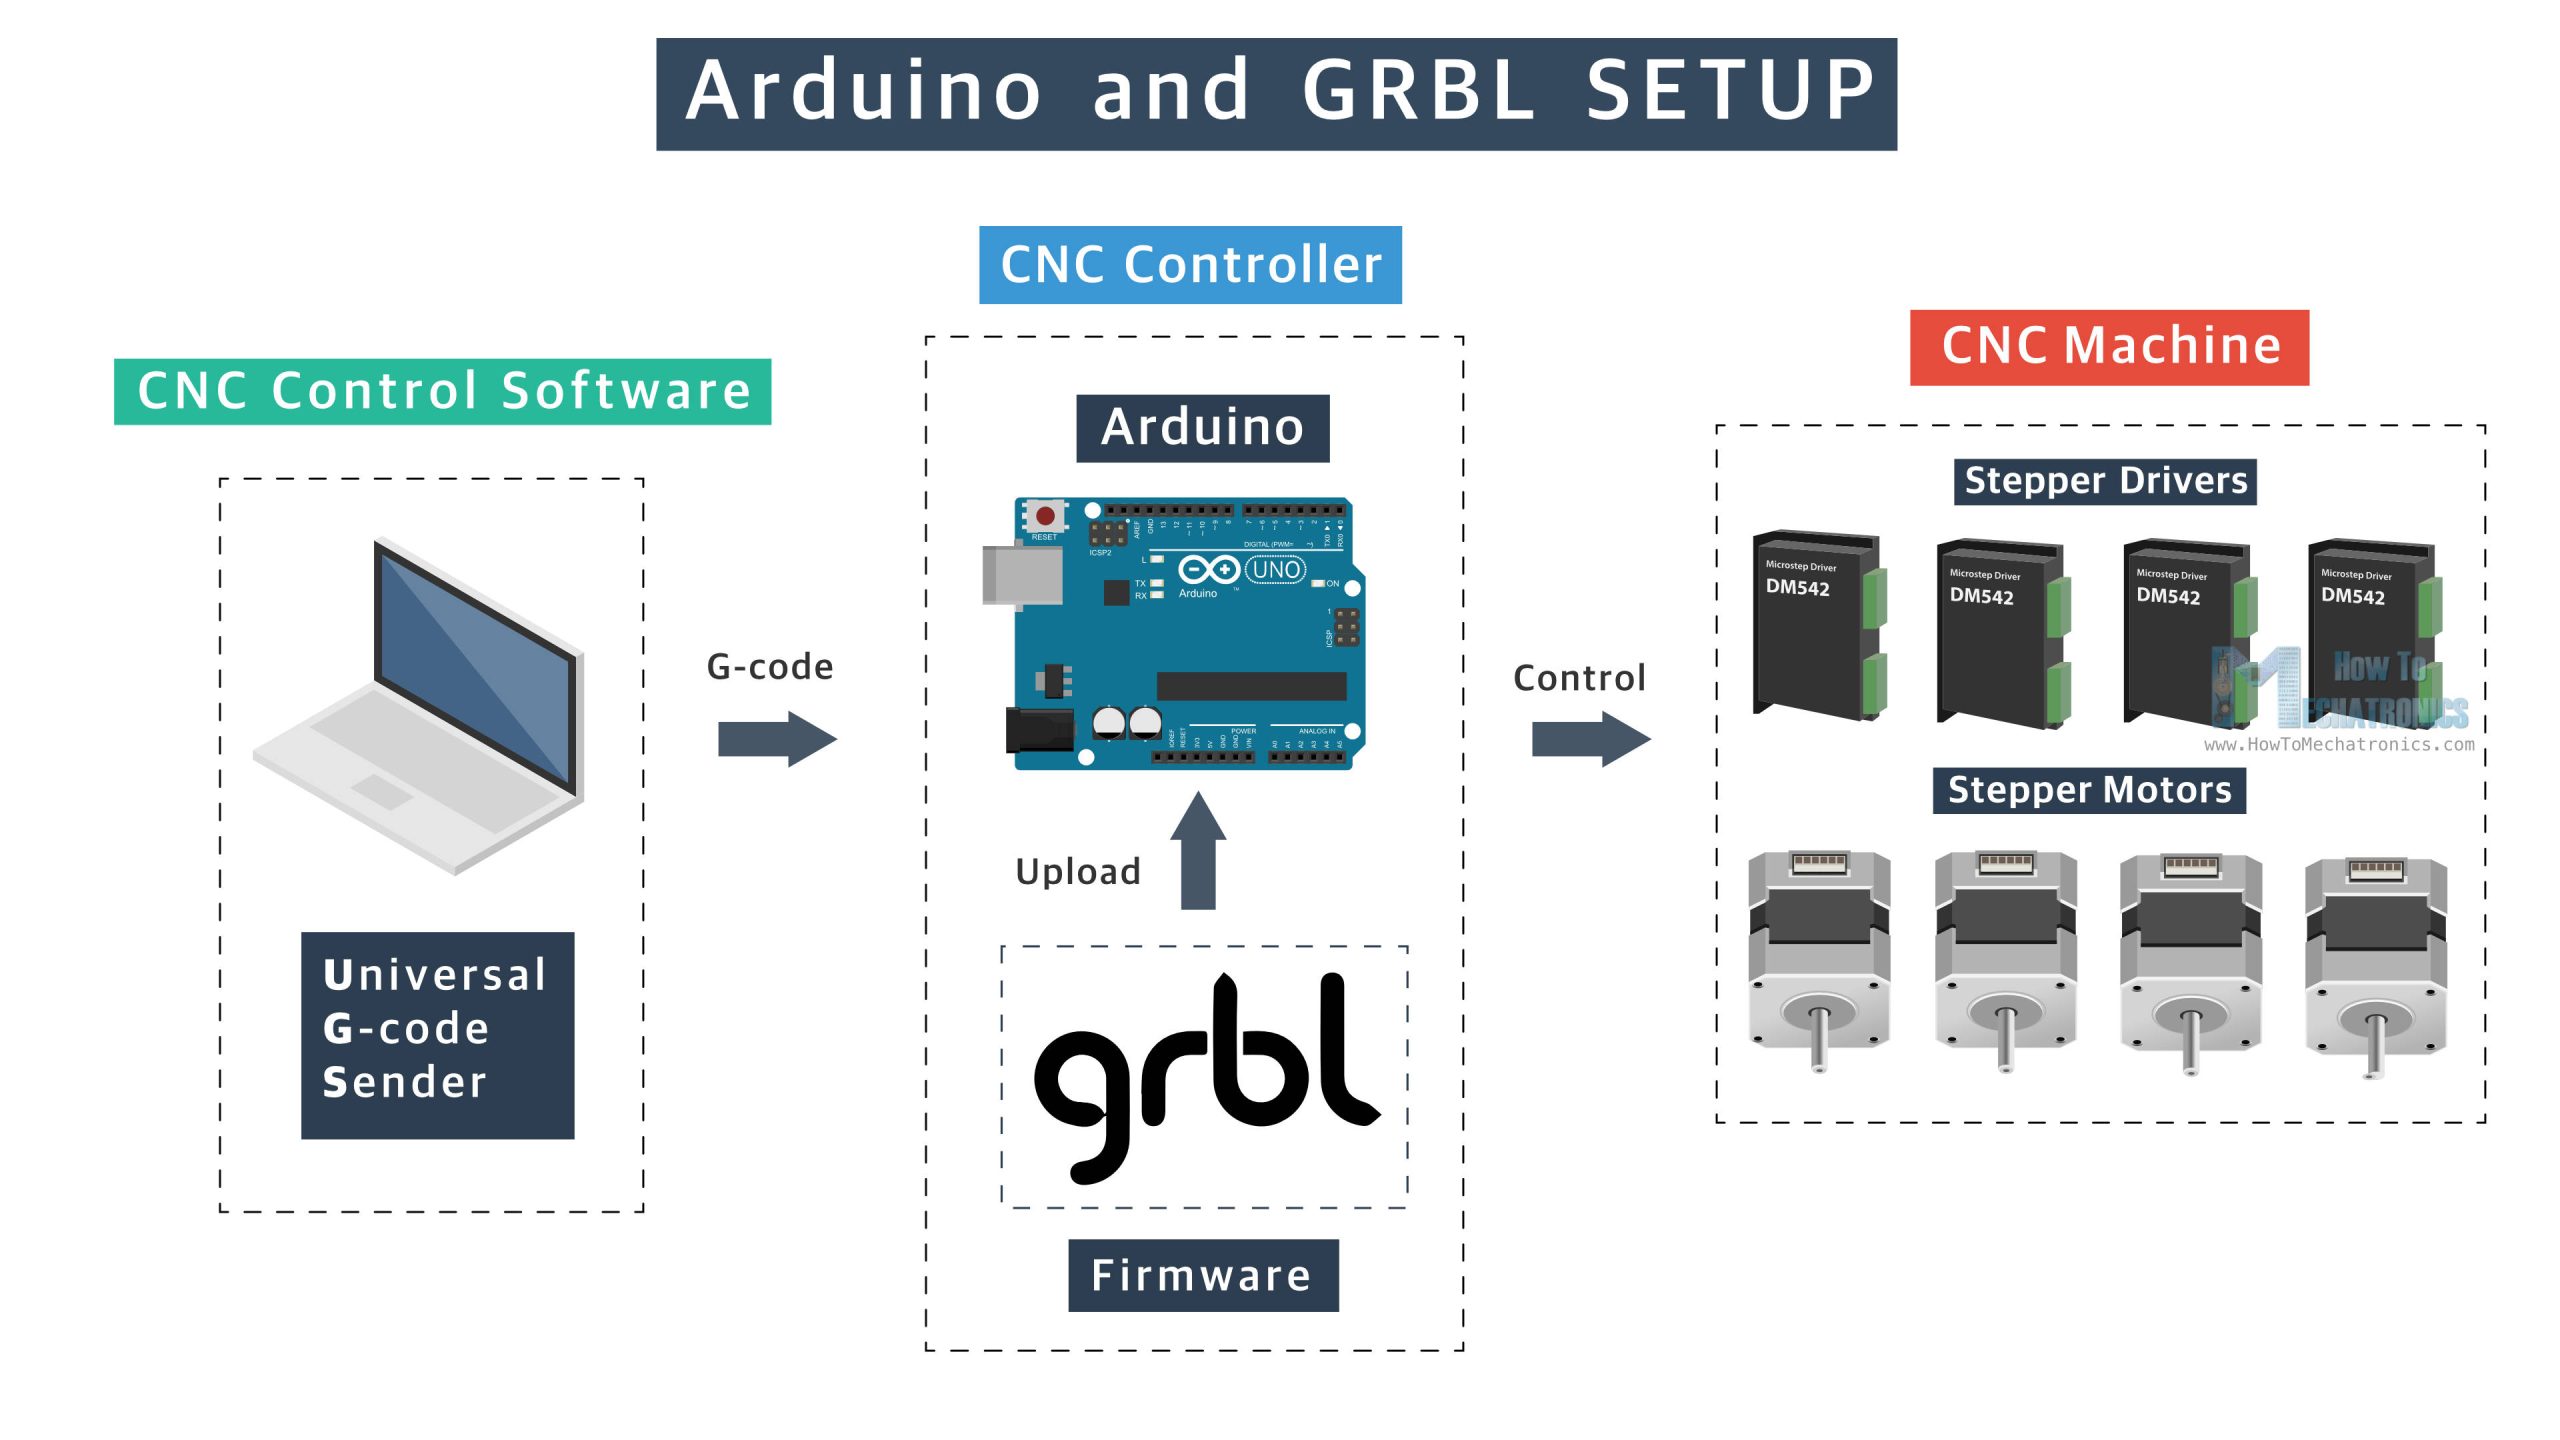
I mean, it doesn’t have to be Arduino and GRBL; we could use any other CNC controller with this CNC build like for example, LinuxCNC, grblHAL, Mach 3 or Mach 4 and others. This Arduino and GRBL combo is the simplest and cheapest option for a CNC controller, but of course, it lacks some advanced features like real-time control and better configurability. If you are not comfortable making the control box on your own, there exist ready-to use CNC control boxes even with the cables for the stepper motors included.
Anyhow, for a detailed guide on how I built the control box for this 3D printed CNC router and how to setup the GRBL and control the machine, check out the next video. There will be also a separate video where I will show you how to make the waste board and the dust shoe for this CNC machine, as well as explain in detail how to get started and make your first cuts on the CNC machine and how I made these demo projects that we are seeing here.
Before we end this tutorial, I would like to show you a few more things, or how rigid and accurate this machine is, and how much it costs to build it.
Rigidity and Accuracy
For demonstrating the rigidity of this CNC machine, I inserted a 6mm shaft on the router and using a dial indicator I will measure how much the machine will deflect when a force is applied to it. I’m using a force meter and a dial indicator for that purpose.
The measuring tools:
Force meter: Amazon | AliExpress
Digital dial indicator: Amazon | AliExpress
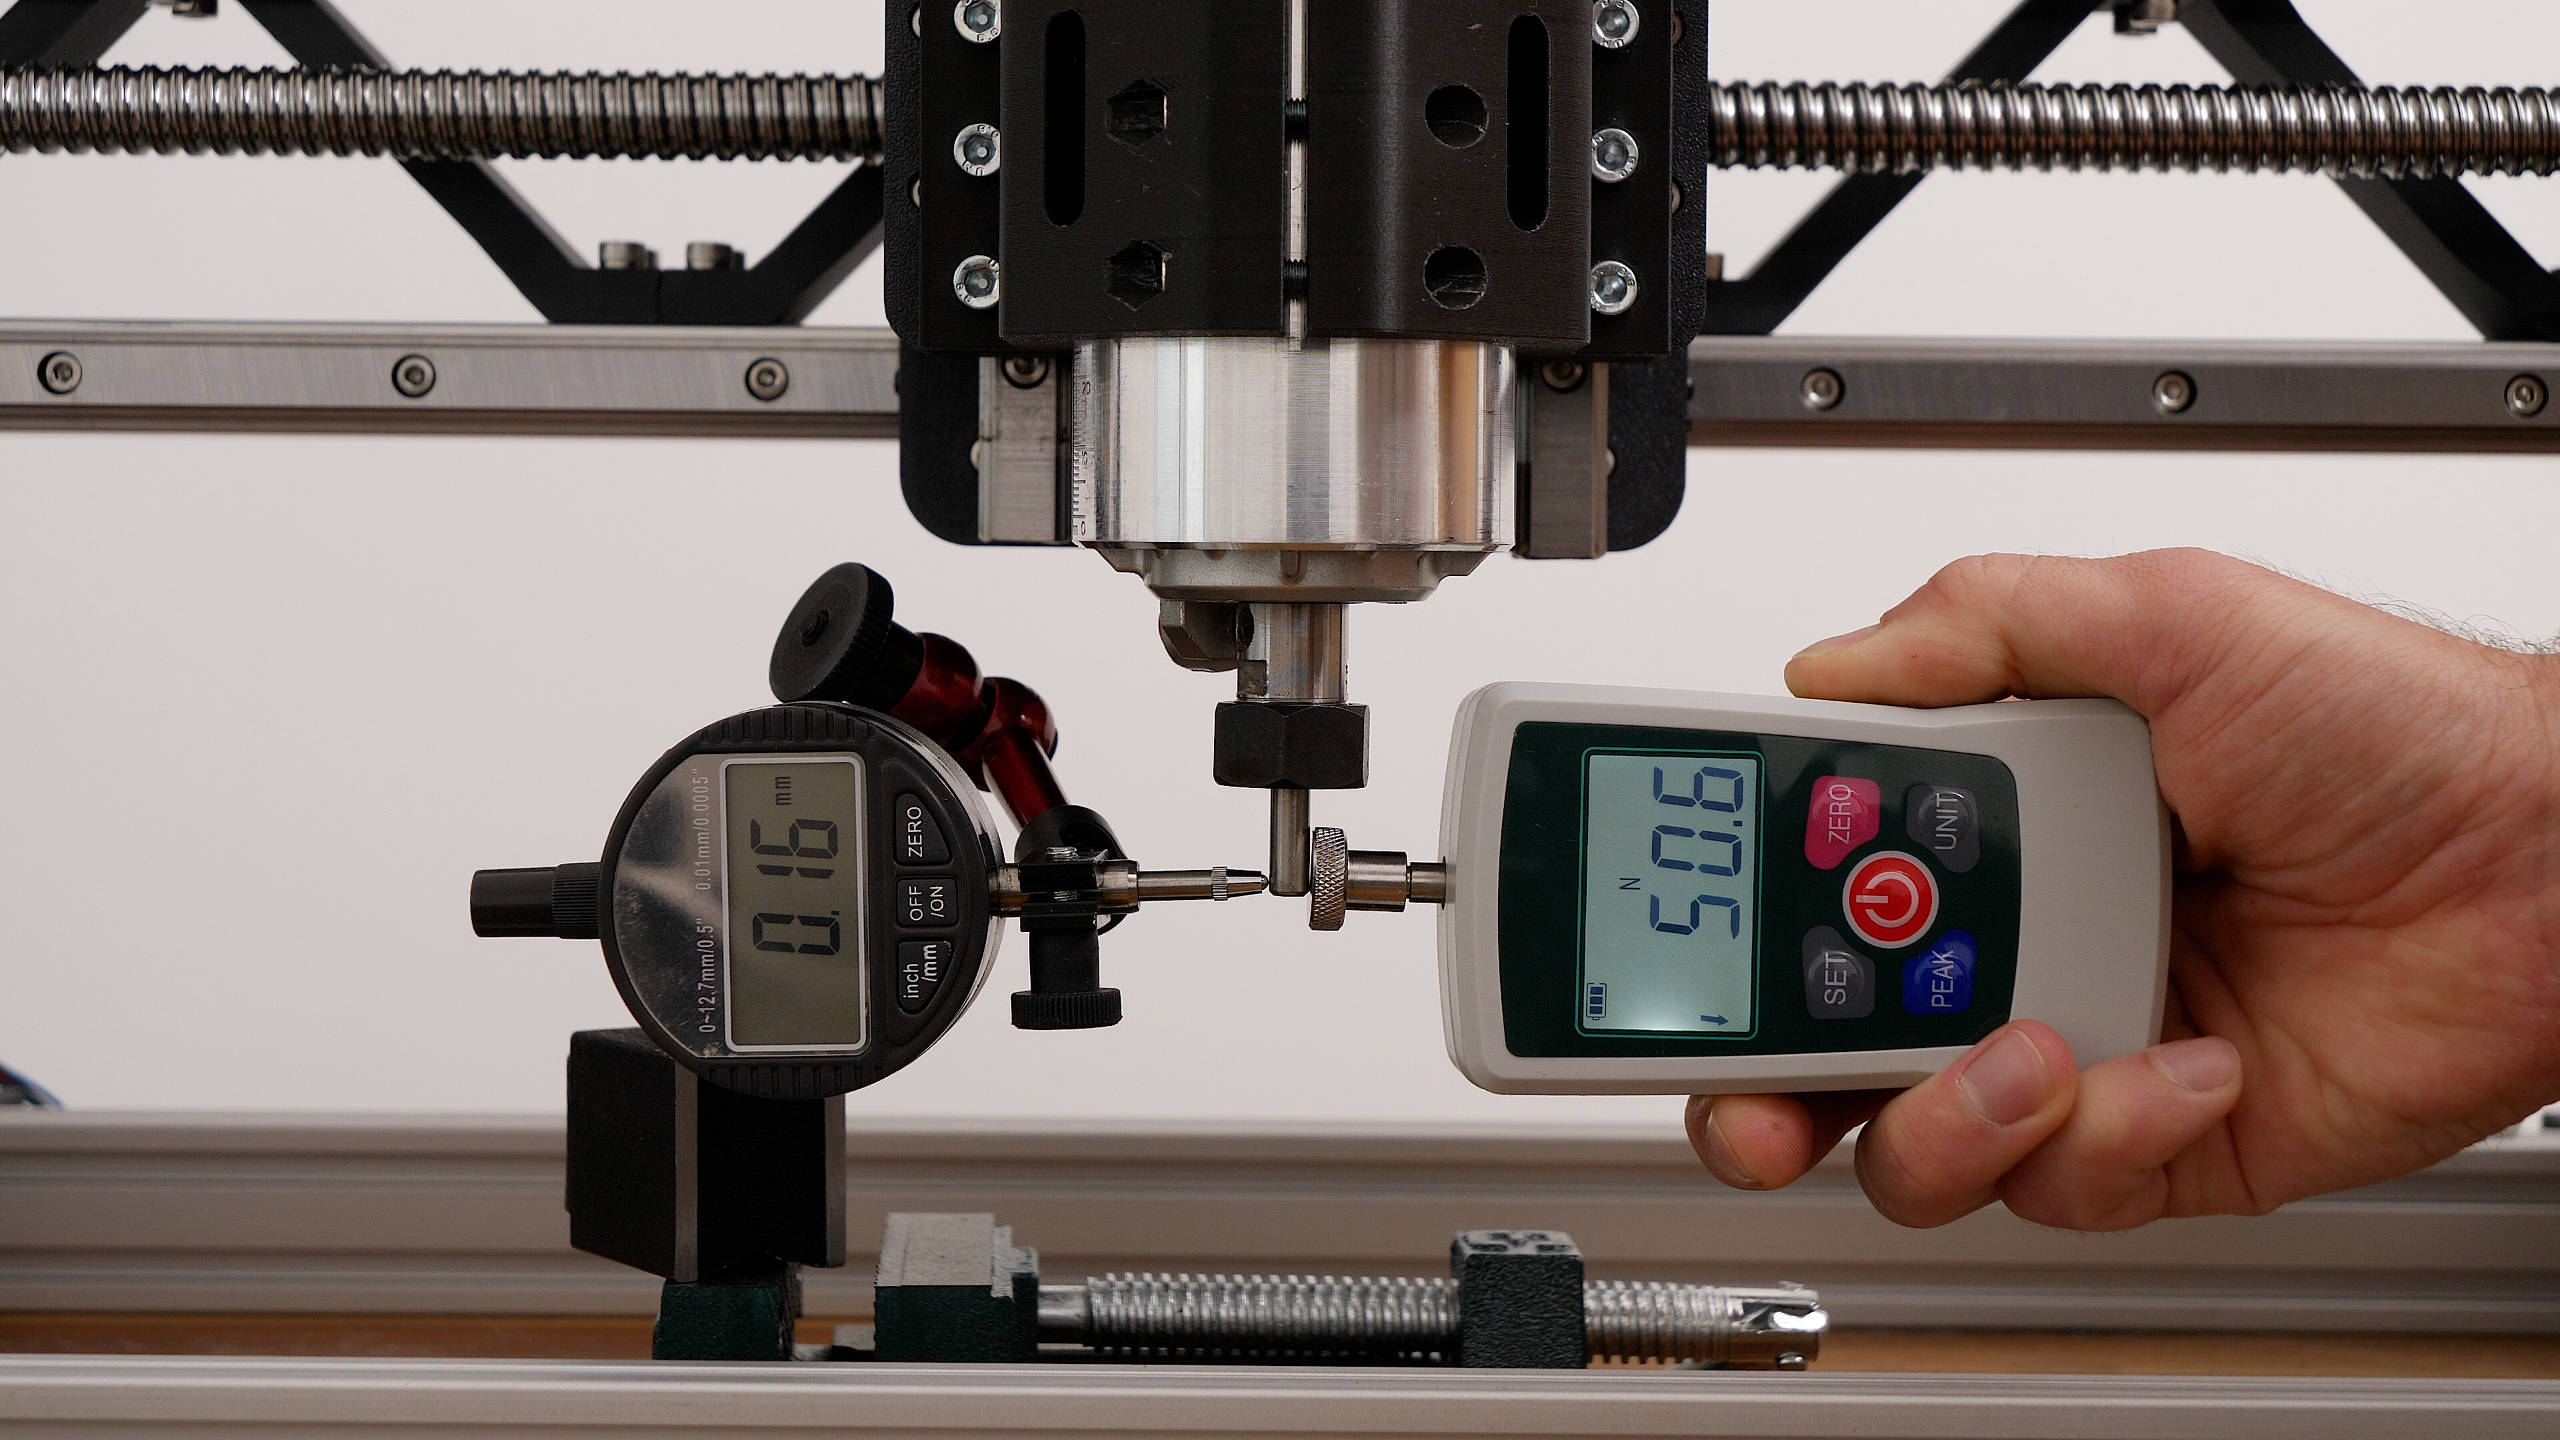
First, I’m testing the X-axis rigidity. At a force of 50N, the end mill deflects around 0.16mm, or 0.24mm at a force of 70N. On the other hand, the deflection in the Y-axis was around 0.22mm at a force of 50N, and around 0.32mm at a force of 70N.
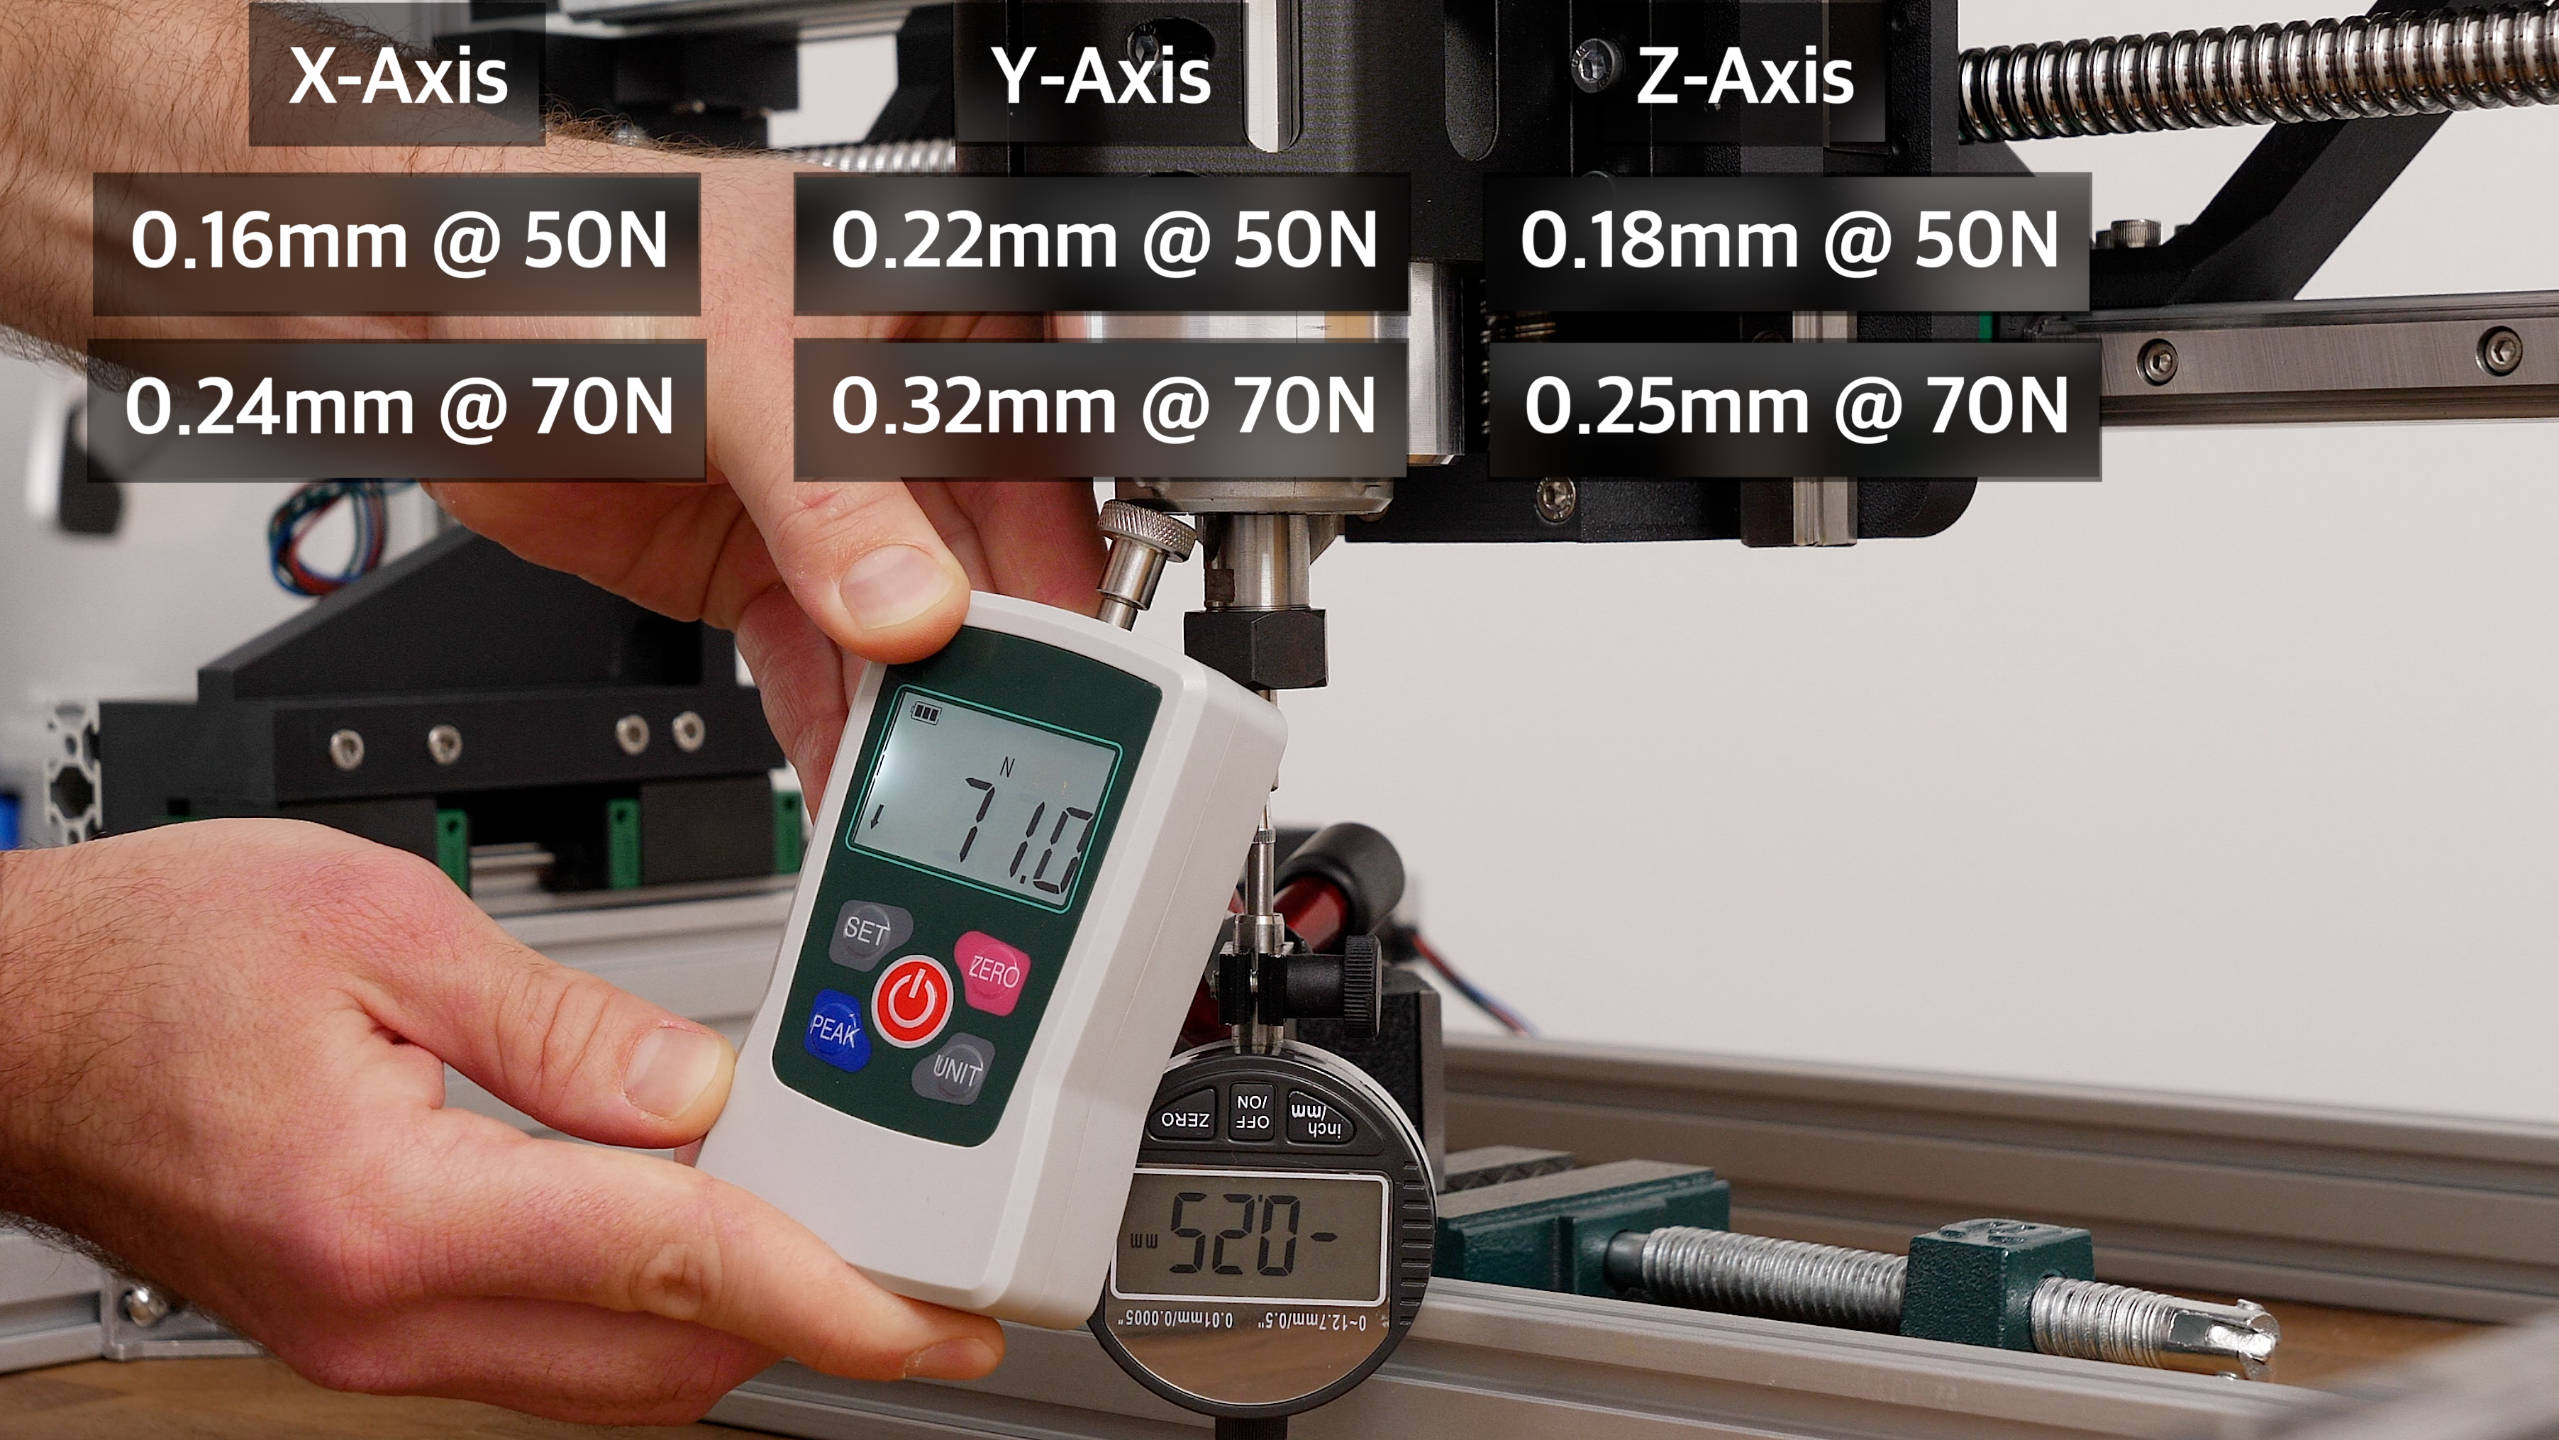
That’s a little bit worse result, but it was expected as this is a gantry style CNC machine which usually has less rigidity in the Y-axis compared to the X-axis.
As for the Z-axis rigidity, I measured around 0.18mm deflection at a force of 50N, and 0.25mm at a force of 70N.
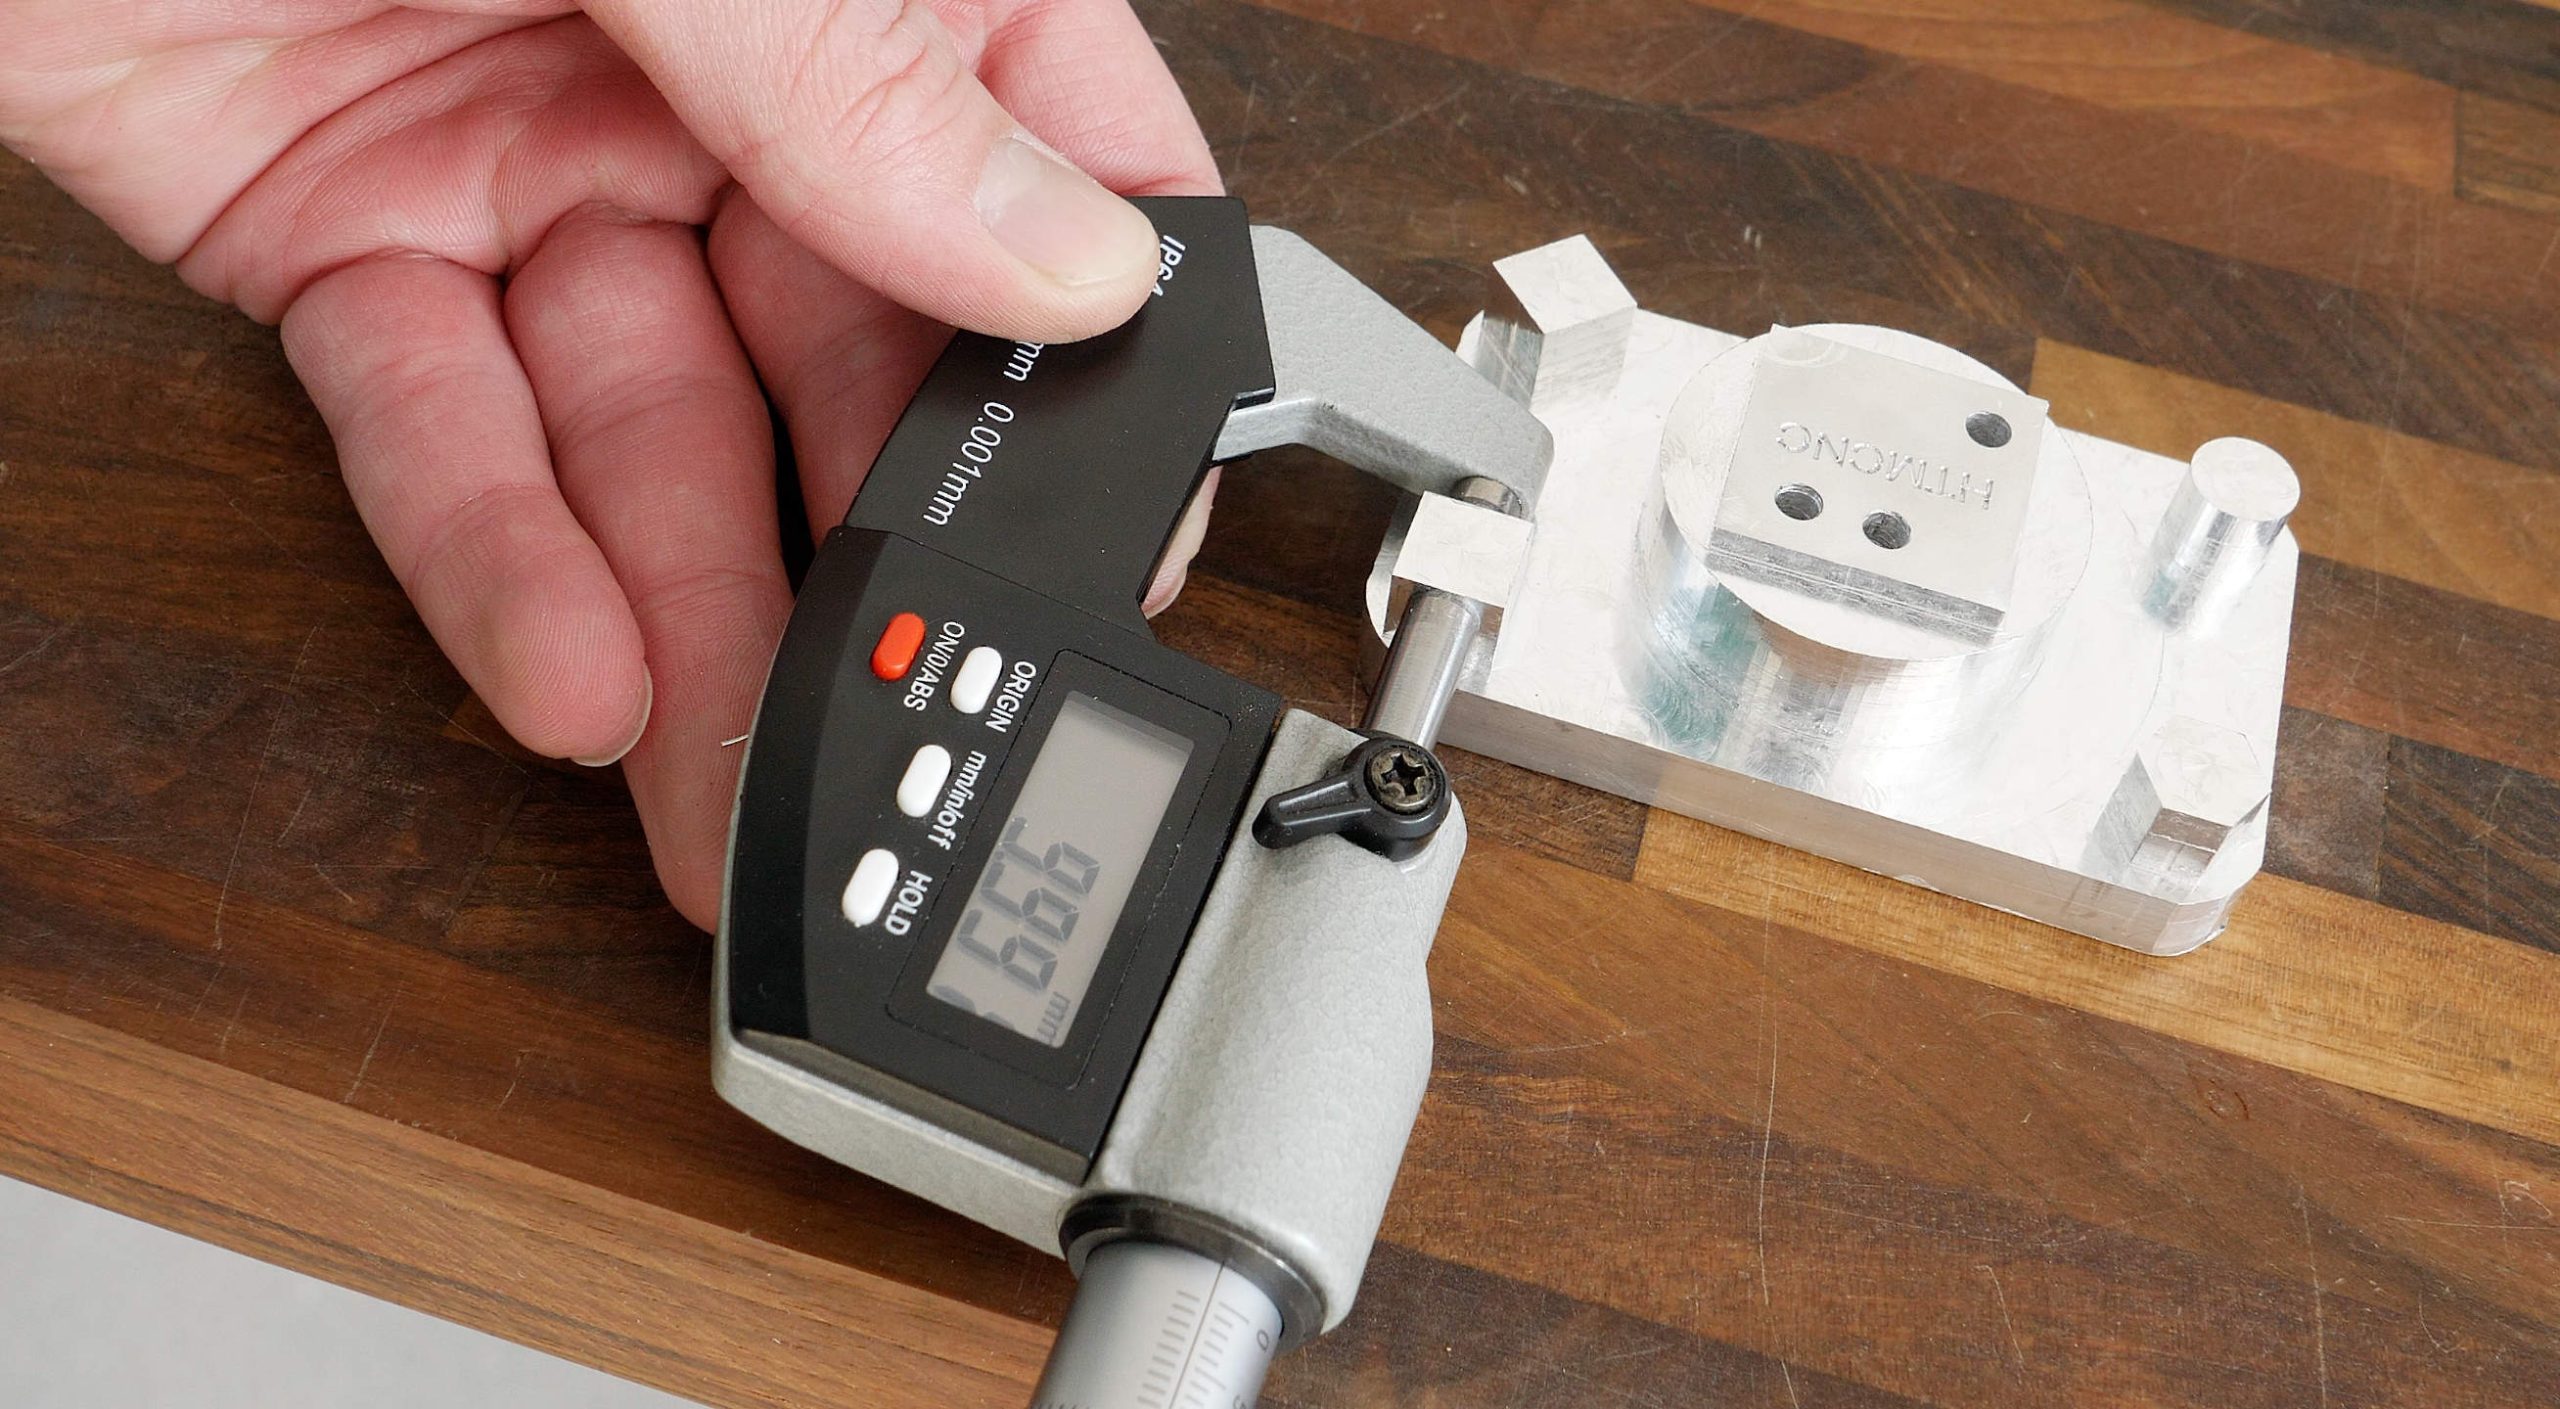
This rigidity of the CNC router resulted in accuracy within 0.06mm when cutting aluminum using appropriate feeds and speeds.
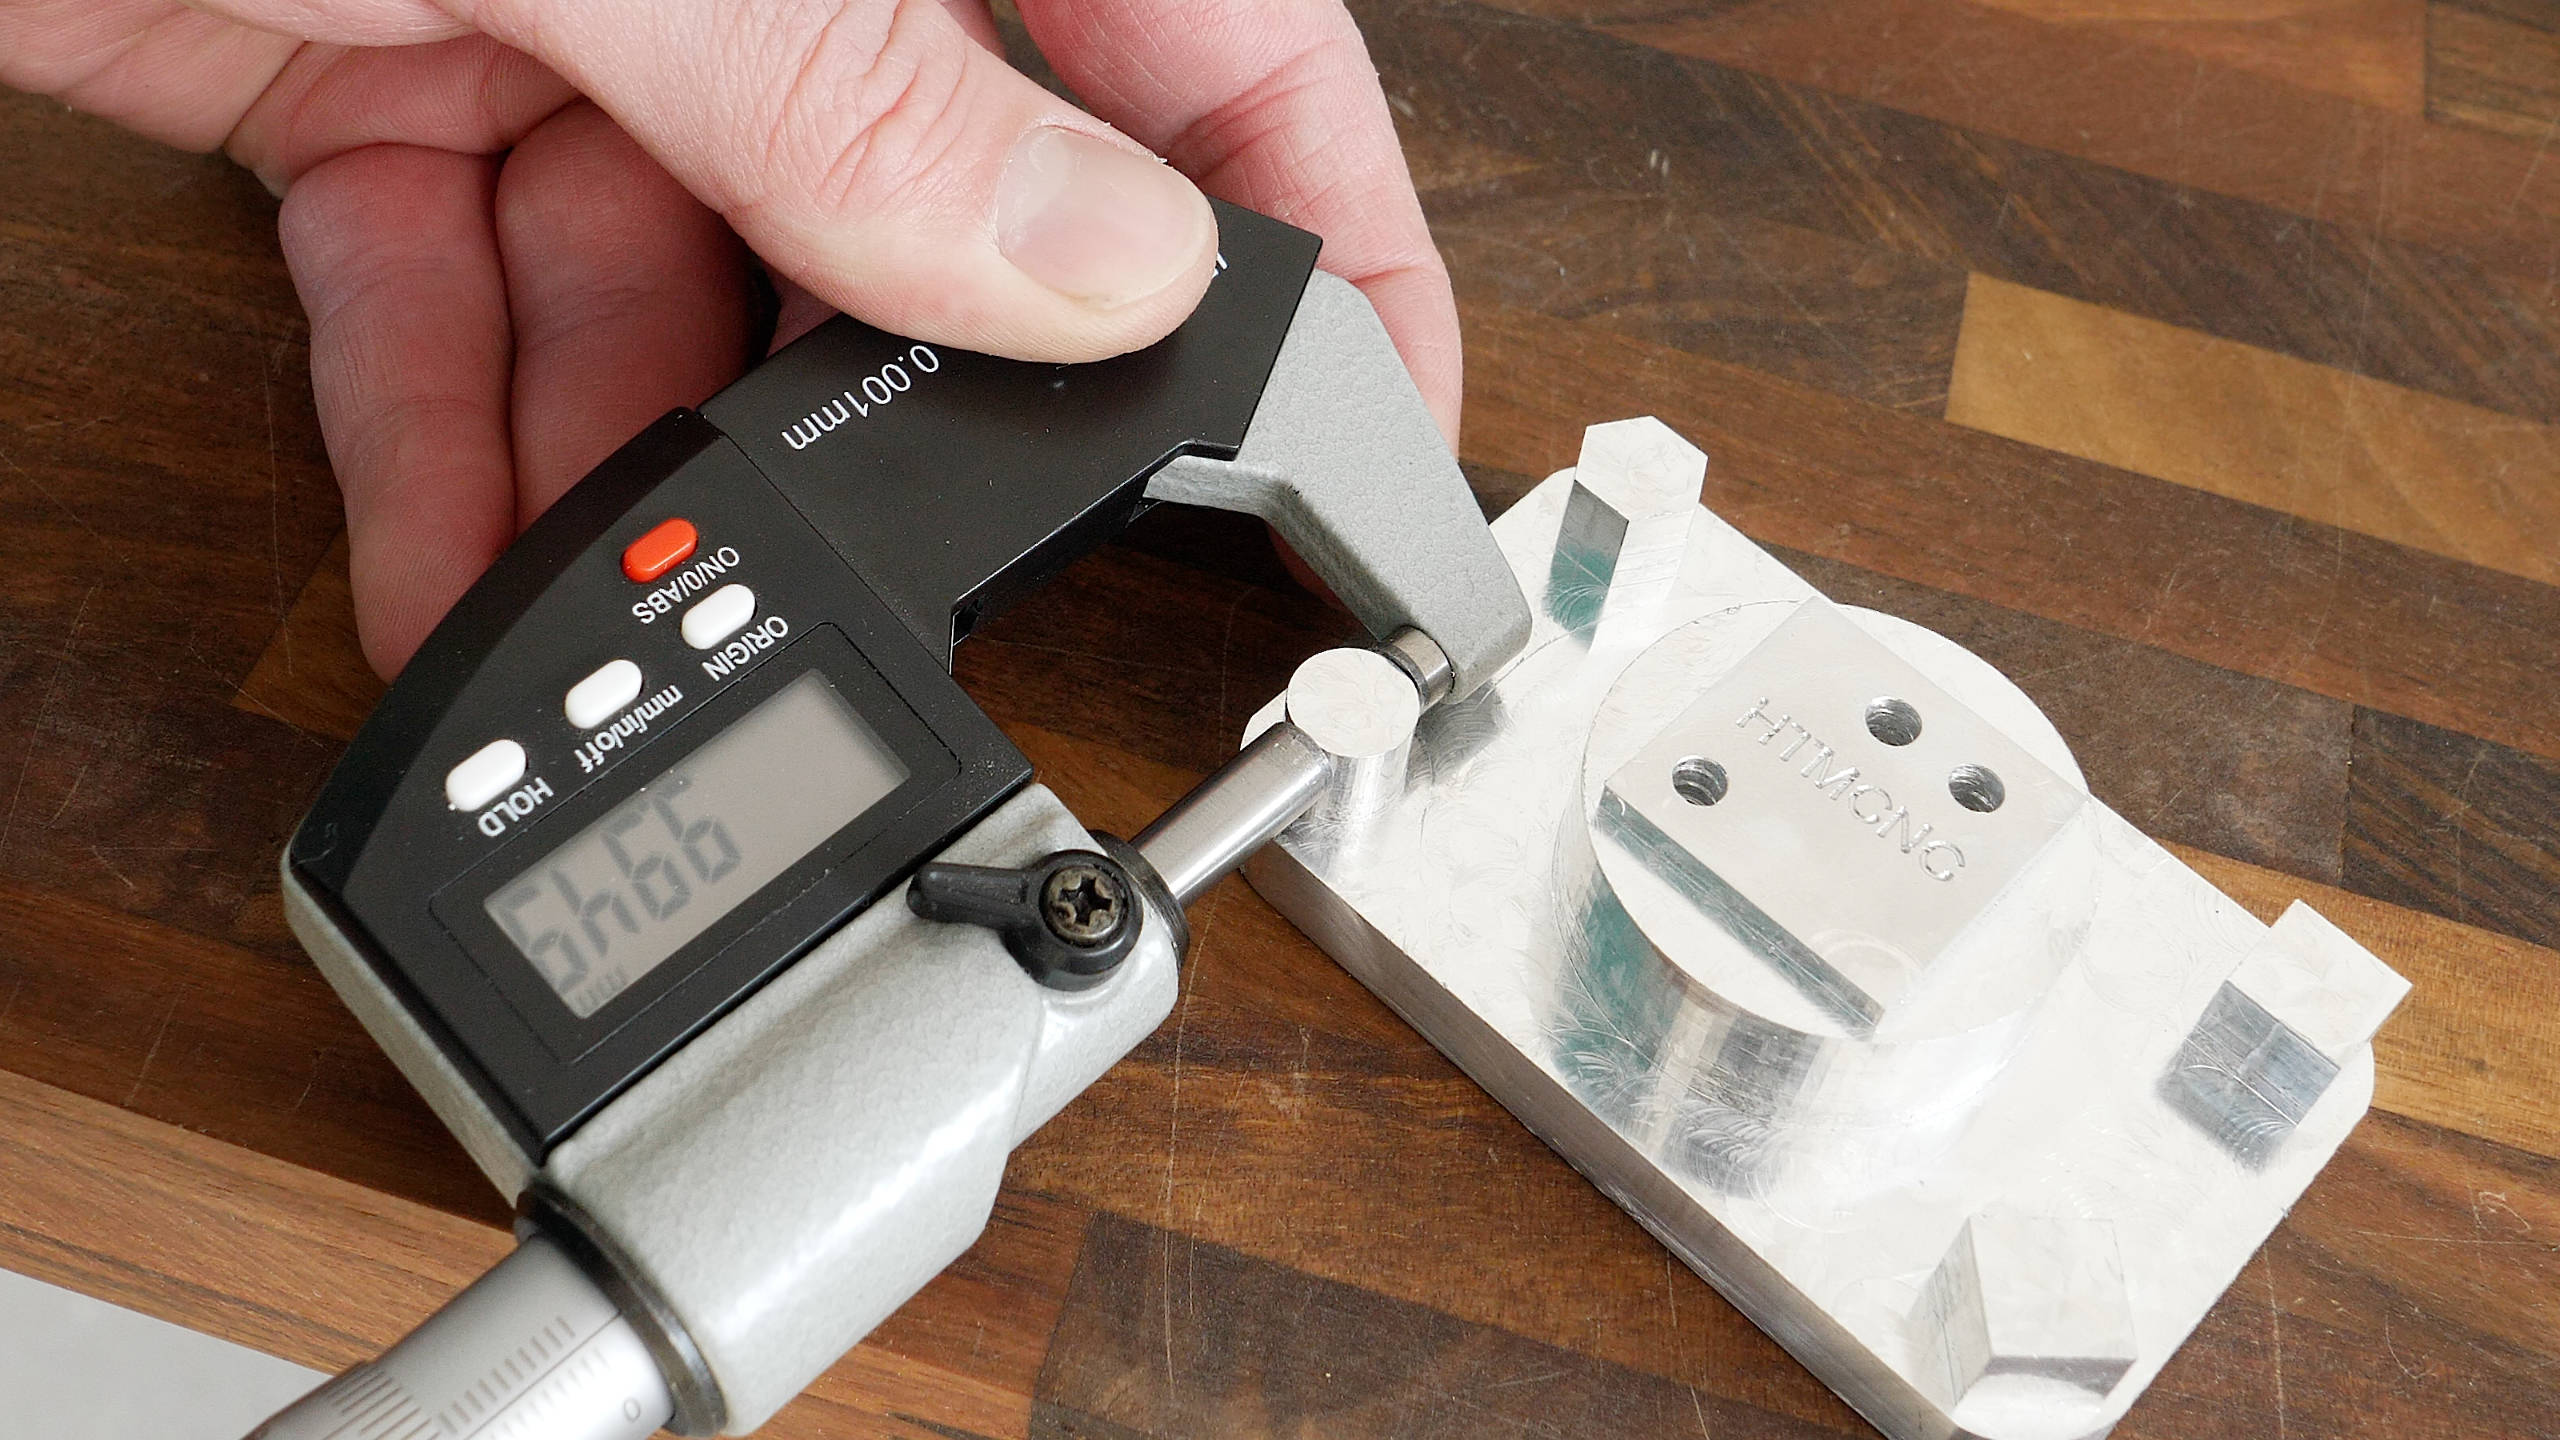
I made this test part out of aluminum with the following settings. For the roughing, 4mm DOC, 1.2mm WOD and 1200mm/min feed rate. The offset was 0.3mm. Then for the final contour pass, 2mm DOC with 500mm/min feed rate. I measured the part with a digital dial indicator and all the shapes in all directions were within 0.06mm accuracy.
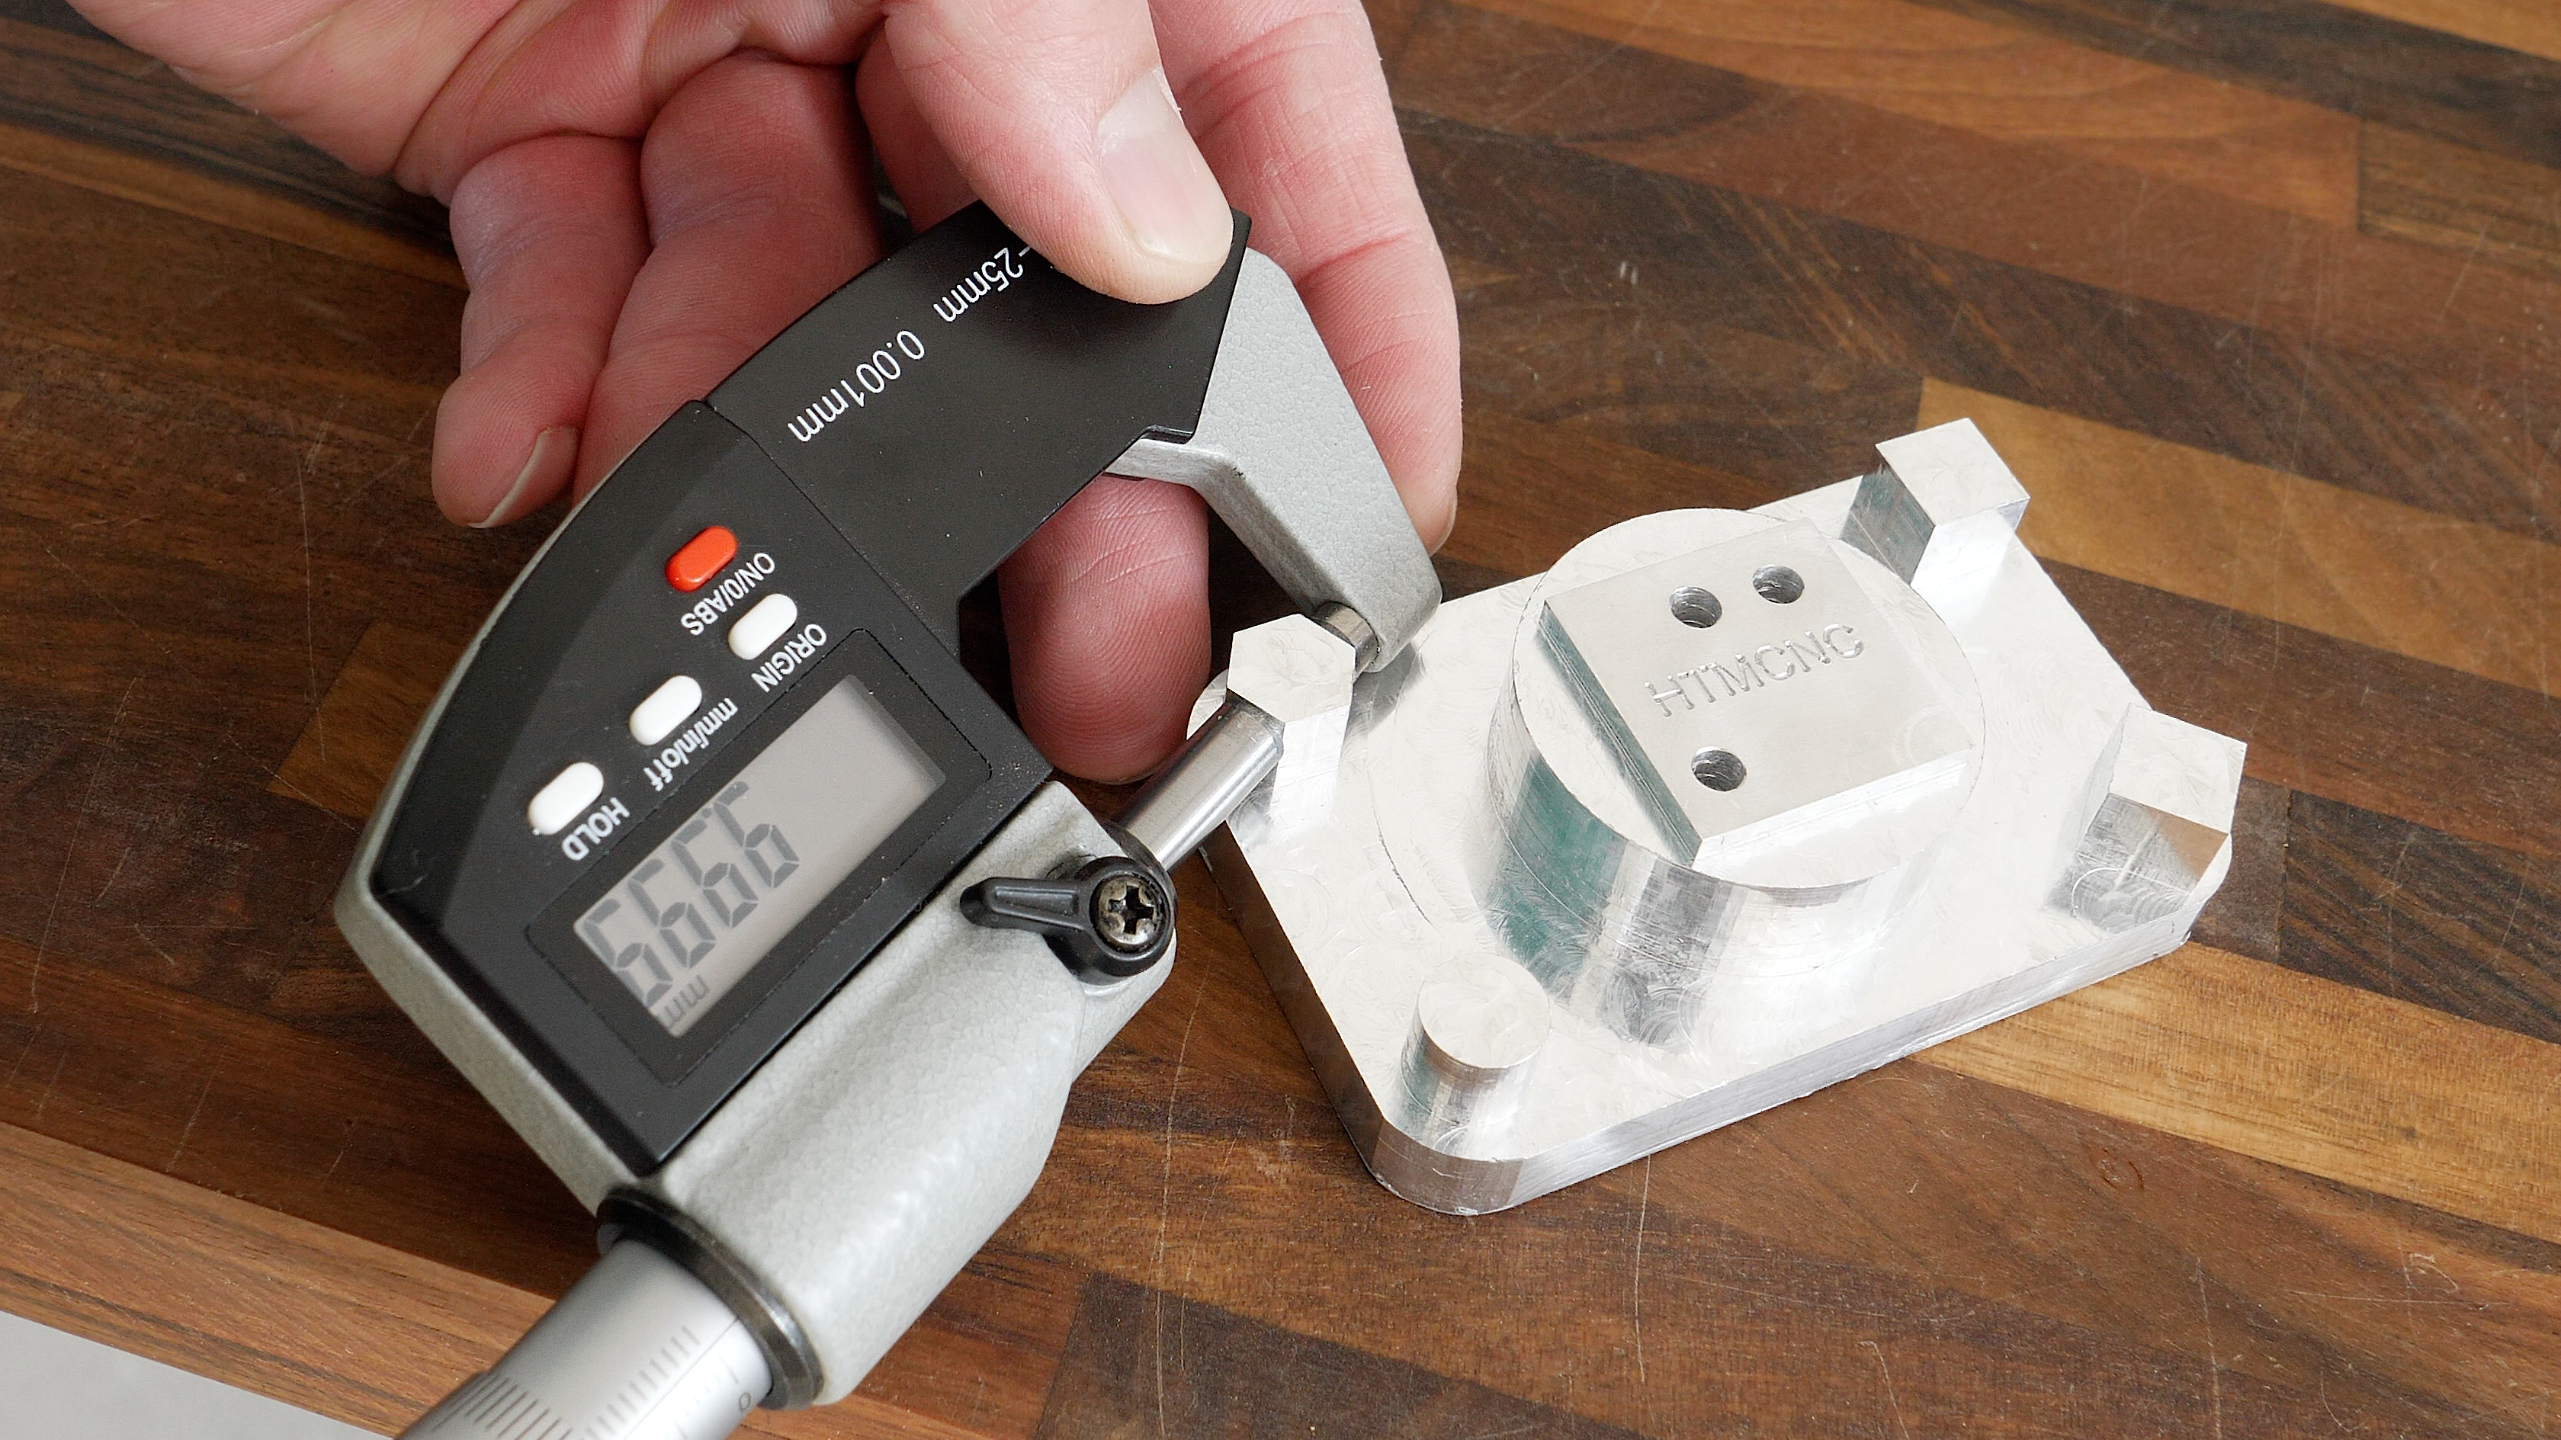
I will say it again; I think that’s a pretty decent result considering it’s a fully 3D printed CNC router, using a trimmer router and an Arduino and GRBL for the motion control.
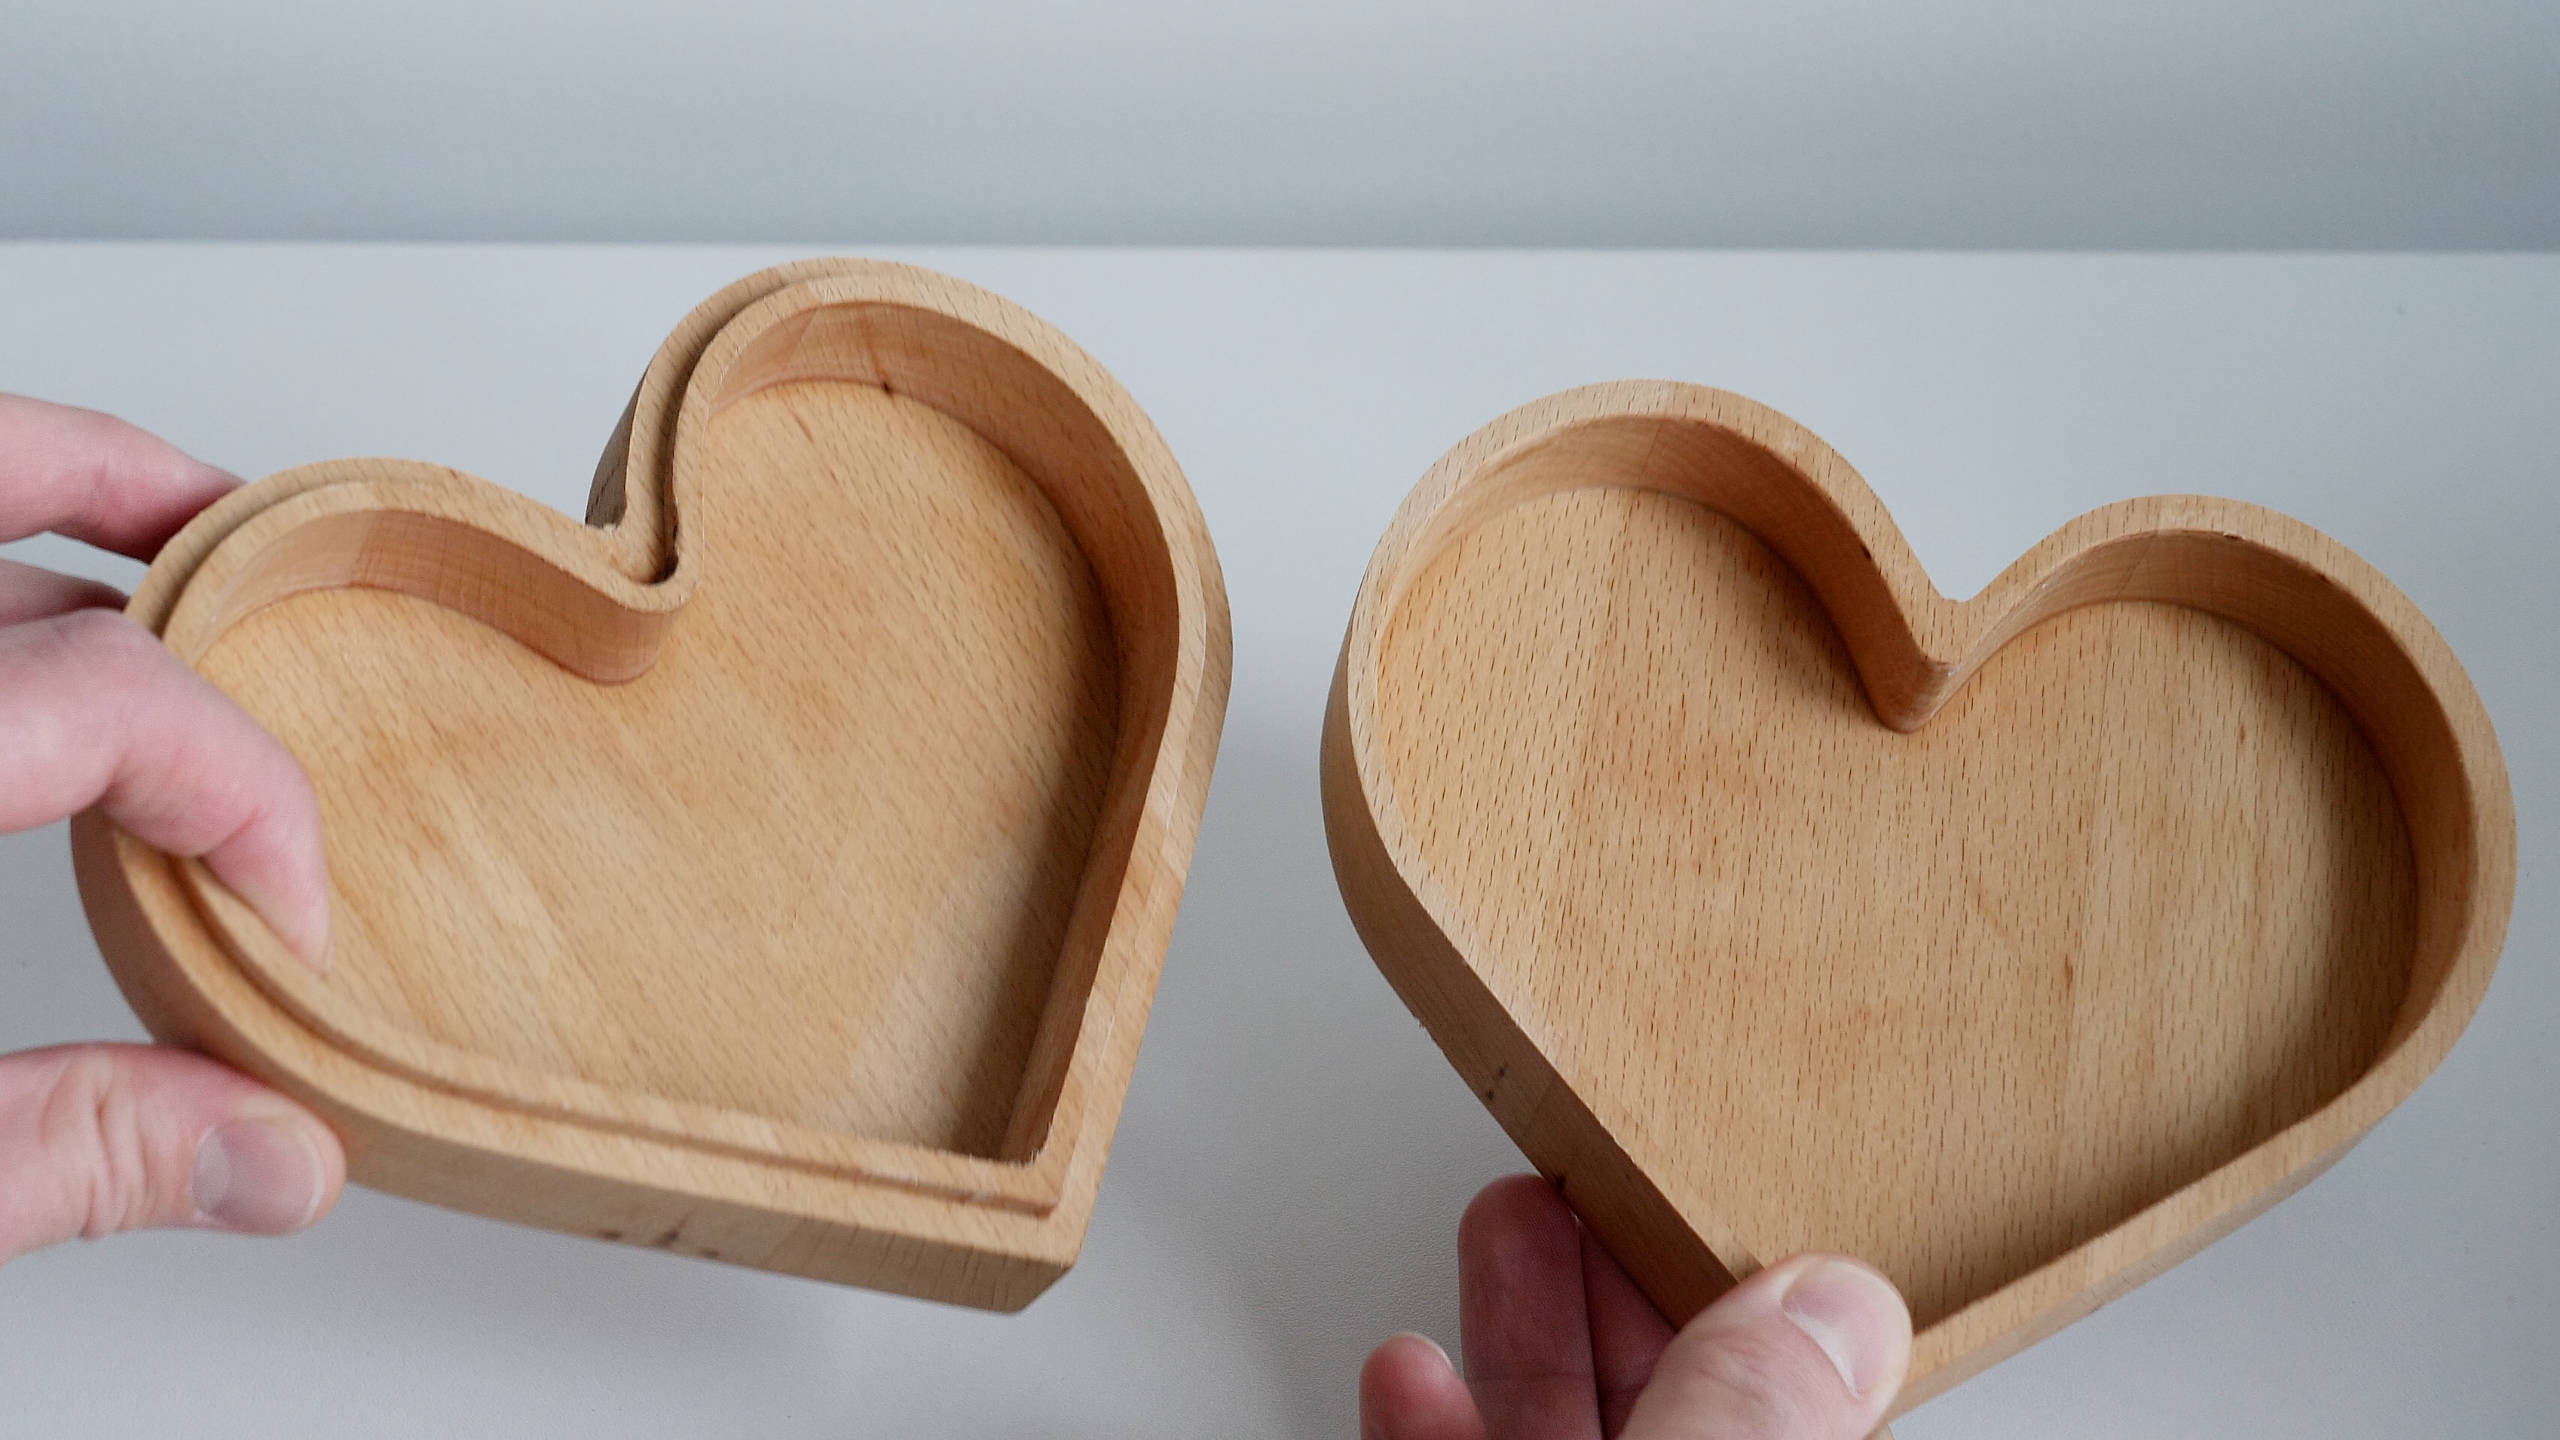
Showcase
Here are some of the projects that I made with this DIY CNC machine.
- 3D relief


- V-bit carving and roughing
- CNC inlay

- Aluminum engraving
- Brass engraving
- Machining a propeller out of aluminum
Nevertheless, stay tuned as more CNC related content is coming. I will also make a Discord or similar for everyone to share their experience building this CNC machine and make a community around it for solving problems and improving the machine.
I think this projects incredible.
How hard would it be to shrink it? I know you talk about making it larger but how much would change if each axis shrunk by 150mm?
Thanks. Well it’s the same concept, just shorter components instead. It should be a problem, just needs to be planned appropriately.
Hi, what an amazing project!
Looking forward to build one too
When approximatly will you publish the second chapter?
Thanks for explaining all the process and keeping it open source!
Hi, I’m glad to hear it, thanks!
The next part is coming in a week or so.
Cheers
Hi Dejan,
I’m starting to gather the materials needed,
any news on part 2 of the video?
love your work!
Hey, thanks. I’m a bit late with that video sorry, should be published in about a week.
Cheers
Awesome work, can’t wait to start sourcing and building. A discord channel for the build would be awesome to follow builds and follow upgrades. Great work Dejan
Hi, what coupler size did you use for the motors to the screws?
Not listed in the parts list
Thanks
Hey, the steppers I used had 8mm shaft, so I used a 8mm to 10mm coupler (the ball screw is 10mm). Yeah, that one is missing, I am adding it to the list now.
Thanks
This thing is pretty badass dude. I’m suitably impressed.
I’ve been thinking of building something similar to it, but extending the build area pretty significantly (1000mm x 1000mm probably) and also making a quick change “tool head” to support laser work as well. Would you mind if I used your stuff as a baseline? 🙂
Also, now that you have this thing machining aluminum, have you considered re-machining some of the 3d printed parts out of billet?
Hey, thanks! I would also like to make one with bigger working area. And sure you can build upon these stuff.
A new all aluminum version is also coming soon.
Cheers
Hi Dejan,
I absolutely love this project, As someone who has been looking to get into CNC for a while, I have been looking for a clear step by step DIY build, and this is perfect. I will definitely be doing this project!
When are you likely to be releasing part 2 regarding the electronics?
Once again, great work and thank you !
Soly
Hey, I’m glad to hear it, thanks!
Part 2 is coming in about two weeks. Sorry for taking me that long but I was waiting for some new parts so I can make some improvements of the control box.
Cheers
Hey Dejan,
Any update on when part 2 comes out with electronics information?
I bought the files but waiting till everything has been documented and released.
Thanks,
Brent
Hi, sorry for the delay part 2, some other stuff came out that I needed to sort out. Currently working on it, it should be published next week.
Cheers
Hello Dejan!
Is there an error in the component list or is my understanding in error? There are 2 Ball Screws for the X-axis and 1 for the Y-axis. Shouldn’t it be the other way around?
Thanks for your work
Hi, thanks for the input. That’s correct, I will update the list.
Cheers
Hello Dejan,
My congratulations for the project so far, I’m definitely looking forward for the control box part in order to start buying everything and finally having a CNC machine.
Moreover, one of my first project will be shaping a surfboard black ( milling EPS foam). With the max measure of 50x150x15 cm. Do you think I could expand the axis as much as that? The Z axis as well?
Thank you so much in advance
Hey, thanks! It’s possible to get 15cm working range in the Z-axis but it will need modifications on several parts, like the gantry height, the Z-axis plate and maybe the X-axis plate.
I loved the video and especially the attention to detail. It seems you probably over engineered it a bit, but the rigidity of the final build is possibly better than machines costing a lot more. Thanks for such a interesting and accessible build.
Hi Dejan,
I’ve watched quite a few videos on DIY CNC machines on Youtube, but this one caught my attention. I am extremely impressed with the attention to detail and the accuracy of the finished product. Unfortunately my 3D printer does not have a big enough build volume to print the x-axis plate, but I have friends that will be able to assist with that.
I am definitely making this one of my next projects. Thank you for the excellent work and sharing it with us.
Greetings from South Africa!
Hey, I’m glad to hear it!
Have fun building one and of course, stay tuned, as this project will get improvements and more related content is comming.
Hello Dejan!
I was just finishing my long time CNC project when your video came out and you made me think about some aspects that i want to revise on mine. I am doing almost all in aluminium 10mm plates and 2040 / 2080 profiles but loved your way of doing this “3d printer friendly” and i wasn’t aware of the PLA carbon fiber capabilities. Contratulations for the project and the video, i simply love your projects and how you share everything with the world.
The most important thing i want to say is that some years ago i built your robot arm (with the hobby servos) and since then I am always trying to make my own interactions and trying to have 100% own mechanical designs in my machines. You and your robot arm (and other projects) were super important so i can feel i can do it myself from stratch, because you make us understand how and why you get there, so I feel very motivated to walk my on path “from scratch”.
Super Thank you for your work, it really makes a difference.
Greeting from Portugal.
Pedro
Hey Pedro,
Thank you! I’m so pleased and happy to hear that I’ve influenced and made a difference in some of your works that you do. It’s the ultimate satisfaction actually and motivation to keep on working it that direction.
Cheers,
Dejan
Please can you tell me the approximate finished cost of this project (not including the Makita router. I understand that it will vary considerably depending on the country, but just a ball-park please (or just what it cost you).
Thanks
Hey, I’m still working on the BOM, but yeah as you said it depends a lot of where you live because of shipping and taxes. It’s around $1000 without the router and without the electronics control box. When the BOM will be complete you will be able to calculate exactly how much it would cost you. Also in the next video I will explain the electronics and make a cost breakdown and options for it.
Cheers
Hello,
I’ve been looking for a new project and i came across
your video on this bad a%% CNC. This is my next project
I’m excited about building it and cant wait to get started.
Moneys tight like always and my main board in my printer is burnt. i will probably order the parts or depending on the price i may just go ahead and get a new board or new creality.
i just wanted to say thank you for keeping IT open source
i will send pics and let you know how things are coming once i get all the parts to start it. thank you.
Hey, glad to hear it. Have fun building one!