In this Arduino Tutorial we will learn how to use the DHT11 or the DHT22 sensor for measuring temperature and humidity with the Arduino board. You can watch the following video or read the written tutorial below for more details.
Overview
These sensors are very popular for electronics hobbyists because there are very cheap but still providing great performance. Here are the main specifications and differences between these two sensors:
The DHT22 is the more expensive version which obviously has better specifications. Its temperature measuring range is from -40 to +125 degrees Celsius with +-0.5 degrees accuracy, while the DHT11 temperature range is from 0 to 50 degrees Celsius with +-2 degrees accuracy. Also the DHT22 sensor has better humidity measuring range, from 0 to 100% with 2-5% accuracy, while the DHT11 humidity range is from 20 to 80% with 5% accuracy.
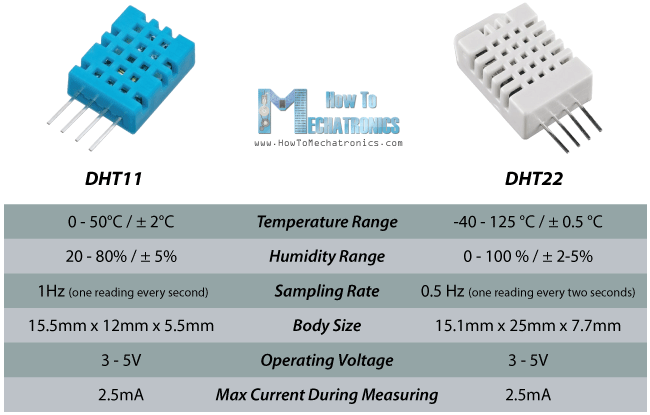
There are two specification where the DHT11 is better than the DHT22. That’s the sampling rate which for the DHT11 is 1Hz or one reading every second, while the DHT22 sampling rate is 0,5Hz or one reading every two seconds and also the DHT11 has smaller body size. The operating voltage of both sensors is from 3 to 5 volts, while the max current used when measuring is 2.5mA.
You can get these components from any of the sites below:
- DHT11 Sensor…………………………….. Amazon / Banggood / AliExpress
- DHT22 Sensor……………………………. Amazon / Banggood / AliExpress
- Arduino Board …………………………… Amazon / Banggood / AliExpress
- Breadboard and Jump Wires ……… Amazon / Banggood / AliExpress
Disclosure: These are affiliate links. As an Amazon Associate I earn from qualifying purchases.
DHT11 / DHT22 Working Principle
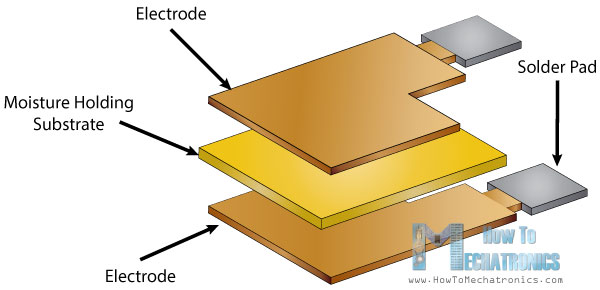
Ok now let’s see how these sensors actually work. They consist of a humidity sensing component, a NTC temperature sensor (or thermistor) and an IC on the back side of the sensor.

For measuring humidity they use the humidity sensing component which has two electrodes with moisture holding substrate between them. So as the humidity changes, the conductivity of the substrate changes or the resistance between these electrodes changes. This change in resistance is measured and processed by the IC which makes it ready to be read by a microcontroller.
On the other hand, for measuring temperature these sensors use a NTC temperature sensor or a thermistor.
A thermistor is actually a variable resistor that changes its resistance with change of the temperature. These sensors are made by sintering of semiconductive materials such as ceramics or polymers in order to provide larger changes in the resistance with just small changes in temperature.

The term “NTC” means “Negative Temperature Coefficient”, which means that the resistance decreases with increase of the temperature.
Circuit Schematics
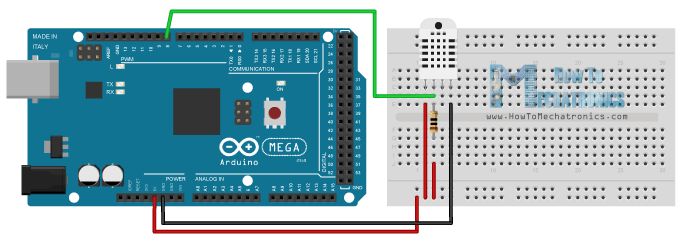
The DHTxx sensors have four pins, VCC, GND, data pin and a not connected pin which has no usage. A pull-up resistor from 5K to 10K Ohms is required to keep the data line high and in order to enable the communication between the sensor and the Arduino Board. There are some versions of these sensors that come with a breakout boards with built-in pull-up resistor and they have just 3 pins.
The DHTXX sensors have their own single wire protocol used for transferring the data. This protocol requires precise timing and the timing diagrams for getting the data from the sensors can be found from the datasheets of the sensors. However, we don’t have to worry much about these timing diagrams because we will use the DHT library which takes care of everything.
Related tutorial: Learn how to build an Arduino based Wireless Weather Station
Source Code
First we need to included the DHT library which can be found from the Arduino official website, then define the pin number to which our sensor is connected and create a DHT object. In the setup section we need to initiate the serial communication because we will use the serial monitor to print the results. Using the read22() function we will read the data from the sensor and put the values of the temperature and the humidity into the t and h variables. If you use the DHT11 sensor you will need to you the read11() function. At the end we will print the temperature and the humidity values on the serial monitor.
/*  DHT11/ DHT22 Sensor Temperature and Humidity Tutorial
 *  Program made by Dejan Nedelkovski,
 *  www.HowToMechatronics.com
 */
/*
 * You can find the DHT Library from Arduino official website
 * https://playground.arduino.cc/Main/DHTLib
 */

#include <dht.h>

#define dataPin 8 // Defines pin number to which the sensor is connected
dht DHT; // Creats a DHT object

void setup() {
  Serial.begin(9600);
}
void loop() {
  int readData = DHT.read22(dataPin); // Reads the data from the sensor
  float t = DHT.temperature; // Gets the values of the temperature
  float h = DHT.humidity; // Gets the values of the humidity

  // Printing the results on the serial monitor
  Serial.print("Temperature = ");
  Serial.print(t);
  Serial.print(" *C ");
  Serial.print("    Humidity = ");
  Serial.print(h);
  Serial.println(" % ");

  delay(2000); // Delays 2 secods, as the DHT22 sampling rate is 0.5Hz
}Code language: PHP (php)
After we will upload this code to the Arduino board, the temperature and humidity results from the sensor can be seen on the Serial monitor.
I also made an example where I display the results on a LCD. Here’s the source code of that example:
/*  DHT11/ DHT22 Sensor Temperature and Humidity Tutorial
 *  Program made by Dejan Nedelkovski,
 *  www.HowToMechatronics.com
 */
/*
 * You can find the DHT Library from Arduino official website
 * https://playground.arduino.cc/Main/DHTLib
 */

#include <LiquidCrystal.h> // includes the LiquidCrystal Library
#include <dht.h>


#define dataPin 8
LiquidCrystal lcd(1, 2, 4, 5, 6, 7); // Creates an LCD object. Parameters: (rs, enable, d4, d5, d6, d7)
dht DHT;

void setup() {
  lcd.begin(16,2); // Initializes the interface to the LCD screen, and specifies the dimensions (width and height) of the display
}

void loop() {
  int readData = DHT.read22(dataPin);
  float t = DHT.temperature;
  float h = DHT.humidity;
  lcd.setCursor(0,0); // Sets the location at which subsequent text written to the LCD will be displayed
  lcd.print("Temp.: "); // Prints string "Temp." on the LCD
  lcd.print(t); // Prints the temperature value from the sensor
  lcd.print(" C");
  lcd.setCursor(0,1);
  lcd.print("Humi.: ");
  lcd.print(h);
  lcd.print(" %");
  delay(2000);
}Code language: PHP (php)
Feel free to ask any question in the comments section below.
Hi
Thanks for all your tutorials. I do have a question on this one.
I have connected my LCD to pin position 8 of the Arduino Mega. Now am adding dht22 to the circuit and was wondering where can I connect it? (your tutorial above suggests that we connect the dht22 to pin8)
Please help
Regards
Manish
Hey, you can connect the DHT22 to any digital pin.
Can I measure -16 DegC to -25DegC using this sensor? Or this code?
Yes, using the DH22 sensor, it can measure up to -40 DegC, while the DH11 cannot do that, it cannot measure below 0 DegC.
Hi Dejan,
Could you please show us how we can can take the measurements form the sensor every 15 minutes?
thanks.
Hi there,
Well you can take the initial value of the time in a variable, for example, t1, and then compare the current time, variabl t2. Something like this:
initialClock = rtc.getTimeStr();
initialMinutes = timeString.substring(3, 5); – As the getTimeStr() function gets string value you need to take just the minutes from the whole string and then you need to convert them into Integers.
Once you have the initial minutes as integers you will do the same for the for the “current” minutes and you will compare both values to match your 15 minutes delay.
if ((t2>t1 & t2-t1==15) || (t2
Love your work. I think the “sample rate” line is wrong. on the DHT11 22 comparison. Wouldn’t 0.5 be 2 samples a second not one sample every 2 seconds.
Thanks! The line is fine. 1 Hz is 1 sample a second, 2 Hz is 2 samples a second, so 0.5 Hz is 0.5 samples a second or 1 sample every two minutes.
HI DEJAN ,
Is not exagerated when I say ” I’m a fan of yours ” and for that I say THANK YOU .
I am at the first steps in these wonderfool world of Arduino . I did some exercise but when I tray Your example of DHT11 & LCD1602 I get these annoying error : “… does not name a type ” and I don’t know way . Can You guide me a little ?.
Hi there and thanks!
I didn’t understand well the error you are getting. Send me the full error listing or a print screen of the same. And also, do you use the same models as in the tutorial?
My sensor is giving: “Temperature = 0.00 *C Humidity = 0.00 %”
I had the same problem, I was using the DHT11 and the code provided in this page is for the DHT22, is you use the DHT11 it´s going to give “Temperature = 0.00 *C Humidity = 0.00 %”
To solve this problem you just have to change “DHT.read22” to “DHT.read11″ in the 11th line, resulting this :
” int readData = DHT.read11(dataPin); // Reads the data from the sensor” 😀
Hi Dejan
Can you please do the same project in i2c and can you tell me how to change it to Fahrenheit? Thanks
What do you mean, i2c LCD or?
Could you explain the arduino IDE code to connect your LCD 16×2 display through i2c because right now is connected as normal (the libraries for the i2c are not present), and my other question is about how to put it on Fahrenheit degrees please?
Thank you
*C to *F conversion can be done in two ways: By using dht.readTemperature(true) function, providing ‘isFarenheit” value ‘true’.
Second way is by mathematical arithematics: F=C*1.8+32
Oop! something went wrong there.My previous comment got distorted a bit.Don’t know why. :/ Here I’m sending it again ….
Hi Dejan!
First of all thanks for posting such nice totorials. I tried few few your tutorial myself, worked fine.But this project (DHT11 & DHT22 sensors Temperature and Humidity Tutorial) is giving me a tough time.I downloaded DHT.h ,DHT_U.h and SimpleDHT.h these headerfiles. The code is not working and neither I could find that dht.h header.Can you please tell me where to find it?
Thanks in advance ^.^
HELLO
please ,I need helping in my project which is gas leakage detection using arduino .
the components which need for project are: arduino ,gas sensor ,bread board ,wires,battery …I want to ask some questions related to this project
Hi there. Sorry but currently I don’t have any tutorial for gas sensor (although I have it on my list to be done).