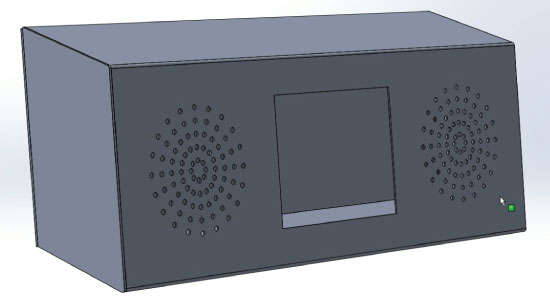
In this project I will show you how you can make an Arduino Touch Screen MP3 Music Player and Alarm Clock. You can watch the following video or read the written tutorial below.
Overview
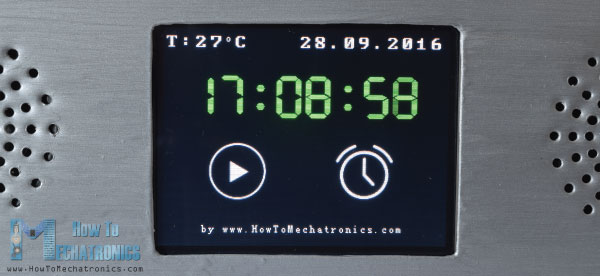
The home screen features a big clock, date and temperature information, as well as, two buttons for the Music Player and the Alarm Clock.
If we enter the Music Player we can start playing the music by pressing the big “Play” button in the middle of the screen. Right beside it, there are two more buttons, for playing the previous or the next song.
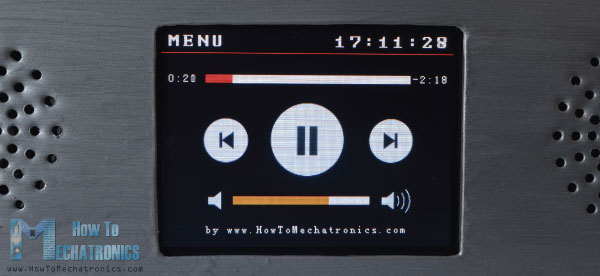
Above these buttons there is the song progress bar, and at the bottom of the screen we have a volume bar and two buttons for decreasing and increasing the volume. In the upper right corner there is a clock and on the left side is the “Menu” button which brings us back to the home screen.
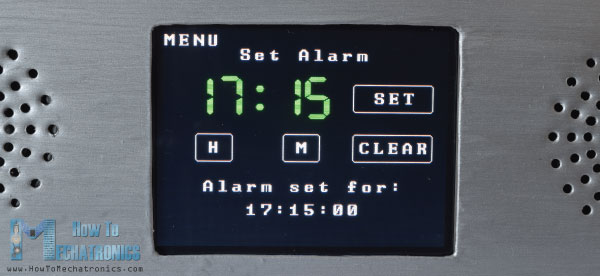
On the other hand, if we enter the Alarm Clock we can set an alarm by using the two buttons for setting the hours and the minutes.
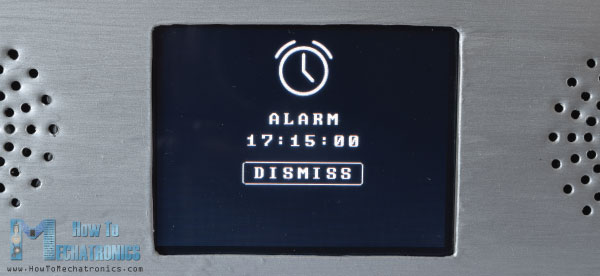
When the alarm will be activated, a song will start playing at a higher volume, and it will keep playing until we press the “Dismiss” button.
How It Works
Now let’s take a look how this device works. It uses an Arduino Mega board and a 3.2” TFT touch screen with a suitable shield for connecting the screen with the Arduino Board. For playing the music, it uses the BY8001 MP3 Player module and for the alarm clock it uses the DS3231 Real Time Clock module.
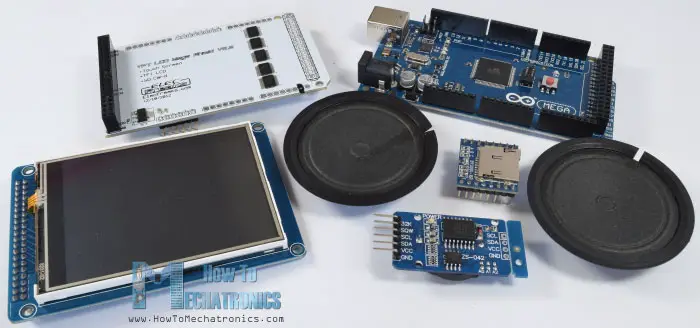
You can get the components needed for this Arduino Project from the links below:
- BY8001-16P MP3 Module ……… Amazon / AliExpress
- 3.2″ TFT Touch Display……….… Amazon / Banggood / AliExpress
- TFT Display Mega Shield……….. Amazon / Banggood / AliExpress
- 0.5W Speaker ………………………. Amazon / Banggood / AliExpress
- DS3231 Real Time Clock ……….. Amazon / Banggood / AliExpress
- Arduino Mega……………………….. Amazon / Banggood / AliExpress
Disclosure: These are affiliate links. As an Amazon Associate I earn from qualifying purchases.
Circuit Schematics
Here’s the circuit schematics of this project:
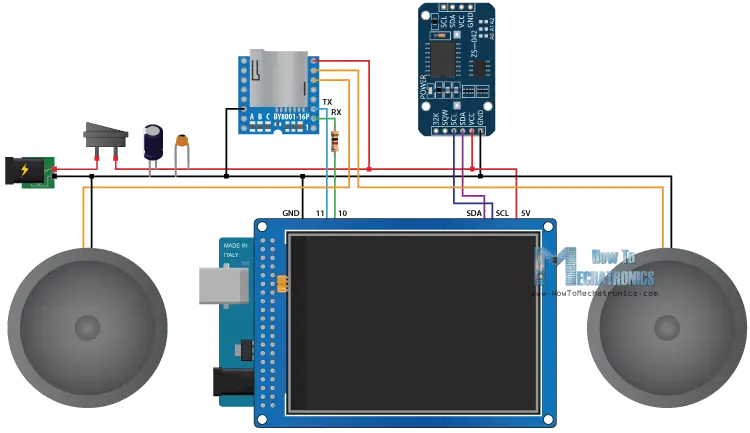
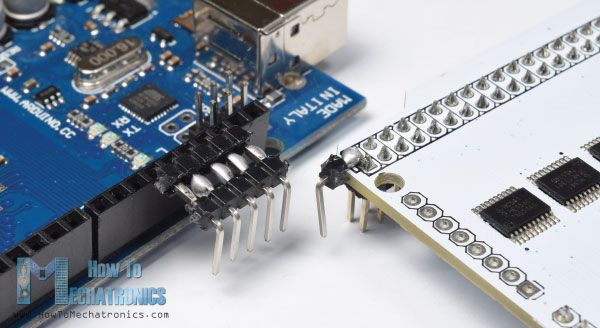
We can note here that the TFT shield is blocking the free pins of the Arduino board so we need to make a custom-made pin headers which we will be able to insert them between the shield and the Arduino.
Also note that for powering the Arduino we need to solder additional pin header to the 5 V pin on the shield, as the shield already uses all Arduino VCC pins.
Once we connect everything together we can proceed with programing the Arduino. However, before we continue I would to suggest you to check my previous detailed tutorials for the TFT touch screen and the DS3231 Real Time Clock module. And as for the MP3 Player module I will give it a quick explanation here in this article.
BY8001-16P MP3 Player Module
The BY8001-16P is a MP3 module which works with MicroSD cards and supports MP3 and WAV audio format files. The module has a built-in 3W power amplifier and can directly drive a single 3W speaker.
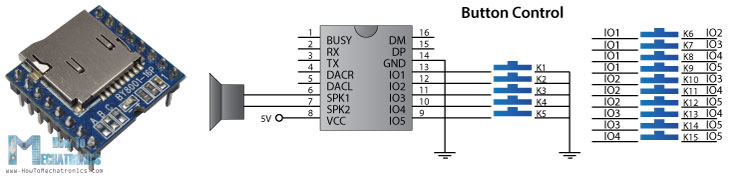
The MP3 Player module can be button controlled using the 5 input pins or using a microcontroller via the serial communication.
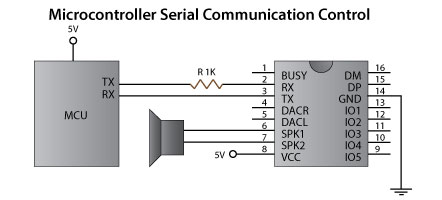
Note here that the serial port pins of the module work at 3.3V so the RX pin of the module needs to be connected through a 1K resistor to the Arduino TX pin. Also note the 3 ports A, B and C which are used for selecting the control modes. For controlling the module using a microcontroller the 3 resistors at these pads need to be removed. The pins number 6 and 7 can be used for directly connecting low power speakers or the pins number 4 and 5 if using external amplifier.
As for the Arduino part the easiest way is to use the BY8001 library which can be downloaded from GitHub. If we open some of its demo examples we can see how it works. So after initializing the module in the setup section, we can use any of the custom-made functions for controlling the module.
Source code
Now we are ready to take a look at the code of this Arduino Touch Screen MP3 Screen Music Player and Alarm Clock. As the code is a bit longer, for better understanding, I will post the source code of the program in sections with description for each section. And at the end of this article I will post the complete source code.
So, first we need to include the libraries for the TFT touch screen, the BY8001-16P MP3 Player and the DS3231 Real Time Clock module, as well as, the library for the serial communication. Then we have to create the appropriate objects and define some variables needed for the program.
#include <UTFT.h>
#include <URTouch.h>
#include <SoftwareSerial.h>
#include <BY8001.h>
#include <DS3231.h>
//==== Creating Objects
UTFT myGLCD(SSD1289, 38, 39, 40, 41); //Parameters should be adjusted to your Display/Schield model
URTouch myTouch( 6, 5, 4, 3, 2);
SoftwareSerial mp3Serial(11, 10); // RX, TX
BY8001 mp3; // creating an instance of class BY8001 and call it 'mp3'
DS3231 rtc(SDA, SCL);
//==== Defining Fonts
extern uint8_t SmallFont[];
extern uint8_t BigFont[];
extern uint8_t SevenSegNumFont[];
extern unsigned int MusicPlayerButton[0x1040];
extern unsigned int AlarmButton[0x1040];
extern unsigned int ButtonPlay[0x1AE9];
extern unsigned int ButtonPause[0x1AE9];
extern unsigned int PreviousButton[0x9C4];
extern unsigned int NextButton[0x9C4];
extern unsigned int VolumeDown[0x170];
extern unsigned int VolumeUp[0x3B8];
int x, y; // Variables for the coordinates where the display has been pressed
char currentPage, playStatus;
int iV = 15;
int trackNum = 1;
int b = 16;
int aHours = 0;
int aMinutes = 0;
boolean alarmNotSet = true;
String alarmString = "";
float currentTemperature, temperature;
static word totalTime, elapsedTime, playback, minutes, seconds, lastSeconds, minutesR, secondsR;
String currentClock, currentHours, currentMinutes, currentSeconds, currentDate;
String timeString, hoursString, minutesString, secondsString, hoursS, minutesS, secondsS, dateS;Code language: Arduino (arduino)We can note here the defining of the bitmaps. Some of the buttons of the program are actually images which are converted into bitmaps using the ImageConverter565 tool which comes with the TFT library.
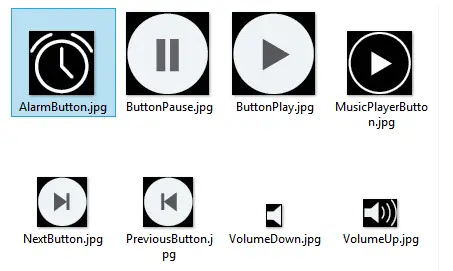
So, these “.c” files needs to be included in the directory of the code file so that they load when launching the sketch. Here you can download these images and “.c” files.
In the setup section after initializing the objects, we call drawHomeScreen() custom function which draws all the graphics of the home screen. Also here we set the initial values of some of the variables, like the playStatus, currentTemp and Date, the initial value of the volume and so on.
void setup() {
  // Initiate display
  myGLCD.InitLCD();
  myGLCD.clrScr();
  myTouch.InitTouch();
  myTouch.setPrecision(PREC_MEDIUM);

  // Initialize the rtc object
  rtc.begin();

  // Music
  Serial.begin(9600);  // set serial monitor baud rate to Arduino IDE
  mp3Serial.begin(9600);  // BY8001 set to 9600 baud (required)
  mp3.setup(mp3Serial); // tell BY8001 library which serial port to use.
  delay(800);  // allow time for BY8001 cold boot; may adjust depending on flash storage size

  drawHomeScreen();  // Draws the Home Screen
  currentPage = '0'; // Indicates that we are at Home Screen
  playStatus = '0';

  mp3.setVolume(15);
  delay(100);
  currentTemperature = rtc.getTemp();
  currentDate = rtc.getDateStr();
  currentClock = rtc.getTimeStr();
  timeString = rtc.getTimeStr();
  currentHours = timeString.substring(0, 2);
  currentMinutes = timeString.substring(3, 5);
  currentSeconds = timeString.substring(6, 8);
}Code language: Arduino (arduino)
Next is the loop section. The first if statement is true as we have set the currentPage variable to be 0 which indicates that we are on the home screen. Here with the next if statement we check whether we have a change in the clock and this happens each second. Now as we are using the seven segment font of the TFT libraries, which doesn’t support any character except numbers, we have to extract only the numbers from the string that is coming with the getTimeStr() function for reading the clock from the DS3231 RTC module.
So using the substring() function we get the hours, the minutes and seconds into separate variables and print them each time a changed has happened in the seconds, the minutes or the hours.
As for the date and temperature, similar, we check whether there is a change compared to the previous state.
void loop() {
  // Homes Screen
  if (currentPage == '0') {
    // Checks for change of the clock
    if ( currentClock != rtc.getTimeStr()) {
      timeString = rtc.getTimeStr();
      hoursS = timeString.substring(0, 2);
      minutesS = timeString.substring(3, 5);
      secondsS = timeString.substring(6, 8);

      myGLCD.setFont(SevenSegNumFont);
      myGLCD.setColor(0, 255, 0);

      myGLCD.print(secondsS, 224, 50);

      if ( currentMinutes != minutesS ) {
        myGLCD.print(minutesS, 128, 50);
        currentMinutes = minutesS;
      }
      if ( currentHours != hoursS ) {
        myGLCD.print(hoursS, 32, 50);
        currentHours = hoursS;
      }
      // Checks for change of the date
      dateS = rtc.getDateStr();
      delay(10);
      if ( currentDate != dateS){
          myGLCD.setColor(255, 255, 255); // Sets color to white
          myGLCD.setFont(BigFont); // Sets font to big
          myGLCD.print(rtc.getDateStr(), 153, 7);
        }
      // Checks for change of the temperature
      temperature = rtc.getTemp();
      delay(10);
      if ( currentTemperature != temperature ){
        myGLCD.setColor(255, 255, 255); // Sets color to white
        myGLCD.setFont(BigFont); // Sets font to big
        myGLCD.printNumI(temperature, 39, 7);
        currentTemperature = temperature;
      }
      delay(10);
      currentClock = rtc.getTimeStr();
    }Code language: Arduino (arduino)
Next, using the myTouch.dataAvailable() function we check whether we have touched the screen and also check whether it’s the Music Player or the Alarm button. So if that’s the Music Player button, first we call the drawFrame() custom function which draws a red circle around the button indicating that the button has been pressed. Also this custom function has a while loop which hold the program stacked until we release the button. Right after that, we set the currentPage variable to 1, clear the screen and call the drawMusicPlayerScreen() custom function which draws all the graphics of the Music Player screen. Similar, if we press the Alarm button we, we set the currentPage variable to 2 and clear the screen.
// Checks whether the screen has been touched
    if (myTouch.dataAvailable()) {
      myTouch.read();
      x = myTouch.getX(); // X coordinate where the screen has been pressed
      y = myTouch.getY(); // Y coordinates where the screen has been pressed
      // If we press the Music Player Button
      if ((x >= 55) && (x <= 120) && (y >= 125) && (y <= 190)) {
          drawFrame(87, 157, 33);
          currentPage = '1';
          myGLCD.clrScr();
          delay(100);
          drawMusicPlayerScreen();
          delay(100);
        }
      // If we press the Alarm Button
      if ((x >= 195) && (x <= 260) && (y >= 125) && (y <= 190)) {
          drawFrame(227, 160, 29);
          currentPage = '2';
          myGLCD.clrScr();
        }
    }Code language: Arduino (arduino)
Next, let’s see what happens in the Music Player screen. Here we are constantly checking whether we have touched the screen. If we touch the Play button and the current playStatus variable is 0, we will call the mp3.playTrackFromFolder() function which will start playing the first song from the MicroSD card. At the same time, we call the drawPauseButton() custom function which draws the Pause button and set the playStatus variable to 2. Using the next two if statements, depending on the playStatues variable, we toggle between playing and pausing the song.
// Music Player Screen
  if (currentPage == '1') {
    if (myTouch.dataAvailable()) {
      myTouch.read();
      x = myTouch.getX(); // X coordinate where the screen has been pressed
      y = myTouch.getY(); // Y coordinates where the screen has been pressed
      // If we press the Play Button
      if ((x >= 116) && (x <= 204) && (y >= 77) && (y <= 165)) {
        if (playStatus == '0') {
          drawFrame(159, 121, 42);
          drawPauseButton();
          mp3.playTrackFromFolder(00, 001);
          delay(100);
          playStatus = '2';
          return;
        }
        if (playStatus == '1') {
          drawFrame(159, 121, 42);
          drawPauseButton();
          mp3.play();
          delay(100);
          playStatus = '2';
          return;
        }
        if (playStatus == '2') {
          drawFrame(159, 121, 42);
          drawPlayButton();
          mp3.pause();
          delay(100);
          playStatus = '1';
          return;
        }
      }Code language: Arduino (arduino)
In similar way, for each pressed button we call the appropriate functions for playing the previous or the next track, decrease or increase the volume, as well as the “Menu” button which brings us back to the home screen.
// If we press the Previous Button
      if ((x >= 45) && (x <= 95) && (y >= 97) && (y <= 147)) {
        drawFrame(70, 121, 26);
        mp3.previousTrack();
        delay(100);
        drawTrackBar();
      }
      // If we press the Next Button
      if ((x >= 227) && (x <= 277) && (y >= 97) && (y <= 147)) {
        drawFrame(252, 122, 26);
        mp3.nextTrack();
        delay(100);
        drawTrackBar();
      }
      // If we press the VolumeDown Button
      if ((x >= 35) && (x <= 75) && (y >= 165) && (y <= 209)) {
        drawUnderline(45, 205, 65, 205);
        if (iV >= 0 & iV <= 30) {
          iV--;
          drawVolume(iV);
        }
        mp3.decreaseVolume();
        delay(100);
      }
      // If we press the VolumeUp Button
      if ((x >= 230) && (x <= 280) && (y >= 165) && (y <= 209)) {
        drawUnderline(235, 205, 275, 205);
        if (iV >= 0 & iV <= 30) {
          iV++;
          drawVolume(iV);
        }
        mp3.increaseVolume();
        delay(100);
      }
      // If we press the MENU Button
      if ((x >= 0) && (x <= 75) && (y >= 0) && (y <= 30)) {
        myGLCD.clrScr();
        drawHomeScreen();  // Draws the Home Screen
        currentPage = '0';
        return;
      }Code language: Arduino (arduino)
The next if statement is used for updating the track progress bar.
// Updates the track bar
    if (playStatus == '1' || playStatus == '2') {
      trackPlayTime();
    }
So if the music is playing we call the trackPlayTime() custom function which using some of the Music Player library functions, like the mp3.getElapsedTrackPlaybackTime(), calculates and prints the elapsed and remained time as well as the track progress bar graphics. Using the printClock() custom function we print the clock in the upper right corner.
// Updates the track bar
void trackPlayTime() {
  totalTime = mp3.getTotalTrackPlaybackTime();
  delay(10);
  elapsedTime = mp3.getElapsedTrackPlaybackTime();
  delay(10);
  minutes = (int)elapsedTime / 60;
  seconds = (((float)elapsedTime / 60) - minutes) * 60;
  playback = totalTime - elapsedTime;
  minutesR = (int)playback / 60;
  secondsR = (((float)playback / 60) - minutesR) * 60;

  myGLCD.setFont(SmallFont);
  myGLCD.setColor(255, 255, 255);
  myGLCD.printNumI(minutes, 8, 48);

  myGLCD.print(":", 16, 48);
  myGLCD.printNumI((int)seconds, 24, 48, 2, '0');

  myGLCD.print("-", 276, 48);
  myGLCD.printNumI(minutesR, 284, 48);
  myGLCD.print(":", 292, 48);
  myGLCD.printNumI((int)secondsR, 300, 48, 2, '0');

  int trackBarX = map(elapsedTime, 0, totalTime, 0, 224);
  myGLCD.setColor(255, 0, 0);
  myGLCD.fillRect (48, 50, 48 + trackBarX, 50 + 8);

  if (totalTime == elapsedTime) {
    mp3.nextTrack();
    delay(30);
    myGLCD.setColor(255, 255, 255);
    myGLCD.fillRect (48, 50, 48 + 224, 50 + 8);
  }
}Code language: Arduino (arduino)
Next is the Alarm Clock screen. Here first we draw all the graphics, the clock, the text and the buttons and also set the variable alarmNotSet to be true so that we can enter the next while loop. Here using the two buttons, H and M, we set the alarm and once we click the “Set” button the value of the alarm is stored into the alarmString variable.
// Alarm Clock Screen
if (currentPage == '2') {
myGLCD.setFont(BigFont);
myGLCD.setColor(255, 255, 255);
myGLCD.print("MENU", 5, 5);
myGLCD.print("Set Alarm", CENTER, 20);
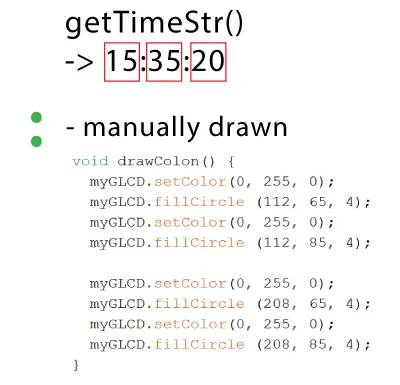
// Draws a colon between the hours and the minutes
myGLCD.setColor(0, 255, 0);
myGLCD.fillCircle (112, 65, 4);
myGLCD.setColor(0, 255, 0);
myGLCD.fillCircle (112, 85, 4);
myGLCD.setFont(SevenSegNumFont);
myGLCD.setColor(0, 255, 0);
myGLCD.printNumI(aHours, 32, 50, 2, '0');
myGLCD.printNumI(aMinutes, 128, 50, 2, '0');
myGLCD.setColor(255, 255, 255);
myGLCD.drawRoundRect (42, 115, 82, 145);
myGLCD.drawRoundRect (138, 115, 178, 145);
myGLCD.setFont(BigFont);
myGLCD.print("H", 54, 122);
myGLCD.print("M", 150, 122);
myGLCD.drawRoundRect (215, 60, 303, 90);
myGLCD.print("SET", 236, 67);
myGLCD.drawRoundRect (215, 115, 303, 145);
myGLCD.print("CLEAR", 220, 122);
alarmNotSet = true;
while (alarmNotSet){
if (myTouch.dataAvailable()) {
myTouch.read();
x = myTouch.getX(); // X coordinate where the screen has been pressed
y = myTouch.getY(); // Y coordinates where the screen has been pressed
//Set hours button
if ((x >= 42) && (x <= 82) && (y >= 115) && (y <= 145)) {
drawRectFrame(42, 115, 82, 145);
aHours++;
if(aHours >=24){
aHours = 0;
}
myGLCD.setFont(SevenSegNumFont);
myGLCD.setColor(0, 255, 0);
myGLCD.printNumI(aHours, 32, 50, 2, '0');
}
// Set minutes buttons
if ((x >= 138) && (x <= 178) && (y >= 115) && (y <= 145)) {
drawRectFrame(138, 115, 178, 145);
aMinutes++;
if(aMinutes >=60){
aMinutes = 0;
}
myGLCD.setFont(SevenSegNumFont);
myGLCD.setColor(0, 255, 0);
myGLCD.printNumI(aMinutes, 128, 50, 2, '0');
}
// Set alarm button
if ((x >= 215) && (x <= 303) && (y >= 60) && (y <= 80)) {
drawRectFrame(215, 60, 303, 90);
if (aHours < 10 && aMinutes < 10){
alarmString = "0"+(String)aHours + ":" + "0"+ (String)aMinutes + ":" + "00";
}
else if (aHours < 10 && aMinutes > 9){
alarmString = "0"+(String)aHours + ":" + (String)aMinutes + ":" + "00";
}
else if (aHours > 9 && aMinutes < 10){
alarmString = (String)aHours + ":" + "0"+ (String)aMinutes + ":" + "00";
}
else {
alarmString = (String)aHours + ":" + (String)aMinutes + ":" + "00";
}
myGLCD.setFont(BigFont);
myGLCD.print("Alarm set for:", CENTER, 165);
myGLCD.print(alarmString, CENTER, 191);
}
// Clear alarm button
if ((x >= 215) && (x <= 303) && (y >= 115) && (y <= 145)) {
drawRectFrame(215, 115, 303, 145);
alarmString="";
myGLCD.setColor(0, 0, 0);
myGLCD.fillRect(45, 165, 275, 210);
}
// If we press the MENU Button
if ((x >= 0) && (x <= 75) && (y >= 0) && (y <= 30)) {
alarmNotSet = false;
currentPage = '0';
myGLCD.clrScr();
drawHomeScreen(); // Draws the Home Screen
}
}
}
}Code language: Arduino (arduino)Note here that we need to adjust this string to have the same form as the string that we get from the getTimeString() function. In this way we will be able to compare them and activate the alarm when the clock will reach that same value or time.
If we press the clear button we will clear the alarmString and if we press the menu button it will get us out of the while loop and send back to the home screen.
For activating the alarm, we check whether the alarm has been set and if the alarm matches with the clock, the first song on the MicroSD card will start playing at a higher volume. Also we will draw all the graphics together with the “Dismiss” button and set the alarmOn variable to true. This will get us into the next while loop which will enable to song to keep playing until we press the “Dismiss” button.
// Alarm activation
    if (alarmNotSet == false) {
      if (alarmString == rtc.getTimeStr()){
        myGLCD.clrScr();
        mp3.setVolume(25);
        mp3.playTrackByIndexNumber(1);
        delay(100);
        myGLCD.setFont(BigFont);
        myGLCD.setColor(255, 255, 255);
        myGLCD.print("ALARM", CENTER, 90);
        myGLCD.drawBitmap (127, 10, 65, 64, AlarmButton);
        myGLCD.print(alarmString, CENTER, 114);
        myGLCD.drawRoundRect (94, 146, 226, 170);
        myGLCD.print("DISMISS", CENTER, 150);
        boolean alarmOn = true;
        while (alarmOn){
          if (myTouch.dataAvailable()) {
          myTouch.read();
          x = myTouch.getX(); // X coordinate where the screen has been pressed
          y = myTouch.getY(); // Y coordinates where the screen has been pressed

          // Stop alarm button
          if ((x >= 94) && (x <= 226) && (y >= 146) && (y <= 170)) {
          drawRectFrame(94, 146, 226, 170);
          alarmOn = false;
          alarmString="";
          myGLCD.clrScr();
          mp3.stopPlayback();
          delay(100);
          currentPage = '0';
          playStatus = '0';
          mp3.setVolume(15);
          drawHomeScreen();
          }

      }
     }
  }
}Code language: Arduino (arduino)
So that’s how the code works and you can find the complete source code at the bottom of the article.
Building the device
Using Solidworks I made the design and here’s how it looks.
You can download this model so you can take the measurements here:
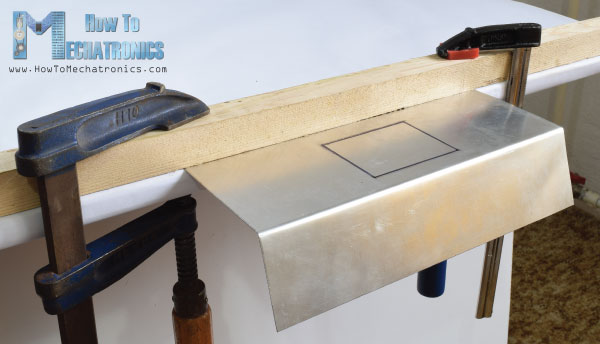
For this project I choose to use Aluminum sheet metal which I cut it to size using a multi tool. Then on the edge of my desk and with the help of some clamps and laths I bent the sheet metal.
As for the speakers, I printed a circular pattern, attached it to place and using a drill I made all of the holes.
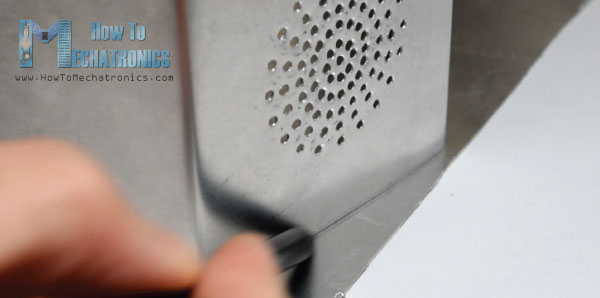
After that I cut the sides to the appropriate form and secured them to the previously bent sheet metal using a glue gun.
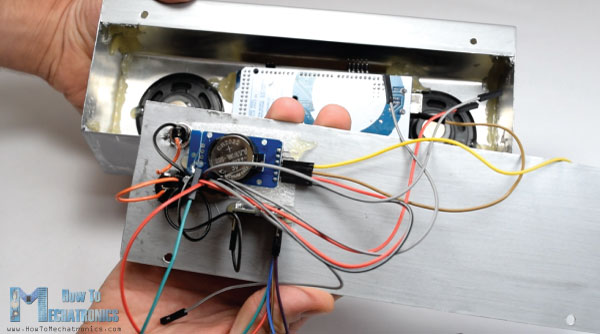
At the end I painted the sheet metal box and it was ready for the electronics components to be attached. Again, using a glue gun I secured all of the components, connected everything together and secured the back lid of the device using two bolts.
That’s all, feel free to ask any question in the comments section below.
Here’s the complete source code of the device:
/*
* Arduino Touch Screen MP3 Music Player and Alarm Clock
*
* Crated by Dejan Nedelkovski,
* www.HowToMechatronics.com
*
* UFTF, URTouch and DS3231 libraries made by Henning Karlsen which can be found and downloaded from his website, www.rinkydinkelectronics.com.
* BY8001 MP3 Player Library made by borland of Arduino forum, Released in public domain. Dowload link: https://github.com/r0ndL/BY8001
*/

#include <UTFT.h>
#include <URTouch.h>
#include <SoftwareSerial.h>
#include <BY8001.h>
#include <DS3231.h>

//==== Creating Objects
UTFT     myGLCD(SSD1289, 38, 39, 40, 41); //Parameters should be adjusted to your Display/Schield model
URTouch  myTouch( 6, 5, 4, 3, 2);


SoftwareSerial mp3Serial(11, 10);  // RX, TX
BY8001 mp3;  // creating an instance of class BY8001 and call it 'mp3'

DS3231  rtc(SDA, SCL);

//==== Defining Fonts
extern uint8_t SmallFont[];
extern uint8_t BigFont[];
extern uint8_t SevenSegNumFont[];

extern unsigned int MusicPlayerButton[0x1040];
extern unsigned int AlarmButton[0x1040];
extern unsigned int ButtonPlay[0x1AE9];
extern unsigned int ButtonPause[0x1AE9];
extern unsigned int PreviousButton[0x9C4];
extern unsigned int NextButton[0x9C4];
extern unsigned int VolumeDown[0x170];
extern unsigned int VolumeUp[0x3B8];

int x, y; // Variables for the coordinates where the display has been pressed
char currentPage, playStatus;
int iV = 15;
int trackNum = 1;
int b = 16;
int aHours = 0;
int aMinutes = 0;
boolean alarmNotSet = true;
String alarmString = "";
float currentTemperature, temperature;
static word totalTime, elapsedTime, playback, minutes, seconds, lastSeconds, minutesR, secondsR;
String currentClock, currentHours, currentMinutes, currentSeconds, currentDate;
String timeString, hoursString, minutesString, secondsString, hoursS, minutesS, secondsS, dateS;

void setup() {
  // Initiate display
  myGLCD.InitLCD();
  myGLCD.clrScr();
  myTouch.InitTouch();
  myTouch.setPrecision(PREC_MEDIUM);

  // Initialize the rtc object
  rtc.begin();

  // Music
  Serial.begin(9600);  // set serial monitor baud rate to Arduino IDE
  mp3Serial.begin(9600);  // BY8001 set to 9600 baud (required)
  mp3.setup(mp3Serial); // tell BY8001 library which serial port to use.
  delay(800);  // allow time for BY8001 cold boot; may adjust depending on flash storage size

  drawHomeScreen();  // Draws the Home Screen
  currentPage = '0'; // Indicates that we are at Home Screen
  playStatus = '0';

  mp3.setVolume(15);
  delay(100);
  currentTemperature = rtc.getTemp();
  currentDate = rtc.getDateStr();
  currentClock = rtc.getTimeStr();
  timeString = rtc.getTimeStr();
  currentHours = timeString.substring(0, 2);
  currentMinutes = timeString.substring(3, 5);
  currentSeconds = timeString.substring(6, 8);
}


void loop() {
  // Homes Screen
  if (currentPage == '0') {
    // Checks for change of the clock
    if ( currentClock != rtc.getTimeStr()) {
      timeString = rtc.getTimeStr();
      hoursS = timeString.substring(0, 2);
      minutesS = timeString.substring(3, 5);
      secondsS = timeString.substring(6, 8);

      myGLCD.setFont(SevenSegNumFont);
      myGLCD.setColor(0, 255, 0);

      myGLCD.print(secondsS, 224, 50);

      if ( currentMinutes != minutesS ) {
        myGLCD.print(minutesS, 128, 50);
        currentMinutes = minutesS;
      }
      if ( currentHours != hoursS ) {
        myGLCD.print(hoursS, 32, 50);
        currentHours = hoursS;
      }
      // Checks for change of the date
      dateS = rtc.getDateStr();
      delay(10);
      if ( currentDate != dateS){
          myGLCD.setColor(255, 255, 255); // Sets color to white
          myGLCD.setFont(BigFont); // Sets font to big
          myGLCD.print(rtc.getDateStr(), 153, 7);
        }
      // Checks for change of the temperature
      temperature = rtc.getTemp();
      delay(10);
      if ( currentTemperature != temperature ){
        myGLCD.setColor(255, 255, 255); // Sets color to white
        myGLCD.setFont(BigFont); // Sets font to big
        myGLCD.printNumI(temperature, 39, 7);
        currentTemperature = temperature;
      }
      delay(10);
      currentClock = rtc.getTimeStr();
    }
    // Checks whether the screen has been touched
    if (myTouch.dataAvailable()) {
      myTouch.read();
      x = myTouch.getX(); // X coordinate where the screen has been pressed
      y = myTouch.getY(); // Y coordinates where the screen has been pressed
      // If we press the Music Player Button
      if ((x >= 55) && (x <= 120) && (y >= 125) && (y <= 190)) {
          drawFrame(87, 157, 33);
          currentPage = '1';
          myGLCD.clrScr();
          delay(100);
          drawMusicPlayerScreen();
          delay(100);
        }
      // If we press the Alarm Button
      if ((x >= 195) && (x <= 260) && (y >= 125) && (y <= 190)) {
          drawFrame(227, 160, 29);
          currentPage = '2';
          myGLCD.clrScr();
        }
    }
  }

  // Music Player Screen
  if (currentPage == '1') {
    if (myTouch.dataAvailable()) {
      myTouch.read();
      x = myTouch.getX(); // X coordinate where the screen has been pressed
      y = myTouch.getY(); // Y coordinates where the screen has been pressed
      // If we press the Play Button
      if ((x >= 116) && (x <= 204) && (y >= 77) && (y <= 165)) {
        if (playStatus == '0') {
          drawFrame(159, 121, 42);
          drawPauseButton();
          mp3.playTrackFromFolder(00, 001);
          delay(100);
          playStatus = '2';
          return;
        }
        if (playStatus == '1') {
          drawFrame(159, 121, 42);
          drawPauseButton();
          mp3.play();
          delay(100);
          playStatus = '2';
          return;
        }
        if (playStatus == '2') {
          drawFrame(159, 121, 42);
          drawPlayButton();
          mp3.pause();
          delay(100);
          playStatus = '1';
          return;
        }
      }
      // If we press the Previous Button
      if ((x >= 45) && (x <= 95) && (y >= 97) && (y <= 147)) {
        drawFrame(70, 121, 26);
        mp3.previousTrack();
        delay(100);
        drawTrackBar();
      }
      // If we press the Next Button
      if ((x >= 227) && (x <= 277) && (y >= 97) && (y <= 147)) {
        drawFrame(252, 122, 26);
        mp3.nextTrack();
        delay(100);
        drawTrackBar();
      }
      // If we press the VolumeDown Button
      if ((x >= 35) && (x <= 75) && (y >= 165) && (y <= 209)) {
        drawUnderline(45, 205, 65, 205);
        if (iV >= 0 & iV <= 30) {
          iV--;
          drawVolume(iV);
        }
        mp3.decreaseVolume();
        delay(100);
      }
      // If we press the VolumeUp Button
      if ((x >= 230) && (x <= 280) && (y >= 165) && (y <= 209)) {
        drawUnderline(235, 205, 275, 205);
        if (iV >= 0 & iV <= 30) {
          iV++;
          drawVolume(iV);
        }
        mp3.increaseVolume();
        delay(100);
      }
      // If we press the MENU Button
      if ((x >= 0) && (x <= 75) && (y >= 0) && (y <= 30)) {
        myGLCD.clrScr();
        drawHomeScreen();  // Draws the Home Screen
        currentPage = '0';
        return;
      }
    }
    // Updates the track bar
    if (playStatus == '1' || playStatus == '2') {
      trackPlayTime();
    }
    // Printing the clock in the upper right corner
    myGLCD.setFont(BigFont);
    myGLCD.setColor(255, 255, 255);
    printClock(187, 5);
  }
  // Alarm Clock Screen
  if (currentPage == '2') {
    myGLCD.setFont(BigFont);
    myGLCD.setColor(255, 255, 255);
    myGLCD.print("MENU", 5, 5);
    myGLCD.print("Set Alarm", CENTER, 20);

    // Draws a colon between the hours and the minutes
    myGLCD.setColor(0, 255, 0);
    myGLCD.fillCircle (112, 65, 4);
    myGLCD.setColor(0, 255, 0);
    myGLCD.fillCircle (112, 85, 4);

    myGLCD.setFont(SevenSegNumFont);
    myGLCD.setColor(0, 255, 0);
    myGLCD.printNumI(aHours, 32, 50, 2, '0');
    myGLCD.printNumI(aMinutes, 128, 50, 2, '0');
    myGLCD.setColor(255, 255, 255);
    myGLCD.drawRoundRect (42, 115, 82, 145);
    myGLCD.drawRoundRect (138, 115, 178, 145);
    myGLCD.setFont(BigFont);
    myGLCD.print("H", 54, 122);
    myGLCD.print("M", 150, 122);

    myGLCD.drawRoundRect (215, 60, 303, 90);
    myGLCD.print("SET", 236, 67);
    myGLCD.drawRoundRect (215, 115, 303, 145);
    myGLCD.print("CLEAR", 220, 122);

    alarmNotSet = true;

    while (alarmNotSet){
      if (myTouch.dataAvailable()) {
        myTouch.read();
        x = myTouch.getX(); // X coordinate where the screen has been pressed
        y = myTouch.getY(); // Y coordinates where the screen has been pressed
        //Set hours button
        if ((x >= 42) && (x <= 82) && (y >= 115) && (y <= 145)) {
          drawRectFrame(42, 115, 82, 145);
          aHours++;
          if(aHours >=24){
            aHours = 0;
          }
          myGLCD.setFont(SevenSegNumFont);
          myGLCD.setColor(0, 255, 0);
          myGLCD.printNumI(aHours, 32, 50, 2, '0');
        }
        // Set minutes buttons
        if ((x >= 138) && (x <= 178) && (y >= 115) && (y <= 145)) {
          drawRectFrame(138, 115, 178, 145);
          aMinutes++;
          if(aMinutes >=60){
            aMinutes = 0;
          }
          myGLCD.setFont(SevenSegNumFont);
          myGLCD.setColor(0, 255, 0);
          myGLCD.printNumI(aMinutes, 128, 50, 2, '0');
      }
      // Set alarm button
      if ((x >= 215) && (x <= 303) && (y >= 60) && (y <= 80)) {
        drawRectFrame(215, 60, 303, 90);
        if (aHours < 10 && aMinutes < 10){
          alarmString = "0"+(String)aHours + ":" + "0"+ (String)aMinutes + ":" + "00";
        }
        else if (aHours < 10 && aMinutes > 9){
          alarmString = "0"+(String)aHours + ":" + (String)aMinutes + ":" + "00";
        }
        else if (aHours > 9 && aMinutes < 10){
          alarmString = (String)aHours + ":" + "0"+ (String)aMinutes + ":" + "00";
        }
        else {
          alarmString = (String)aHours + ":" + (String)aMinutes + ":" + "00";
        }
        myGLCD.setFont(BigFont);
        myGLCD.print("Alarm set for:", CENTER, 165);
        myGLCD.print(alarmString, CENTER, 191);

      }
      // Clear alarm button
      if ((x >= 215) && (x <= 303) && (y >= 115) && (y <= 145)) {
        drawRectFrame(215, 115, 303, 145);
        alarmString="";
        myGLCD.setColor(0, 0, 0);
        myGLCD.fillRect(45, 165, 275, 210);
      }
      // If we press the MENU Button
      if ((x >= 0) && (x <= 75) && (y >= 0) && (y <= 30)) {
        alarmNotSet = false;
        currentPage = '0';
        myGLCD.clrScr();
        drawHomeScreen();  // Draws the Home Screen
      }
      }
    }

    }
    // Alarm activation
    if (alarmNotSet == false) {
      if (alarmString == rtc.getTimeStr()){
        myGLCD.clrScr();
        mp3.setVolume(25);
        mp3.playTrackByIndexNumber(1);
        delay(100);
        myGLCD.setFont(BigFont);
        myGLCD.setColor(255, 255, 255);
        myGLCD.print("ALARM", CENTER, 90);
        myGLCD.drawBitmap (127, 10, 65, 64, AlarmButton);
        myGLCD.print(alarmString, CENTER, 114);
        myGLCD.drawRoundRect (94, 146, 226, 170);
        myGLCD.print("DISMISS", CENTER, 150);
        boolean alarmOn = true;
        while (alarmOn){
          if (myTouch.dataAvailable()) {
          myTouch.read();
          x = myTouch.getX(); // X coordinate where the screen has been pressed
          y = myTouch.getY(); // Y coordinates where the screen has been pressed

          // Stop alarm button
          if ((x >= 94) && (x <= 226) && (y >= 146) && (y <= 170)) {
          drawRectFrame(94, 146, 226, 170);
          alarmOn = false;
          alarmString="";
          myGLCD.clrScr();
          mp3.stopPlayback();
          delay(100);
          currentPage = '0';
          playStatus = '0';
          mp3.setVolume(15);
          drawHomeScreen();
          }

      }
        }
      }
    }
}

void drawHomeScreen() {
  myGLCD.setBackColor(0, 0, 0); // Sets the background color of the area where the text will be printed to black
  myGLCD.setColor(255, 255, 255); // Sets color to white
  myGLCD.setFont(BigFont); // Sets font to big
  myGLCD.print(rtc.getDateStr(), 153, 7);
  myGLCD.print("T:", 7, 7);
  myGLCD.printNumI(rtc.getTemp(), 39, 7);
  myGLCD.print("C", 82, 7);
  myGLCD.setFont(SmallFont);
  myGLCD.print("o", 74, 5);
  if (alarmString == "" ) {
    myGLCD.setColor(255, 255, 255);
    myGLCD.print("by www.HowToMechatronics.com", CENTER, 215);
  }
  else {
    myGLCD.setColor(255, 255, 255);
    myGLCD.print("Alarm set for: ", 68, 215);
    myGLCD.print(alarmString, 188, 215);
  }
  drawMusicPlayerButton();
  drawAlarmButton();
  drawHomeClock();
}

void drawMusicPlayerScreen() {
  // Title
  myGLCD.setBackColor(0, 0, 0); // Sets the background color of the area where the text will be printed to black
  myGLCD.setColor(255, 255, 255); // Sets color to white
  myGLCD.setFont(BigFont); // Sets font to big
  myGLCD.print("MENU", 5, 5); // Prints the string on the screen
  myGLCD.setColor(255, 0, 0); // Sets color to red
  myGLCD.drawLine(0, 26, 319, 26); // Draws the red line

  myGLCD.setColor(255, 255, 255); // Sets color to white
  myGLCD.setFont(SmallFont); // Sets font to big
  myGLCD.print("by www.HowToMechatronics.com", CENTER, 215); // Prints the string on the screen

  // Volume Bar
  myGLCD.setColor(255, 255, 255);
  myGLCD.fillRect (78, 184, 78 + 150, 184 + 8);
  myGLCD.setColor(240, 196, 30);
  myGLCD.fillRect (78, 184, 78 + 75, 184 + 8);

  // Track Bar
  myGLCD.setColor(255, 255, 255);
  myGLCD.fillRect (48, 50, 48 + 224, 50 + 8);
  myGLCD.setFont(SmallFont);
  myGLCD.setColor(255, 255, 255);
  myGLCD.print("0:00", 8, 48);
  myGLCD.print("-0:00", 276, 48);

  drawPlayButton();
  if (playStatus == '2') {
    drawPauseButton();
  }
  drawPreviousButton();
  drawNextButton();
  drawVolumeDown();
  drawVolumeUp();
}

void drawMusicPlayerButton() {
  myGLCD.drawBitmap (55, 125, 65, 64, MusicPlayerButton);
}
void drawAlarmButton() {
  myGLCD.drawBitmap (195, 125, 65, 64, AlarmButton);
}
void drawPlayButton() {
  myGLCD.drawBitmap (118, 79, 83, 83, ButtonPlay);
}
void drawPauseButton() {
  myGLCD.drawBitmap (118, 79, 83, 83, ButtonPause);
}
void drawNextButton() {
  myGLCD.drawBitmap (227, 97, 50, 50, NextButton);
}
void drawPreviousButton() {
  myGLCD.drawBitmap (45, 97, 50, 50, PreviousButton);
}
void drawVolumeDown() {
  myGLCD.drawBitmap (50, 177, 16, 23, VolumeDown);
}
void drawVolumeUp() {
  myGLCD.drawBitmap (241, 175, 34, 28, VolumeUp);
}
// check for if Mp3 Player is stopped
bool checkFor_mp3IsStopped() {
  if (mp3Serial.available() > 0) {
    if (mp3.getPlaybackStatus() == 0) {
      return true;
    }
  }
  else return false;
}

// Highlights the button when pressed
void drawFrame(int x, int y, int r) {
  myGLCD.setColor(255, 0, 0);
  myGLCD.drawCircle (x, y, r);
  while (myTouch.dataAvailable())
    myTouch.read();
  myGLCD.setColor(0, 0, 0);
  myGLCD.drawCircle (x, y, r);
}
void drawRectFrame(int x1, int y1, int x2, int y2) {
  myGLCD.setColor(255, 0, 0);
  myGLCD.drawRoundRect (x1, y1, x2, y2);
  while (myTouch.dataAvailable())
    myTouch.read();
  myGLCD.setColor(255, 255, 255);
  myGLCD.drawRoundRect (x1, y1, x2, y2);
}
void drawUnderline(int x1, int y1, int x2, int y2) {
  myGLCD.setColor(255, 0, 0);
  myGLCD.drawLine (x1, y1, x2, y2);
  while (myTouch.dataAvailable())
    myTouch.read();
  myGLCD.setColor(0, 0, 0);
  myGLCD.drawLine (x1, y1, x2, y2);
}

// Sound bar
void drawVolume(int x) {
  myGLCD.setColor(255, 255, 255);
  myGLCD.fillRect (78 + 5 * x, 184, 78 + 150, 184 + 8);
  myGLCD.setColor(240, 196, 30);
  myGLCD.fillRect (78, 184, 78 + 5 * x, 184 + 8);
}

// Clears the track bar
void drawTrackBar() {
  myGLCD.setColor(255, 255, 255);
  myGLCD.fillRect (48, 50, 48 + 224, 50 + 8);
}
// Updates the track bar
void trackPlayTime() {
  totalTime = mp3.getTotalTrackPlaybackTime();
  delay(10);
  elapsedTime = mp3.getElapsedTrackPlaybackTime();
  delay(10);
  minutes = (int)elapsedTime / 60;
  seconds = (((float)elapsedTime / 60) - minutes) * 60;
  playback = totalTime - elapsedTime;
  minutesR = (int)playback / 60;
  secondsR = (((float)playback / 60) - minutesR) * 60;

  myGLCD.setFont(SmallFont);
  myGLCD.setColor(255, 255, 255);
  myGLCD.printNumI(minutes, 8, 48);

  myGLCD.print(":", 16, 48);
  myGLCD.printNumI((int)seconds, 24, 48, 2, '0');

  myGLCD.print("-", 276, 48);
  myGLCD.printNumI(minutesR, 284, 48);
  myGLCD.print(":", 292, 48);
  myGLCD.printNumI((int)secondsR, 300, 48, 2, '0');

  int trackBarX = map(elapsedTime, 0, totalTime, 0, 224);
  myGLCD.setColor(255, 0, 0);
  myGLCD.fillRect (48, 50, 48 + trackBarX, 50 + 8);

  if (totalTime == elapsedTime) {
    mp3.nextTrack();
    delay(30);
    myGLCD.setColor(255, 255, 255);
    myGLCD.fillRect (48, 50, 48 + 224, 50 + 8);
  }
}

void printClock(int x, int y) {
  if ( currentClock != rtc.getTimeStr()) {
    myGLCD.print(rtc.getTimeStr(), x, y);
    currentClock = rtc.getTimeStr();
  }
}

void drawColon() {
  myGLCD.setColor(0, 255, 0);
  myGLCD.fillCircle (112, 65, 4);
  myGLCD.setColor(0, 255, 0);
  myGLCD.fillCircle (112, 85, 4);

  myGLCD.setColor(0, 255, 0);
  myGLCD.fillCircle (208, 65, 4);
  myGLCD.setColor(0, 255, 0);
  myGLCD.fillCircle (208, 85, 4);
}
void drawHomeClock() {
  timeString = rtc.getTimeStr();
  currentHours = timeString.substring(0, 2);
  currentMinutes = timeString.substring(3, 5);
  currentSeconds = timeString.substring(6, 8);
  myGLCD.setFont(SevenSegNumFont);
  myGLCD.setColor(0, 255, 0);
  myGLCD.print(currentSeconds, 224, 50);
  myGLCD.print(currentMinutes, 128, 50);
  myGLCD.print(currentHours, 32, 50);
  drawColon();
}Code language: Arduino (arduino)
Feel free to ask any question in the comments section below and don’t forget to check out my collection of Arduino Projects.
Great build! I’ve purchased everything and have assembled it all however, while i get no errors on the compiler, and when uploading, there is no sign that the code has done anything, the screen sits there illuminated and does nothing more. I have looked around a bit for possible solutions regarding the hardware, but no no luck except for a single demo from the URTouch library called “URTouch_ButtonTest”. Even there the touch aspect has no effect, rather its just an image. I am at a loss for the solution. Do you have any ideas?
Hi seems like a cool project, I’m attempting to try it out. However my compiler is having trouble finding the URtouch library, any ideas why?
Make use you have installed the correct library for the touch screen.
This is a great project. Thanks for sharing the code. I noticed that you used 2 capacitors at the power input. Why are they used and how did you calculate its values?
Thanks! The capacitors are used as decoupling capacitors for stabilizing the power. These values are common for decoupling capacitors.
Dejan,
I really like to try your project.
I have a few questions.
1) What are the 2 components between de switch and the mp3 module in your circuit schematics?
2) I think you are using a non chargeable battery, is that possible because of the charge function of the RTC?
3) When I use a chargeable battery, is ther a chance of overloaded the battery because it is 3V and the main power is 5V?
1) Those two components are two decoupling capacitors.
2) True, the battery in non chargeable.
3) I’m not quite sure about this, I guess it depends on the type of the battery, but a 5V main power would probably do harm to the 3V device.
Hello
I m from Slovenia , Andrej is my name, today I have try code with arduino 1.8 , with TFT SSD1963 7″ , compile and upload are ok, but display is black, just arduino have cenecting without another devices (SD CARD, RTC, …)
My settings for TFT display 7″
UTFT myGLCD(CTE70, 38, 39, 40, 41); //Parameters should be adjusted to your Display/Schield model
URTouch myTouch( 6, 5, 4, 3, 2);
Please help me if is possible.
Thank You !
With friends Regaeds!
Andrej
Hi there. I’m afraid your display might not be compatible with the UTFT library. Check their compatibility list, you can find it in its documentation files.
Great project..nice work . But only one question – how set the time and data on home screen (not alarm?)
Thanks! Well first you need to set the Real Time Clock module to the correct time and the battery will keep it. Check my particular tutorial for that.
Thanks for reply!
What about reading Tag from mp3 songs? Is this posible?
With regards
Thanks Dejan,
I am using your plans as the basis for what I want to do. I am incorporating a PL-680 to add FM radio and also an ESP8266 to connect to my wireless network and get internet time (maybe even hook into google calendar for alarms). If I ever finish, I’ll provide and update 🙂
That sounds like a cool project. Have fun making it! 🙂
Hi there, I am looking into making this player for my final project at school. I am having trouble trying to identify the capacitors you have used. I believe one is a disc ceramic and the other an electrolytic. But there are no values shown. Could you help me please?
Doesn’t make much difference those values. I think I used 0.1uF as well as 1uF.
Great project..nice work
Please I want make clock 12hour format AM/PM
What can I do….
Thanks. The particular library for the DS3231 RTC module that I used in this tutorial doesn’t support 12 hour format, but there might be some other libraries which does support that.
Hey everyone
I’m gonna build up a PC speaker with Arduino, and my desired speaker detailed as follows:
1. 3.5 mm jack, Bluetooth and USB as an input section.
2. I need to make some process on my input signal (FFT and cross-correlation) in order to create visual EQ on LCD, Reinforcing/Weakening some signal’s frequency in case of need and pass signal throw an adaptive noise cancellation like RLS (or LMS algorithm in the case of memory shortage) and a vocal commander, turn on/down volume, next/previous and pause/stop command with voice command.(it’s totally depend on the processing speed and memory, I doubt Arduino can handle it )
3. And in output section, two approximately 60 Watt speakers (I don’t know which one is more accurate!!! two mono amplifier or one stereo amplifier.)
So gimme your point of views about it and its Strengths/weak points.
I did a lot of DSP works in MATLAB environment and I know about the basis of signal processing but I don’t know about the feasibility of run it on Arduino.
And would you please recommend your intended module for section one and three of my question.
You project idea sounds great but I couldn’t suggest anything specific, it’s quite a big project…
Great project dear Nedelkovski,
I’m going to build up your project with some minor changes 😉
and I appreciate your help to made it.
– First one I need to change ‘BY8001 Module’ to a module that can communicate with the Bluetooth protocol, so what’s your recommending module name?
– Second I need to analyzing the mp3 sound file in order to build a digital equalizer, is it possible in Arduino?
– Third what if I want to use a 10 or 15watt speaker? do I need amplifier?
Thanks. Sure your idea is possible to be built using Arduino but it’s quite different and its a bigger project then this one. I couldn’t suggest anything specific as I haven’t used any similar modules.
Hi. great job.
Can I use Arduino Uno R3 to build this project?
Tks
Hi there and thanks. Not really, because you will need a different TFT Display, as well as, a lot of modification in the code to make it suitable for a different display which is suitably for the Arduino UNO board.
Instead of manually drawn the semicolon you can use the “SevenSegNumFontPlus” font that is the same “SevenSegNumFont” plus a ‘:’ character.
Find more about it at https://www.rinkydinkelectronics.com/r_fonts.php
Nice project. Thanks for sharing it.
I haven’t notice there are additional fonts to be downloaded. That’s great!
Thanks for the remark!
Hi
I noticed you connected the speakers to SPK1/SPK1 and GND.
The BY8001 datasheet reports to connect the speaker to SPK1 and SPK2.
I tried to connect the speaker between SPK1 and GND. The speaker consumes 300mA !
Really, 300mA? Well I didn’t tested the amp consumption in my case. And yes, according to the datasheet the speaker is connected to SPK1 and SPK2. Did you try this connection, how much current does it draw?
How do I make the pin header that you mentioned? This is my first arduino project so I’m not sure about most things.
Just take a look at the picture. They are just two 90 degrees pin headers soldered together forming a 180 degrees pin header. You don’t even have to use that, you can use a simple wire to make the connections.
HI i was just thinking, what is the speakers that you used and the link for the mp3 is unavailable. I would like you to give a link that is the same chip for mp3 and one for the speakers that you used in you project. Other whys Great project.
Thanks. Please check the links again, I have updated them.