In this Arduino tutorial we will learn how to control 8×8 LED Matrix using the MAX7219 driver and the Arduino board. You can watch the following video or read the written tutorial below for more details.
Overview
We will make three examples, with the first one we will explain the basic working principle of the MAX7219 , in the second example we will see how the scrolling text on the 8×8 LED Matrix works, and in the third example we will control them via Bluetooth and a custom build Android application.
MAX7219
Now let’s take a closer look at the MAX7219 driver. The IC is capable of driving 64 individual LEDs while using only 3 wires for communication with the Arduino, and what’s more we can daisy chain multiple drivers and matrixes and still use the same 3 wires.
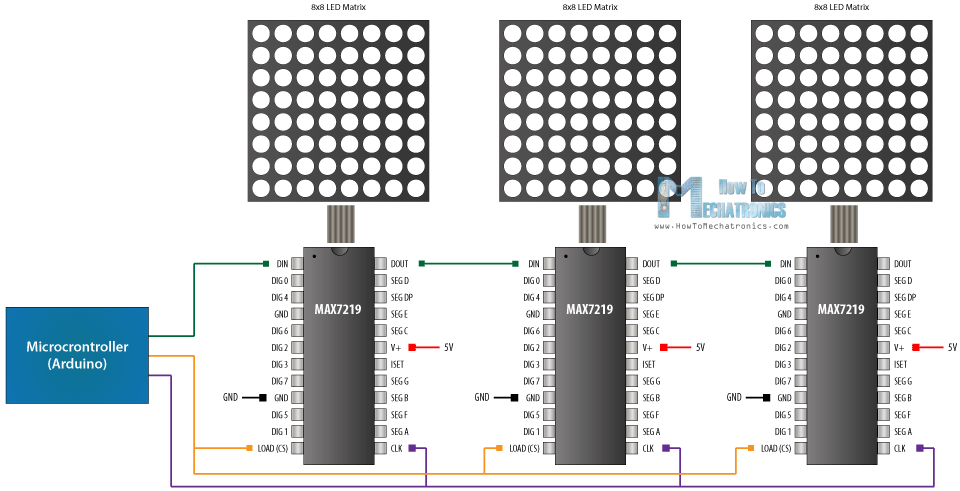
The 64 LEDs are driven by 16 output pins of the IC. The question now is how is that possible. Well the maximum number of LEDs light up at the same time is actually eight. The LEDs are arranged as 8×8 set of rows and columns. So the MAX7219 activates each column for a very short period of time and at the same time it also drives each row. So by rapidly switching through the columns and rows the human eye will only notice a continuous light.

Note how the pins of a common 8×8 LED Matrix are internally arranged, so if you are building a matrix on your own you should consider it.
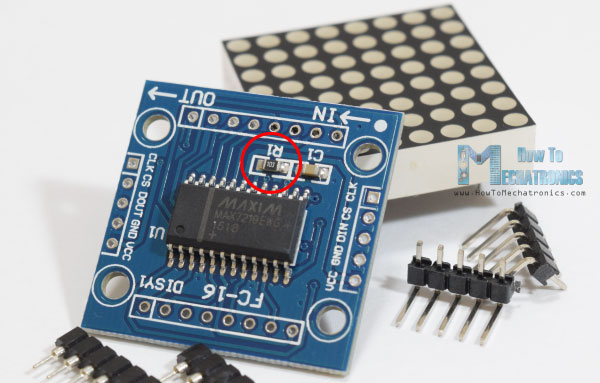
Also note that a common breakout board for the MAX7219 comes with a resistor between the 5V and the IC pin number 18. The resistor is used for setting the brightness or the current flow to the LEDs.
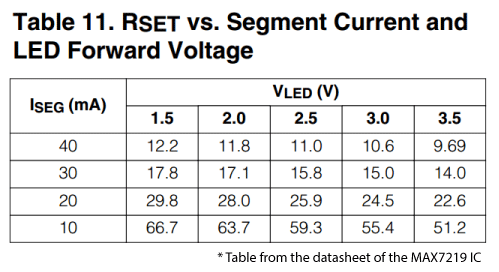
The following table from the datasheet of the IC shows the value of the resistor that we should use according to the forward voltage drop of our LEDs.
Circuit Schematic
Now let’s connect the 8×8 LED Matrix module to the Arduino Board. Here’s the circuit schematic:
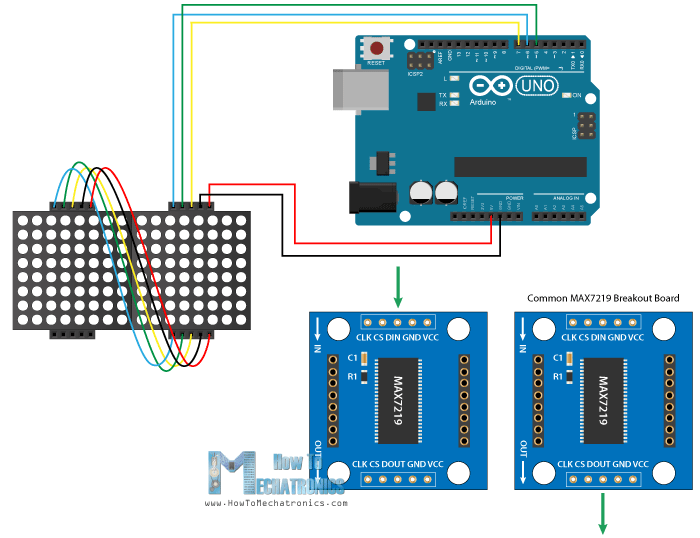
The VCC and GND of the module go to the 5V and GND pins of the Arduino and the three other pins, DIN, CLK and CS go to any digital pin of the Arduino board. If we want to connect more than one module we just connect the output pins of the previous breakout board to the input pins of the new module. Actually these pins are all the same except that the DOUT pin of the previous board goes to the DIN pin of the new board.
You can get the components needed for this Arduino Tutorial from the links below:
- 8×8 LED MAX7219 Dot Matrix Module….. Amazon / Banggood / AliExpress
- HC-05 Bluetooth Module ……………………… Amazon / Banggood / AliExpress
- Arduino Board …………………………………….. Amazon / Banggood / AliExpress
- Breadboard and Jump Wires ………………… Amazon / Banggood / AliExpress
Disclosure: These are affiliate links. As an Amazon Associate I earn from qualifying purchases.

Basic MAX7219 Arduino Code
Once we connect the modules we are ready to take a look at the Arduino code of the first example. We will use the MaxMatrix library which can be downloaded from GitHub.
/*
8x8 LED Matrix MAX7219 Example 01
by Dejan Nedelkovski, www.HowToMechatronics.com
Based on the following library:
GitHub | riyas-org/max7219 https://github.com/riyas-org/max7219
*/
#include <MaxMatrix.h>
int DIN = 7; // DIN pin of MAX7219 module
int CLK = 6; // CLK pin of MAX7219 module
int CS = 5; // CS pin of MAX7219 module
int maxInUse = 1;
MaxMatrix m(DIN, CS, CLK, maxInUse);
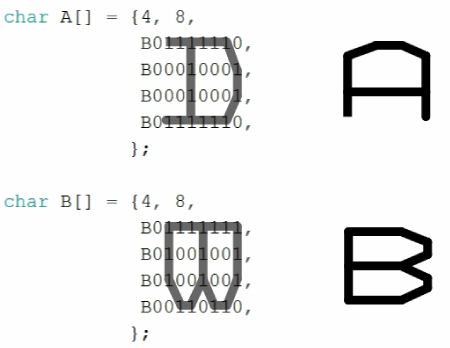
char A[] = {4, 8,
B01111110,
B00010001,
B00010001,
B01111110,
};
char B[] = {4, 8,
B01111111,
B01001001,
B01001001,
B00110110,
};
char smile01[] = {8, 8,
B00111100,
B01000010,
B10010101,
B10100001,
B10100001,
B10010101,
B01000010,
B00111100
};
char smile02[] = {8, 8,
B00111100,
B01000010,
B10010101,
B10010001,
B10010001,
B10010101,
B01000010,
B00111100
};
char smile03[] = {8, 8,
B00111100,
B01000010,
B10100101,
B10010001,
B10010001,
B10100101,
B01000010,
B00111100
};
void setup() {
m.init(); // MAX7219 initialization
m.setIntensity(8); // initial led matrix intensity, 0-15
}
void loop() {
// Seting the LEDs On or Off at x,y or row,column position
m.setDot(6,2,true);
delay(1000);
m.setDot(6,3,true);
delay(1000);
m.clear(); // Clears the display
for (int i=0; i<8; i++){
m.setDot(i,i,true);
delay(300);
}
m.clear();
// Displaying the character at x,y (upper left corner of the character)
m.writeSprite(2, 0, A);
delay(1000);
m.writeSprite(2, 0, B);
delay(1000);
m.writeSprite(0, 0, smile01);
delay(1000);
m.writeSprite(0, 0, smile02);
delay(1000);
m.writeSprite(0, 0, smile03);
delay(1000);
for (int i=0; i<8; i++){
m.shiftLeft(false,false);
delay(300);
}
m.clear();
}
Code language: PHP (php)Description: So first we need to include the MaxMatrix.h library, define the pins to which the module is connected, set how many modules we use and define the MaxMatrix object.
For displaying characters we need to define them in an array of characters or bytes, and here I have several examples. We can notice how the bits are forming the characters which are actually zeros and ones. In this case they are rotated 90 degrees but the library example suggests to use them in such a way so that would be easier later to implement the shiftLeft custom function for scrolling a text.
In the setup section we just need to initialize the module and set the brightness of the LEDs. In the loop section using the setDot() function we can set any individual LED to light up at X, Y or Row/ Column position and using the clear() function we can clear the display.
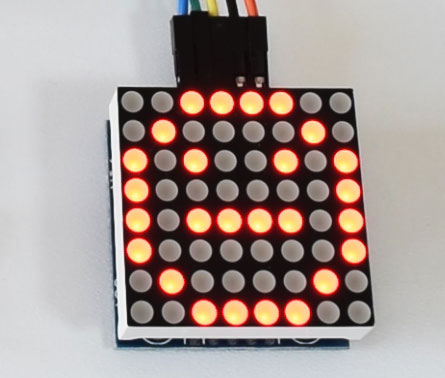
For displaying the predefined characters we use the writeSprite() function, and first two arguments are the X and Y position of the upper left corner of character. At the end using the shiftLeft() function we move or scroll the character to the left.
8×8 LED Matrix Scrolling Arduino Code
Next let’s take a look at the scrolling text example and see what’s different. Below the code you will find its description.
/*
      8x8 LED Matrix MAX7219 Scrolling Text Example

   Based on the following library:
   GitHub | riyas-org/max7219  https://github.com/riyas-org/max7219
*/


#include <MaxMatrix.h>
#include <avr/pgmspace.h>

PROGMEM const unsigned char CH[] = {
  3, 8, B00000000, B00000000, B00000000, B00000000, B00000000, // space
  1, 8, B01011111, B00000000, B00000000, B00000000, B00000000, // !
  3, 8, B00000011, B00000000, B00000011, B00000000, B00000000, // "
  5, 8, B00010100, B00111110, B00010100, B00111110, B00010100, // #
  4, 8, B00100100, B01101010, B00101011, B00010010, B00000000, // $
  5, 8, B01100011, B00010011, B00001000, B01100100, B01100011, // %
  5, 8, B00110110, B01001001, B01010110, B00100000, B01010000, // &
  1, 8, B00000011, B00000000, B00000000, B00000000, B00000000, // '
  3, 8, B00011100, B00100010, B01000001, B00000000, B00000000, // (
  3, 8, B01000001, B00100010, B00011100, B00000000, B00000000, // )
  5, 8, B00101000, B00011000, B00001110, B00011000, B00101000, // *
  5, 8, B00001000, B00001000, B00111110, B00001000, B00001000, // +
  2, 8, B10110000, B01110000, B00000000, B00000000, B00000000, // ,
  4, 8, B00001000, B00001000, B00001000, B00001000, B00000000, // -
  2, 8, B01100000, B01100000, B00000000, B00000000, B00000000, // .
  4, 8, B01100000, B00011000, B00000110, B00000001, B00000000, // /
  4, 8, B00111110, B01000001, B01000001, B00111110, B00000000, // 0
  3, 8, B01000010, B01111111, B01000000, B00000000, B00000000, // 1
  4, 8, B01100010, B01010001, B01001001, B01000110, B00000000, // 2
  4, 8, B00100010, B01000001, B01001001, B00110110, B00000000, // 3
  4, 8, B00011000, B00010100, B00010010, B01111111, B00000000, // 4
  4, 8, B00100111, B01000101, B01000101, B00111001, B00000000, // 5
  4, 8, B00111110, B01001001, B01001001, B00110000, B00000000, // 6
  4, 8, B01100001, B00010001, B00001001, B00000111, B00000000, // 7
  4, 8, B00110110, B01001001, B01001001, B00110110, B00000000, // 8
  4, 8, B00000110, B01001001, B01001001, B00111110, B00000000, // 9
  2, 8, B01010000, B00000000, B00000000, B00000000, B00000000, // :
  2, 8, B10000000, B01010000, B00000000, B00000000, B00000000, // ;
  3, 8, B00010000, B00101000, B01000100, B00000000, B00000000, // <
  3, 8, B00010100, B00010100, B00010100, B00000000, B00000000, // =
  3, 8, B01000100, B00101000, B00010000, B00000000, B00000000, // >
  4, 8, B00000010, B01011001, B00001001, B00000110, B00000000, // ?
  5, 8, B00111110, B01001001, B01010101, B01011101, B00001110, // @
  4, 8, B01111110, B00010001, B00010001, B01111110, B00000000, // A
  4, 8, B01111111, B01001001, B01001001, B00110110, B00000000, // B
  4, 8, B00111110, B01000001, B01000001, B00100010, B00000000, // C
  4, 8, B01111111, B01000001, B01000001, B00111110, B00000000, // D
  4, 8, B01111111, B01001001, B01001001, B01000001, B00000000, // E
  4, 8, B01111111, B00001001, B00001001, B00000001, B00000000, // F
  4, 8, B00111110, B01000001, B01001001, B01111010, B00000000, // G
  4, 8, B01111111, B00001000, B00001000, B01111111, B00000000, // H
  3, 8, B01000001, B01111111, B01000001, B00000000, B00000000, // I
  4, 8, B00110000, B01000000, B01000001, B00111111, B00000000, // J
  4, 8, B01111111, B00001000, B00010100, B01100011, B00000000, // K
  4, 8, B01111111, B01000000, B01000000, B01000000, B00000000, // L
  5, 8, B01111111, B00000010, B00001100, B00000010, B01111111, // M
  5, 8, B01111111, B00000100, B00001000, B00010000, B01111111, // N
  4, 8, B00111110, B01000001, B01000001, B00111110, B00000000, // O
  4, 8, B01111111, B00001001, B00001001, B00000110, B00000000, // P
  4, 8, B00111110, B01000001, B01000001, B10111110, B00000000, // Q
  4, 8, B01111111, B00001001, B00001001, B01110110, B00000000, // R
  4, 8, B01000110, B01001001, B01001001, B00110010, B00000000, // S
  5, 8, B00000001, B00000001, B01111111, B00000001, B00000001, // T
  4, 8, B00111111, B01000000, B01000000, B00111111, B00000000, // U
  5, 8, B00001111, B00110000, B01000000, B00110000, B00001111, // V
  5, 8, B00111111, B01000000, B00111000, B01000000, B00111111, // W
  5, 8, B01100011, B00010100, B00001000, B00010100, B01100011, // X
  5, 8, B00000111, B00001000, B01110000, B00001000, B00000111, // Y
  4, 8, B01100001, B01010001, B01001001, B01000111, B00000000, // Z
  2, 8, B01111111, B01000001, B00000000, B00000000, B00000000, // [
  4, 8, B00000001, B00000110, B00011000, B01100000, B00000000, // \ backslash
  2, 8, B01000001, B01111111, B00000000, B00000000, B00000000, // ]
  3, 8, B00000010, B00000001, B00000010, B00000000, B00000000, // hat
  4, 8, B01000000, B01000000, B01000000, B01000000, B00000000, // _
  2, 8, B00000001, B00000010, B00000000, B00000000, B00000000, // `
  4, 8, B00100000, B01010100, B01010100, B01111000, B00000000, // a
  4, 8, B01111111, B01000100, B01000100, B00111000, B00000000, // b
  4, 8, B00111000, B01000100, B01000100, B00101000, B00000000, // c
  4, 8, B00111000, B01000100, B01000100, B01111111, B00000000, // d
  4, 8, B00111000, B01010100, B01010100, B00011000, B00000000, // e
  3, 8, B00000100, B01111110, B00000101, B00000000, B00000000, // f
  4, 8, B10011000, B10100100, B10100100, B01111000, B00000000, // g
  4, 8, B01111111, B00000100, B00000100, B01111000, B00000000, // h
  3, 8, B01000100, B01111101, B01000000, B00000000, B00000000, // i
  4, 8, B01000000, B10000000, B10000100, B01111101, B00000000, // j
  4, 8, B01111111, B00010000, B00101000, B01000100, B00000000, // k
  3, 8, B01000001, B01111111, B01000000, B00000000, B00000000, // l
  5, 8, B01111100, B00000100, B01111100, B00000100, B01111000, // m
  4, 8, B01111100, B00000100, B00000100, B01111000, B00000000, // n
  4, 8, B00111000, B01000100, B01000100, B00111000, B00000000, // o
  4, 8, B11111100, B00100100, B00100100, B00011000, B00000000, // p
  4, 8, B00011000, B00100100, B00100100, B11111100, B00000000, // q
  4, 8, B01111100, B00001000, B00000100, B00000100, B00000000, // r
  4, 8, B01001000, B01010100, B01010100, B00100100, B00000000, // s
  3, 8, B00000100, B00111111, B01000100, B00000000, B00000000, // t
  4, 8, B00111100, B01000000, B01000000, B01111100, B00000000, // u
  5, 8, B00011100, B00100000, B01000000, B00100000, B00011100, // v
  5, 8, B00111100, B01000000, B00111100, B01000000, B00111100, // w
  5, 8, B01000100, B00101000, B00010000, B00101000, B01000100, // x
  4, 8, B10011100, B10100000, B10100000, B01111100, B00000000, // y
  3, 8, B01100100, B01010100, B01001100, B00000000, B00000000, // z
  3, 8, B00001000, B00110110, B01000001, B00000000, B00000000, // {
  1, 8, B01111111, B00000000, B00000000, B00000000, B00000000, // |
  3, 8, B01000001, B00110110, B00001000, B00000000, B00000000, // }
  4, 8, B00001000, B00000100, B00001000, B00000100, B00000000, // ~
};

int DIN = 7;   // DIN pin of MAX7219 module
int CLK = 6;   // CLK pin of MAX7219 module
int CS = 5;    // CS pin of MAX7219 module
int maxInUse = 2;

MaxMatrix m(DIN, CS, CLK, maxInUse);

byte buffer[10];

char text[]= "HowToMechatronics.com  "; // Scrolling text

void setup() {
  m.init(); // module initialize
  m.setIntensity(15); // dot matix intensity 0-15
}

void loop() {

  printStringWithShift(text, 100); // (text, scrolling speed)

}
// Display=the extracted characters with scrolling
void printCharWithShift(char c, int shift_speed) {
  if (c < 32) return;
  c -= 32;
  memcpy_P(buffer, CH + 7 * c, 7);
  m.writeSprite(32, 0, buffer);
  m.setColumn(32 + buffer[0], 0);

  for (int i = 0; i < buffer[0] + 1; i++)
  {
    delay(shift_speed);
    m.shiftLeft(false, false);
  }
}
// Extract the characters from the text string
void printStringWithShift(char* s, int shift_speed) {
  while (*s != 0) {
    printCharWithShift(*s, shift_speed);
    s++;
  }
}Code language: PHP (php)
Description: Here we have to include an additional library for the PROGMEN which is variable modifier and it’s used for storing data in the flash memory instead of SRAM. When we have a larger database of variables which are static, like in this case defining letters and characters, it’s better to store them in the flash memory because it’s much bigger, 32K bytes, compared to the 2K bytes of the SRAM.
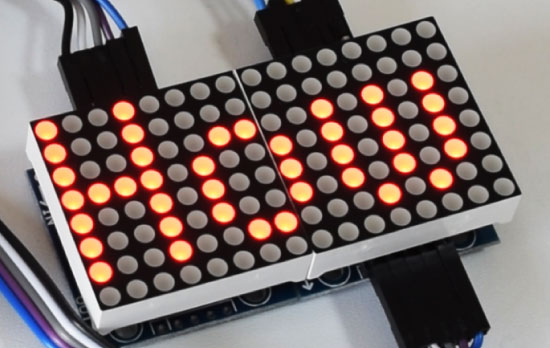
Next with a character array we define the scrolling text and in the loop section the custom function printStringWithShift, prints the scrolling text on the LED matrix with a scrolling speed defined in milliseconds with the second argument. The first thing that this custom function do is that it extracts the characters from the text string and then display these scrolling characters on the led matrix.
Android App for Controlling 8×8 LED Matrix via Bluetooth
Once we learned how the MAX7219 works, now we can make the third example which is a practical Arduino project where we will build a custom Android app to control the LED matrix via Bluetooth communication. Before we continue I would suggest you to check my detailed tutorials on how to use the HC-05 Bluetooth module and how to build a custom Android app using the MIT App Inventor online application.

Here’s the Arduino code and now let’s see the modifications compared to the previous example.
/*
      8x8 LED Matrix MAX7219 Scrolling Text
          Android Control via Bluetooth

   by Dejan Nedelkovski, www.HowToMechatronics.com

   Based on the following library:
   GitHub | riyas-org/max7219  https://github.com/riyas-org/max7219
*/

#include <MaxMatrix.h>
#include <SoftwareSerial.h>
#include <avr/pgmspace.h>

PROGMEM const unsigned char CH[] = {
  3, 8, B00000000, B00000000, B00000000, B00000000, B00000000, // space
  1, 8, B01011111, B00000000, B00000000, B00000000, B00000000, // !
  3, 8, B00000011, B00000000, B00000011, B00000000, B00000000, // "
  5, 8, B00010100, B00111110, B00010100, B00111110, B00010100, // #
  4, 8, B00100100, B01101010, B00101011, B00010010, B00000000, // $
  5, 8, B01100011, B00010011, B00001000, B01100100, B01100011, // %
  5, 8, B00110110, B01001001, B01010110, B00100000, B01010000, // &
  1, 8, B00000011, B00000000, B00000000, B00000000, B00000000, // '
  3, 8, B00011100, B00100010, B01000001, B00000000, B00000000, // (
  3, 8, B01000001, B00100010, B00011100, B00000000, B00000000, // )
  5, 8, B00101000, B00011000, B00001110, B00011000, B00101000, // *
  5, 8, B00001000, B00001000, B00111110, B00001000, B00001000, // +
  2, 8, B10110000, B01110000, B00000000, B00000000, B00000000, // ,
  4, 8, B00001000, B00001000, B00001000, B00001000, B00000000, // -
  2, 8, B01100000, B01100000, B00000000, B00000000, B00000000, // .
  4, 8, B01100000, B00011000, B00000110, B00000001, B00000000, // /
  4, 8, B00111110, B01000001, B01000001, B00111110, B00000000, // 0
  3, 8, B01000010, B01111111, B01000000, B00000000, B00000000, // 1
  4, 8, B01100010, B01010001, B01001001, B01000110, B00000000, // 2
  4, 8, B00100010, B01000001, B01001001, B00110110, B00000000, // 3
  4, 8, B00011000, B00010100, B00010010, B01111111, B00000000, // 4
  4, 8, B00100111, B01000101, B01000101, B00111001, B00000000, // 5
  4, 8, B00111110, B01001001, B01001001, B00110000, B00000000, // 6
  4, 8, B01100001, B00010001, B00001001, B00000111, B00000000, // 7
  4, 8, B00110110, B01001001, B01001001, B00110110, B00000000, // 8
  4, 8, B00000110, B01001001, B01001001, B00111110, B00000000, // 9
  2, 8, B01010000, B00000000, B00000000, B00000000, B00000000, // :
  2, 8, B10000000, B01010000, B00000000, B00000000, B00000000, // ;
  3, 8, B00010000, B00101000, B01000100, B00000000, B00000000, // <
  3, 8, B00010100, B00010100, B00010100, B00000000, B00000000, // =
  3, 8, B01000100, B00101000, B00010000, B00000000, B00000000, // >
  4, 8, B00000010, B01011001, B00001001, B00000110, B00000000, // ?
  5, 8, B00111110, B01001001, B01010101, B01011101, B00001110, // @
  4, 8, B01111110, B00010001, B00010001, B01111110, B00000000, // A
  4, 8, B01111111, B01001001, B01001001, B00110110, B00000000, // B
  4, 8, B00111110, B01000001, B01000001, B00100010, B00000000, // C
  4, 8, B01111111, B01000001, B01000001, B00111110, B00000000, // D
  4, 8, B01111111, B01001001, B01001001, B01000001, B00000000, // E
  4, 8, B01111111, B00001001, B00001001, B00000001, B00000000, // F
  4, 8, B00111110, B01000001, B01001001, B01111010, B00000000, // G
  4, 8, B01111111, B00001000, B00001000, B01111111, B00000000, // H
  3, 8, B01000001, B01111111, B01000001, B00000000, B00000000, // I
  4, 8, B00110000, B01000000, B01000001, B00111111, B00000000, // J
  4, 8, B01111111, B00001000, B00010100, B01100011, B00000000, // K
  4, 8, B01111111, B01000000, B01000000, B01000000, B00000000, // L
  5, 8, B01111111, B00000010, B00001100, B00000010, B01111111, // M
  5, 8, B01111111, B00000100, B00001000, B00010000, B01111111, // N
  4, 8, B00111110, B01000001, B01000001, B00111110, B00000000, // O
  4, 8, B01111111, B00001001, B00001001, B00000110, B00000000, // P
  4, 8, B00111110, B01000001, B01000001, B10111110, B00000000, // Q
  4, 8, B01111111, B00001001, B00001001, B01110110, B00000000, // R
  4, 8, B01000110, B01001001, B01001001, B00110010, B00000000, // S
  5, 8, B00000001, B00000001, B01111111, B00000001, B00000001, // T
  4, 8, B00111111, B01000000, B01000000, B00111111, B00000000, // U
  5, 8, B00001111, B00110000, B01000000, B00110000, B00001111, // V
  5, 8, B00111111, B01000000, B00111000, B01000000, B00111111, // W
  5, 8, B01100011, B00010100, B00001000, B00010100, B01100011, // X
  5, 8, B00000111, B00001000, B01110000, B00001000, B00000111, // Y
  4, 8, B01100001, B01010001, B01001001, B01000111, B00000000, // Z
  2, 8, B01111111, B01000001, B00000000, B00000000, B00000000, // [
  4, 8, B00000001, B00000110, B00011000, B01100000, B00000000, // \ backslash
  2, 8, B01000001, B01111111, B00000000, B00000000, B00000000, // ]
  3, 8, B00000010, B00000001, B00000010, B00000000, B00000000, // hat
  4, 8, B01000000, B01000000, B01000000, B01000000, B00000000, // _
  2, 8, B00000001, B00000010, B00000000, B00000000, B00000000, // `
  4, 8, B00100000, B01010100, B01010100, B01111000, B00000000, // a
  4, 8, B01111111, B01000100, B01000100, B00111000, B00000000, // b
  4, 8, B00111000, B01000100, B01000100, B00101000, B00000000, // c
  4, 8, B00111000, B01000100, B01000100, B01111111, B00000000, // d
  4, 8, B00111000, B01010100, B01010100, B00011000, B00000000, // e
  3, 8, B00000100, B01111110, B00000101, B00000000, B00000000, // f
  4, 8, B10011000, B10100100, B10100100, B01111000, B00000000, // g
  4, 8, B01111111, B00000100, B00000100, B01111000, B00000000, // h
  3, 8, B01000100, B01111101, B01000000, B00000000, B00000000, // i
  4, 8, B01000000, B10000000, B10000100, B01111101, B00000000, // j
  4, 8, B01111111, B00010000, B00101000, B01000100, B00000000, // k
  3, 8, B01000001, B01111111, B01000000, B00000000, B00000000, // l
  5, 8, B01111100, B00000100, B01111100, B00000100, B01111000, // m
  4, 8, B01111100, B00000100, B00000100, B01111000, B00000000, // n
  4, 8, B00111000, B01000100, B01000100, B00111000, B00000000, // o
  4, 8, B11111100, B00100100, B00100100, B00011000, B00000000, // p
  4, 8, B00011000, B00100100, B00100100, B11111100, B00000000, // q
  4, 8, B01111100, B00001000, B00000100, B00000100, B00000000, // r
  4, 8, B01001000, B01010100, B01010100, B00100100, B00000000, // s
  3, 8, B00000100, B00111111, B01000100, B00000000, B00000000, // t
  4, 8, B00111100, B01000000, B01000000, B01111100, B00000000, // u
  5, 8, B00011100, B00100000, B01000000, B00100000, B00011100, // v
  5, 8, B00111100, B01000000, B00111100, B01000000, B00111100, // w
  5, 8, B01000100, B00101000, B00010000, B00101000, B01000100, // x
  4, 8, B10011100, B10100000, B10100000, B01111100, B00000000, // y
  3, 8, B01100100, B01010100, B01001100, B00000000, B00000000, // z
  3, 8, B00001000, B00110110, B01000001, B00000000, B00000000, // {
  1, 8, B01111111, B00000000, B00000000, B00000000, B00000000, // |
  3, 8, B01000001, B00110110, B00001000, B00000000, B00000000, // }
  4, 8, B00001000, B00000100, B00001000, B00000100, B00000000, // ~
};

int dIn = 7;   // DIN pin of MAX7219 module
int clk = 6;   // CLK pin of MAX7219 module
int cs = 5;    // CS pin of MAX7219 module

int maxInUse = 2;    // Number of MAX7219's connected

MaxMatrix m(dIn, cs, clk, maxInUse);
SoftwareSerial Bluetooth(8, 7); // Bluetooth

byte buffer[10];
char incomebyte;
int scrollSpeed = 100;
char text[100] = "HowToMechatronics.com  "; // Initial text message
int brightness = 15;
int count = 0;
char indicator;

void setup() {
  m.init(); // MAX7219 initialization
  m.setIntensity(brightness); // initial led matrix intensity, 0-15
  Bluetooth.begin(38400); // Default communication rate of the Bluetooth module
}

void loop() {
  // Printing the text
  printStringWithShift(text, scrollSpeed);

  if (Bluetooth.available()) {   // Checks whether data is comming from the serial port
    indicator = Bluetooth.read();   // Starts reading the serial port, the first byte from the incoming data
    // If we have pressed the "Send" button from the Android App, clear the previous text
    if (indicator == '1') {
      for (int i = 0; i < 100; i++) {
        text[i] = 0;
        m.clear();
      }
      // Read the whole data/string comming from the phone and put it into text[] array.
      while (Bluetooth.available()) {
        incomebyte = Bluetooth.read();
        text[count] = incomebyte;
        count++;
      }
      count = 0;
    }
    // Adjusting the Scrolling Speed
    else if (indicator == '2') {
      String sS = Bluetooth.readString();
      scrollSpeed = 150 - sS.toInt(); // Milliseconds, subtraction because lower value means higher scrolling speed
    }
    // Adjusting the brightness
    else if (indicator == '3') {
      String sB = Bluetooth.readString();
      brightness = sB.toInt();
      m.setIntensity(brightness);
    }
  }

}

void printCharWithShift(char c, int shift_speed) {
  if (c < 32) return;
  c -= 32;
  memcpy_P(buffer, CH + 7 * c, 7);
  m.writeSprite(32, 0, buffer);
  m.setColumn(32 + buffer[0], 0);

  for (int i = 0; i < buffer[0] + 1; i++)
  {
    delay(shift_speed);
    m.shiftLeft(false, false);
  }
}

void printStringWithShift(char* s, int shift_speed) {
  while (*s != 0) {
    printCharWithShift(*s, shift_speed);
    s++;
  }
}

void printString(char* s)
{
  int col = 0;
  while (*s != 0)
  {
    if (*s < 32) continue;
    char c = *s - 32;
    memcpy_P(buffer, CH + 7 * c, 7);
    m.writeSprite(col, 0, buffer);
    m.setColumn(col + buffer[0], 0);
    col += buffer[0] + 1;
    s++;
  }
}Code language: PHP (php)
Description: First we need to include the SoftwareSerial.h library which will enable the Bluetooth communication and define some variables needed for the program. In the setup section we need to initialize the Bluetooth at its default baud rate of 38400 bits per second. I set the initial text message to be “HowToMechatronics.com” with 100 milliseconds delay scrolling speed.
Next, in the loop section, using the Bluetooth.available() function we check whether there is incoming data from the serial port and if that’s true using the Bluetooth.read function we start reading the serial port, one byte each iteration. So the first incoming byte will be always stored into the “indicator” variable and according to it choose whether we will change the text message, the scrolling speed or the brightness of the LED matrix.
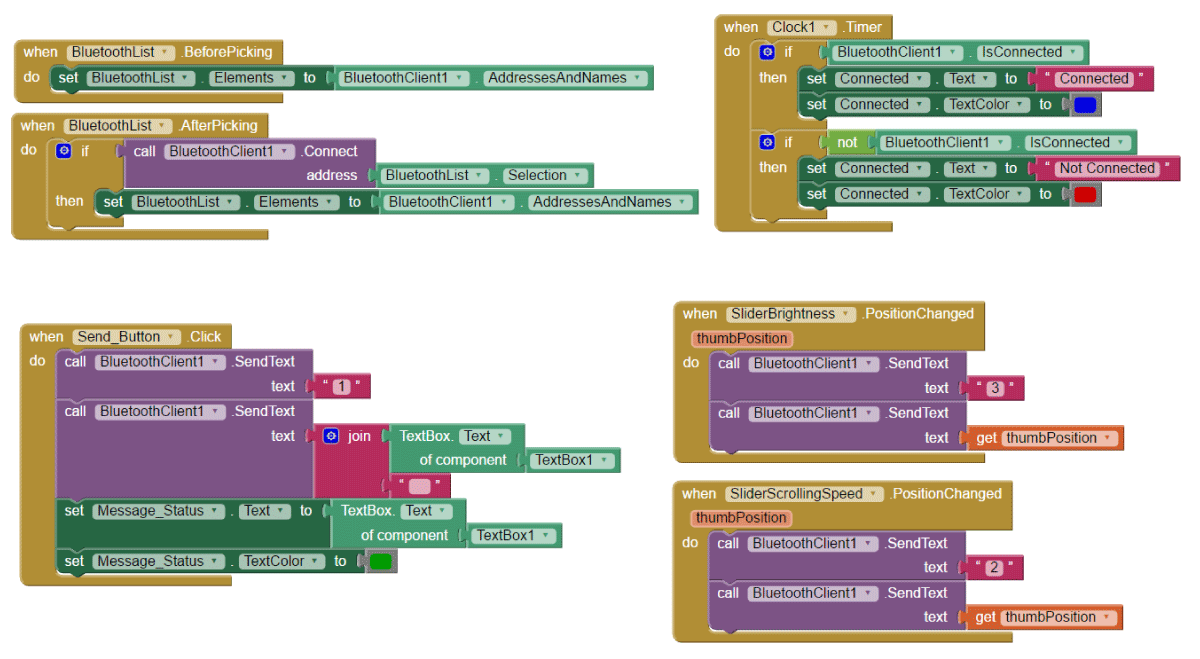
If we take a look at the Android app code blocks we can notice that when the “Send” button is clicked, first we send the indication byte, in this case “1”, which means we want the change the text message. In order to do that, at the Arduino side, we will clear the whole character array and also clear the LED matrix display. Then in the “while” loop we will read the rest of the data in the serial port, and that’s the messaged typed in the text box of the Android app.
In case the indication variable is “2”, that means we have changed the position of the scrolling speed slider, so we will read its new value using the Bluetooth.readString() function and adjust the scrolling speed. In the same way we adjust the brightness of the LEDs.
Here you can download the Android app:
That’s pretty much everything for this tutorial, if you have any question you can use the comments section below.
if using arduino NANO change these:
SoftwareSerial Bluetooth(0, 1);
Bluetooth.begin(9600);
Cheers. 😉
Hi Dejan,
Thanks a lot for sharing. Very good job!
For me, everything is OK (I had just to adapt the pins for Arduino UNO and the speed for Bluetooth Module to 9600 and the number of modules to 8).
I’m using FC-16 ( 2 x 4 modules of MAXX7216 soldered from factory).
Is there a way to turn each module to 1/4 turn anti-clockwise ? I don’t want to de-solder and resolder the 8 modules !
PS in another project I tried (with another library), I had the same problem and I found that I had to adapt from this in the IDE :
from this :
#define HARDWARE_TYPE MD_MAX72XX::
to this :
#define HARDWARE_TYPE MD_MAX72XX::FC16_HW
I tried to change a lot of stuffs into libraries, code, etc… but without success.
So if you have an idea how I can fix that … I will be gracefull !!
Have a good day.
Bernard
If the bluetooth control does not work you need to change the speed of the serial port to 9600.
133. Bluetooth.begin(9600); // Default communication rate of the Bluetooth module
Enjoy! 😉
Very inspiring! thanks for sharing your knowledge with this tutorial !!!
Good afternoon,
I made the design with two Matrix MAX7219, in the test with the code “8×8 LED Matrix MAX7219 Scrolling Text Android Control via Bluetooth”, the scrolling is starting in each Matrix at the same time. I am using the Arduino Mega ADK, could this be the cause of this error. Do I have to modify anything in the code?
You need to change:
int maxInUse = 1;
to
int maxInUse = 2;
because you are using two modules.
What is the use of this file?
Arduino_8x8_LED_Matrix_Control.aia
Can I open the project in the inventor app to make some modifications
Yes, that’s the MIT App Inventor project file, which can be modified.
Okay, I was able to build
appreciate
Sorry, I forgot to mention that though code is working great, it is displaying and scrolling text in wrong direction… Text needs to be rotated 90 degrees. Any way to do it?
I know that’s a problem that occurs with some models. You could try with different library or with different bytes for the character array.
As a follow-up to my previous post, I’ve now made a printed circuit board for this project and with 6 modules connected, it runs fine (30 minutes, no problems). When I add one or two more module, after about 1 minute, various faults occur – whole modules stop displaying and /or random leds flashing on and off. I’m using a 5 volt power supply capable of supplying several amps so don’t think it’s a power problem. Have also added decoupling capacitors across all the voltage rails to each module. Have also tried adding pull-up resistors and then pull-down resistor to the CS, CLOCK and DIN lines without any improvement. If I power off and on again, it works fine for a minute or so. Just wondered if anyone else has got this working with all eight modules connected.
Thanks for the follow-up, you have done quite some work to get there. I’m so sorry I’m not able to give any specific help at this point, as I don’t have and haven’t tried working with 8 modules. How about trying it with another Arduino board?
Hi Dejan
Thanks for the reply and you were 100% correct. Have tried it with Uno and Nano and both work as expected; no glitches! Re-tried with 2 other Pro Minis and both these gave same problems so either I’ve got a bad batch or the Pro Mini is not suitable. Will be using the Nano for this project now. Thanks again for you help.
Mr. John & Mr. Dejan…
Iam so sorry to join in this comment. May be my answer will help you to solbe the problem.
My question is from where the the 5V which supplying the 8pcs dot matrix module? Is it take from yhe arduino or from external power suplies? As I know the 5V pin of arduino only can supply the module in a limited Amp. So maybe it will dropped when you ise the 6 or 8 pcs dot matrix in high brightness.
My suggestion is set the brightness to be (1) or use an extelnal 5V supply directly to the dotmatrix module.
Hope this can helpfully…
Hello, i have a problem with the App.
Left down block there is a stetement set Message Status.Text to …
I´ve no idea where this comes from and so i´m not able to send any text to the hc 05.
Is ist possible tha you upload the .aia file for the app inventor?
Please check the downloads now, I’ve update the article and add the .aia file.
Excellent project, all working fine except I can’t connect from my Android (version 4.1.2) using the app. The Android bluetooth setting sees the HC-05 and pairs with it OK but when clicking “Connect” on the app, it says “not connected”. Have tested the HC-05 with other devices and it works fine – any ideas?
Thank you.
Not quite sure, but I guess there isn’t much you can do about it. Probably the MIT app inventor is not compatible with the older Android version.
Thanks for the reply; I’ve loaded the app on my mobile and it works fine so you are right. Have added another 4 LED matrix board making 8 in total and get the following problem:
Numbering the LED modules from 1 to 8 starting with the one nearest the Arduino, program works fine with up to 4 modules, changing to 5 (maxInUse = 5), the display starts half way across module 1 and also does not display on the first half of module 6.
Changing the number of modules through 6 to 8, I have the same problem but moved over one module. Set to 4, I get the same message displayed twice – on 1 to 4 and 5 to 8 so I know all the modules are working OK and can’t find any problem with the wiring.
Have you tried this program with 8 modules?
It’s a great project but it having some difficulty in Bluetooth sketch
after some modifications it working very fine and like a charm can i please have the Bluetooth app aia file please
The app file can be found at the bottom of the article.
how many of these led matrix i can do in series?, will it become to long if i make it into 8*104 (13 led matrix 8*8)?. thanks in advance
The recommended number is 8 modules in series.
Wow! it is so educating, Please I am using Arduino 1.6.12 version to upload, but it is complaining of—– fatal error: MaxMatrix.h: No such file or directory. so I don’t know if it is the version is used that caused it.
It sounds like you haven’t installed the library.
Hello but which goes to the rx and what the tx -of the module bluethoot of the two pins 9-8 thank you.
Tx – Pin 8, RX – Pin 9
Dear Dejan, thank you for your well written tutorials and your will to share them with the Arduino community worldwide. Now i would really like your opinion/help.
I did everything like in the article and the message is scrolling perfectly but i cannot connect my smartphone with the bluetooth device. I see the BT05 but when i try to conenct i get no reply from it. It seems that maybe the problem is that the HC-05 is in AT mode and not in Data mode and thats why the red LED is blinking slowly (1 time every 2 sec) . Do you have any idea what is may causing the fault? Also in the serial monitoring when i press something i am not receiving ‘ok’ as a reply from the module.
The code needs the following correction : SoftwareSerial BTSerial(8,9);
The pin 7 is already occupied!
Well you should first try the examples from the basic Arduino Bluetooth tutorial. You might have connected the Bluetooth module incorrectly (or defined the pins incorrectly), or maybe you model has different default baud rate of 9600 instead of 38400.
I have loved your videos, some of the most informative, however this one is not working properly. I have no problems reading mechatronics.com on the matrix but cant communicate with it via BT . None of the app features work for me, are you not using tx/rx pins on the arduino? It seems your using 7,8 and using 7 for the matrix. I hope this is clear. I have been trying to figure this out for weeks and cant. We are making a sign for the church and trying to use this please help!!!.
That’s correct, pins 9 and 8 are for the Bluetooth, and for the matrix, 7 is Din, 6 CLK, 5 CS. I made a correction in the code.
Additionally you can check my other detailed tutorials about using Arduino, Bluetooth, Android and the App Inventor.
Max 7219 dot matrix is the only possible example ?? Is it possible to use different dot matrix ??
Sure you can achieve this with different dot matrix but you would probably need a different code as well.
Thanks for your project . I was made this project using AVR microcontroller but now thanks for your tutorial so that i can make it again from arduino