In this Arduino IR Tutorial we will learn how to control electronic devices using a TV remote and an Arduino. We will make few examples starting from controlling a simple LED, then controlling a DC Fan speed, to controlling high voltage home appliances. You can watch the following video or read the written tutorial below.
How It Works
We can notice that the LED in front of the TV Remote flickers when we press a button. Actually we can only see this through a camera because this is an infrared light and it is not visible to the human eye.
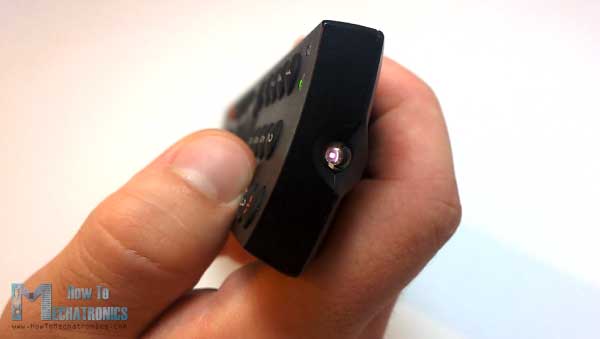
So the flickering means that when we press a button the infrared LED is sending a burst of light or pulses that we need receive them with an infrared receiver.

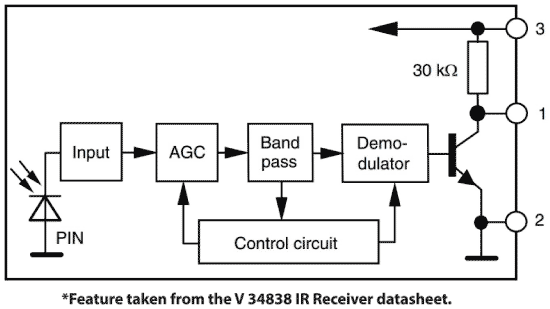
In this tutorial we will use the V 34838 IR Receiver which has the following block diagram from where we can see that it will amplify, filter and demodulate the received signal and provide clean logic output which is acceptable for the digital input of the Arduino Board.
Then using the Ken Shirriff‘s Arduino-IRremote Library and it’s demo example we can see from the serial monitor a unique hexadecimal code for each button press which we can use it when making our program.

Link to Ken Shirriff‘s Arduino-IRremote Library: https://github.com/z3t0/Arduino-IRremote
Controlling a RGB LED with a TV Remote
You can get the components from any of the sites below:
- IR Receiver……………………………… Amazon / Banggood / AliExpress
- RGB LED………………………………… Amazon / Banggood / AliExpress
- 3x 220 Ohms resistors………….…… Amazon / Banggood / AliExpress
- Arduino Board ………………………….. Amazon / Banggood / AliExpress
- Breadboard and Jump Wires …….. Amazon / Banggood / AliExpress
Disclosure: These are affiliate links. As an Amazon Associate I earn from qualifying purchases.
So we will control the LED Color using the 4 colored buttons of the TV Remote. That means that first we need to see the hexadecimal codes for each of these buttons by uploading the IRrecvDemo example and run the Serial Monitor. We will press each of these buttons and write down their codes.

Now we will modify the demo code like this and add if statements which will be executed if a particular button is pressed. So for each button we will set appropriate RGB values, and the setColor() function will light up the LED in the particular color. For more details how a RGB LED works with Arduino you can check my Arduino RGB Tutorial.
/*
 *  Controlling a RGB LED with a TV Remote
 *
 *  Modified IRrecvDemo example from Ken Shirriff IRremote Library
 *  Ken Shirriff
 *  https://arcfn.com
 *
 *  Modified by Dejan Nedelkovski,
 *  www.HowToMechatronics.com
 *
 */

#include <IRremote.h>

int RECV_PIN = 8; // IR Receiver - Arduino Pin Number 8

IRrecv irrecv(RECV_PIN);

decode_results results;

int redPin = 5;
int greenPin = 6;
int bluePin = 7;

void setup()
{
  Serial.begin(9600);
  irrecv.enableIRIn(); // Start the receiver
  pinMode(redPin, OUTPUT);
  pinMode(greenPin, OUTPUT);
  pinMode(bluePin, OUTPUT);
}

void loop() {

  if (irrecv.decode(&results)) {

    if (results.value == 0xF21D7D46) { // Red Button
      setColor(255, 0, 0);  // Sets Red Color to the RGB LED
      delay(100);
      }
    if (results.value == 0x87CF1B29) { // Green Button
       setColor(0, 255, 0);  // Green Color
      delay(100);
      }
    if (results.value == 0x6623D37C) { // Yellow Button
      setColor(255, 255, 0);  // Yellow Color
      delay(100);
      }
    if (results.value == 0x854115F2) { // Blue Button
      setColor(0, 0, 255);  // Blue Color
      delay(100);
      }
     if (results.value == 0x1639AB6E) { // Stop Button
      setColor(0, 0, 0);  // OFF
      delay(100);
      }

    irrecv.resume(); // Receive the next value
  }
  delay(100);
}
// Custom made function for activating the RGB LED
void setColor(int red, int green, int blue)
{
  analogWrite(redPin, red); // Sends PWM signal to the Red pin
  analogWrite(greenPin, green);
  analogWrite(bluePin, blue);
}Code language: PHP (php)
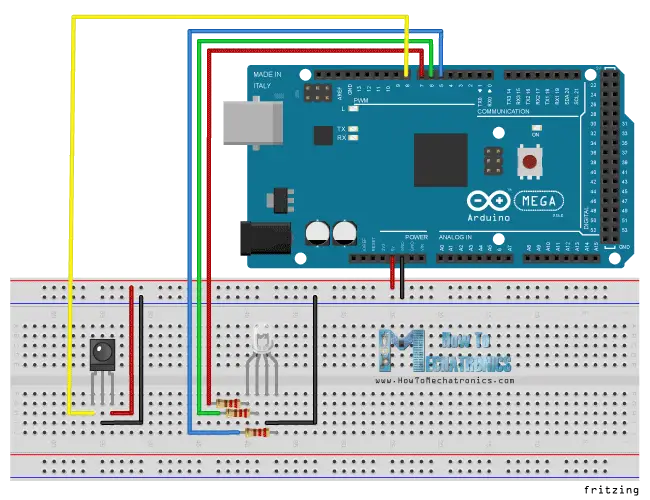
Here’s the circuit schematics of Arduino IR controlled RGB LED:
Controlling a DC Fan speed with a TV Remote
Components needed for the this example:
- DC Motor………………. Amazon / Banggood / AliExpress
- or DC Fan………………. Amazon / Banggood / AliExpress
- NPN Transistor……… Amazon / Banggood / AliExpress
- Diode……………………. Amazon / Banggood / AliExpress
- Capacitor – 1uF …….. Amazon / Banggood / AliExpress
- Resistor – 1k Ohms .. Amazon / Banggood / AliExpress
In this example will control a DC Fan speed using the forward and the backward buttons of the TV Remote. We will use this circuit schematics for controlling the speed of the fan, or actually we will control the PWM signal using the buttons. For more details how this circuit schematics works, you can check my Arduino Motors Tutorial.
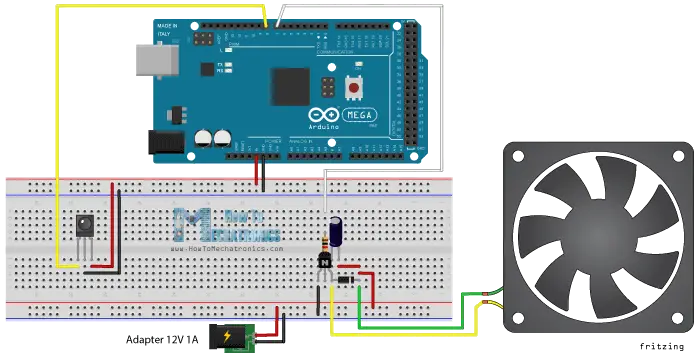
Here’s the source code for this example. So using the analogWrite() function we will send PWM signal to the base of the transistor. The PLAY button will start the motor at maximum speed, or the duty cycle of PWM signal will be 100% and the STOP button will stop it. The forward button will increase the speed of the fan with each pressing by increasing the duty cycle of the PWM signal, and the backward button will decrease it.
/*
 *  Controlling a DC Fan Speed with a TV Remote
 *
 *  Modified IRrecvDemo example from Ken Shirriff IRremote Library
 *  Ken Shirriff
 *  https://arcfn.com
 *
 *  Modified by Dejan Nedelkovski,
 *  www.HowToMechatronics.com
 *
 */

#include <IRremote.h>

int RECV_PIN = 8; // IR Receiver - Arduino Pin Number 8
int pwmPin = 7; // Arduino Pin Number 7 to the Base of the Transistor
int pwmValue;

IRrecv irrecv(RECV_PIN);

decode_results results;


void setup() {
  Serial.begin(9600);
  irrecv.enableIRIn(); // Start the receiver
  pinMode( pwmPin, OUTPUT);
  pwmValue = 0; // Starts the program with turned off motor
}

void loop() {

  if (irrecv.decode(&results)) {

    analogWrite(pwmPin, pwmValue);

    if (results.value == 0xAFAF8374) { // PLAY Button
        pwmValue = 255; // 100% Duty Cycle | Max Speed
        }
    if (results.value == 0x98519C65) { // STOP Button
        pwmValue = 0; // 0% Duty Cycke | Turned off
        }
    if (results.value == 0x93F1BA08) { // FORWARD Button
        if(pwmValue <= 245){
        pwmValue = pwmValue + 10; // Increases the Duty Cycle of the PWM Signal
        delay(20);
      }
    }
    if (results.value == 0x71D086FF) { // BACKWARD Button
      if(pwmValue >= 20){
        pwmValue = pwmValue - 10; // Decreases the Duty Cycle of the PWM Signal
        delay(20);
      }
    }
  Serial.print(pwmValue);
  Serial.print(" ");
  Serial.println(results.value, HEX);

  irrecv.resume(); // Receive the next value
  }
  delay(100);
}
Code language: PHP (php)
Controlling High Voltage Home Appliances with a TV Remote
Components needed for this tutorial:
- 5V Relay Module……. Amazon / Banggood / AliExpress
- Cable, plug, socket
The final example will be controlling high voltage home appliances using the TV Remote. For that we will need a relay module. I will use the HL-52S relay module which has a rating of 10 A at 250 and 125 V AC. Here’s the circuit schematics of Arduino IR controlled high voltage home appliances example. With the pin number 7 from the Arduino Board we will control the relay on which there’s a socket for connecting any high voltage electronic device.
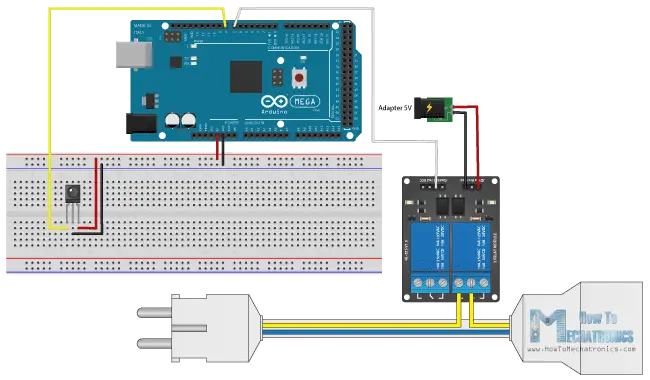
As we will use HIGH VOLTAGE, we must be very cautious and I’m warning you here that improper or incorrect use could result in serious injuries or death and I don’t take any responsibility for your actions. For more details how to use the relay and how to make a socket for plugging any electronic device you can check my Arduino Relay Tutorial.

Here’s the source code of this example:
/*
 *  Controlling High Voltage Home Appliances with a TV Remote
 *
 *  Modified IRrecvDemo example from Ken Shirriff IRremote Library
 *  Ken Shirriff
 *  https://arcfn.com
 *
 *  Modified by Dejan,
 *  www.HowToMechatronics.com
 *
 */

#include <IRremote.h>

int RECV_PIN = 8;
int relayOut = 7;
int buttonState ;

IRrecv irrecv(RECV_PIN);

decode_results results;


void setup() {
  Serial.begin(9600);
  irrecv.enableIRIn(); // Start the receiver
  pinMode( relayOut, OUTPUT);
  buttonState = HIGH; // Starts the program with turned off Relay. The relay input works inversly so HIGH state means deactivated relay

}

void loop() {

  buttonState = digitalRead(relayOut);

  if (irrecv.decode(&results)) {

    if (results.value == 0xAFAF8374) { // PLAY Button
        digitalWrite(relayOut, LOW); // Activates the relay
        }
    if (results.value == 0x98519C65) { // STOP Button
        digitalWrite(relayOut, HIGH); // Deactivates the relay
        }

  irrecv.resume(); // Receive the next value
  }

  Serial.print(" ");
  Serial.println(results.value, HEX);


  delay(100);
}Code language: PHP (php)