Welcome to the second Arduino Tutorial from our Arduino Tutorial Series. In this tutorial we will learn how the Digital Input and Output pins work and we will make few examples using Buttons and LEDs. Also we will learn what is PWM (Pulse Width Modulation) and make examples for controlling the LED brightness using PWM.
This is a Step by Step Video Tutorial which is easy to be followed. Also, below the video you can find what Parts do we need for this tutorial and the Source Codes of the Examples in the video.
Components needed for this tutorial
- Arduino Board …………………………… Amazon / Banggood / AliExpress
- Breadboard and Jump Wires ……… Amazon / Banggood / AliExpress
- LED …………………………………………… Amazon / Banggood / AliExpress
- 220 Ohm Resistor …………………….. Amazon / Banggood / AliExpress
Disclosure: These are affiliate links. As an Amazon Associate I earn from qualifying purchases.
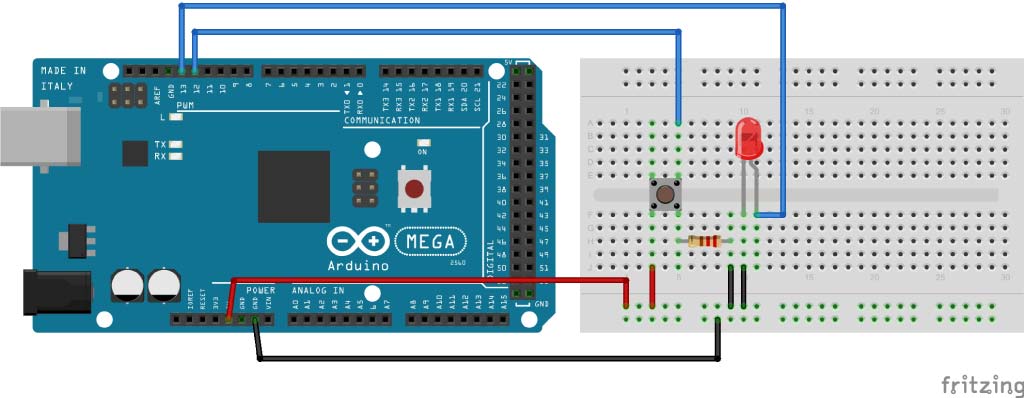
Circuit schematic of the examples
Source code of the first example
int button = 12;
int led = 13;

int buttonState = 0;

void setup() {
pinMode(led, OUTPUT);
pinMode(button, INPUT);
}

void loop() {
buttonState = digitalRead(button);
if (buttonState == HIGH)) {
digitalWrite(led, HIGH);
}
else {
digitalWrite(led, LOW);
}
}Code language: JavaScript (javascript)
Source Code of the second example
int led = 13;
int button = 12;

int buttonState =0;
int brightness = 0;
int brightup = 2;

void setup() {
pinMode(led, OUTPUT);
pinMode(button, INPUT);
}

void loop() {
analogWrite(led, brightness);

buttonState = digitalRead(button);

if ( buttonState == HIGH ) {
brightness = brightness + brightup;
}
if ( brightness == 255 ) {
brightness = 0;
}
delay(30);
}Code language: JavaScript (javascript)
Awesome Tutorials, Why dont you write a post about.
The essential books to know about
1. electronics
2. signals and sensors
3. aurdino programming
because what i lack is the electronics background. which is a setback to choose what components are to be used to solve a problem