Welcome to the sixth Arduino Tutorial from our Arduino Tutorial Series. In this tutorial we will learn how to connect Arduino to Processing and how are they communicatng using the Serial Port. Also we will make an example where we will use the Processing IDE to send commands to the Arduino Board and vice-verse.
This is a Step by Step Video Tutorial which is easy to be followed. Also, below the video you can find what Parts do we need for this tutorial and the Source Codes of the Examples in the video.
Components needed for this Arduino Tutorial
You can get the components from any of the sites below:
- Arduino Board …………………………… Amazon / Banggood / AliExpress
- Breadboard and Jump Wires ……… Amazon / Banggood / AliExpress
- LED …………………………………………… Amazon / Banggood / AliExpress
- 220 Ohm Resistor …………………….. Amazon / Banggood / AliExpress
- Push Button ……………………………… Amazon / Banggood / AliExpress
Disclosure: These are affiliate links. As an Amazon Associate I earn from qualifying purchases.
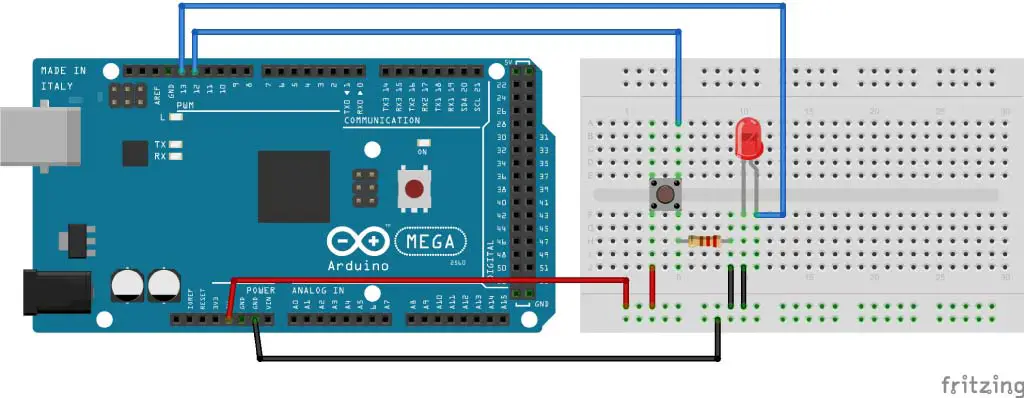
Circuit Schematic
Arduino Source Code
int led = 13;
int button = 12;

void setup() {
pinMode(led, OUTPUT);
pinMode(button, INPUT);
Serial.begin(9600);
}

void loop(){
if(Serial.available() > 0) {
char ledState = Serial.read();
if(ledState == '1'){
digitalWrite(led, HIGH);
}
if(ledState == '0'){
digitalWrite(led, LOW);
}
}
int buttonState = digitalRead(button);
if ( buttonState == HIGH){
Serial.println("Button is pressed");
delay(500);
}
}Code language: Arduino (arduino)
Processing Source Code
import processing.serial.*;

Serial myPort;
String myText="";

void setup(){
size(300, 300);
myPort = new Serial(this, "COM4", 9600);
myPort.bufferUntil('n');
}
void serialEvent (Serial myPort){
myText = myPort.readStringUntil('n');
}

void draw(){
background(0,0,0);
text(myText, 120, 120);
myText="";

if(mousePressed && (mouseButton == LEFT)){
myPort.write('1');
}
if (mousePressed && (mouseButton == RIGHT)){
myPort.write('0');
}
}Code language: Arduino (arduino)
Thanks for share!
hi ..! it was really helpfull , i just made it ..! thanks ..!
You have created an outstanding website! I’m new to electronics so before trying to build your ultrasonic radar project, I am trying to replicate your Tutorial #06 circuit using both IDE and Processing code. Everything appears correct in my sketches and circuit, but after each time I compile and upload the IDE and then run the Processing code I get “Error opening serial port COM5:Port Busy” as an error message. Using the same COM and baud rate for both, any suggestions would be appreciated.
Hey, thanks! Well first of all the PORT should match with the PORT your Arduino is connected to the PCB. You can first check whether the serial communication works by checking whether you get or receiver data on the Arduino Serial Monitor. If that’s ok, that means the same port should be in the Processing IDE code. The error you are getting indicates like the port is busy, so make sure you have the Arduino Serial Monitor turned off.
This is an outstanding website you built here. I feel like I hit gold or something. Thank you so much for these tutorials! This is quality stuff… BTW, what’s your background, if you don’t mind me asking?
Thank you, I’m glad to hear this! I’ve a Mechatronics Engineering degree.
I’m trying to get the wiring correct. I’m following the picture you have up here, and the coding works. There’s no errors, but nothing happens to the LED when I click or press the button. In your video you have two resistors? but in the picture there’s only one resistors. I I can’t see the video to clearly with wiring at an angle. Can you help me? Maybe put another picture of wiring.
One of the resistors is for the button and the second one is for the LED (the one missing on the circuit schematics). Please doubly check your connections. Also check whether you are getting any data on the Arduino serial monitor before sending it to Processing (whether the button is working).
can i use it with arduino uno ?
Sure you can.
Good Work
its very helpful to me
Thank You
Alexandros
Thanks! Nice to hear that!
The Circuit Schematic picture is not right ground from components is not fit to the ground line!
Yea it has a little error, but it’s intuitive because the lines for the ground are black, so you can’t miss them.
when i press run nothing happens ,i am running processing 3.0.2 on a windows 64 bit machine.
all code looks okay,please help
Do you get any error message?
What is my port in Mac?
It should be something like /dev/cu.usbserial-1B1 for a USB board.