Welcome to the fifth Arduino Tutorial from our Arduino Tutorial Series. In this tutorial we will learn how the Serial Communication works and make few examples of it for better understanding.
This is a Step by Step Video Tutorial which is easy to be followed. Also, below the video you can find what Parts do we need for this tutorial and the Source Codes of the Examples in the video.
Components needed for this Arduino Tutorial
- Arduino Board …………………………… Amazon / Banggood / AliExpress
- Breadboard and Jump Wires ……… Amazon / Banggood / AliExpress
- LED …………………………………………… Amazon / Banggood / AliExpress
- 220 Ohm Resistor …………………….. Amazon / Banggood / AliExpress
- Push Button ……………………………… Amazon / Banggood / AliExpress
Disclosure: These are affiliate links. As an Amazon Associate I earn from qualifying purchases.
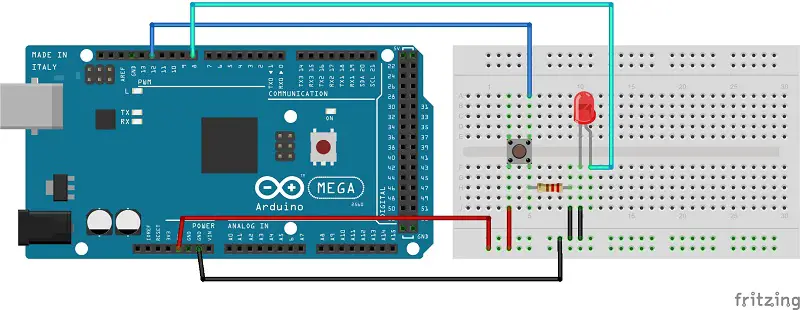
Circuit schematic
Source Code
int led = 13;
int button = 12;

void setup() {
pinMode(led, OUTPUT);
pinMode(button, INPUT);
Serial.begin(9600);
}

void loop(){
if(Serial.available() > 0) {
char ledState = Serial.read();
if(ledState == '1'){
digitalWrite(led, HIGH);
}
if(ledState == '0'){
digitalWrite(led, LOW);
}
}
int buttonState = digitalRead(button);
if ( buttonState == HIGH){
Serial.println("Button is pressed");
delay(500);
}
}Code language: JavaScript (javascript)