In this Arduino Tutorial we will learn how a PIR Sensor works and how to use it with the Arduino Board for detecting motion. You can watch the following video or read the written tutorial below.
How It Works
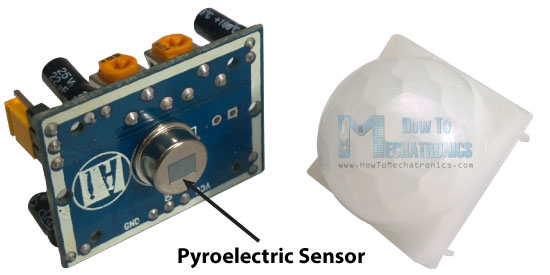
First let’s explain the working principle. The module actually consists of a Pyroelectric sensor which generates energy when exposed to heat.
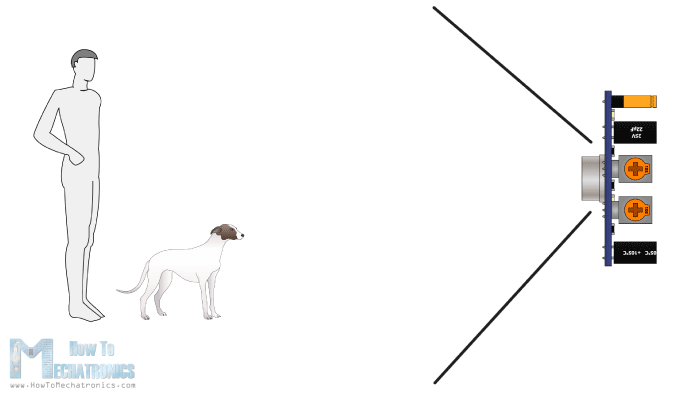
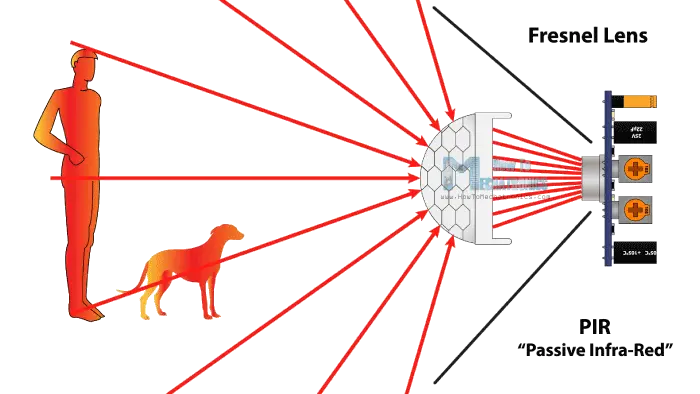
That means when a human or animal body will get in the range of the sensor it will detect a movement because the human or animal body emits heat energy in a form of infrared radiation. That’s where the name of the sensor comes from, a Passive Infra-Red sensor. And the term “passive” means that sensor is not using any energy for detecting purposes, it just works by detecting the energy given off by the other objects.
The module also consists a specially designed cover named Fresnel lens, which focuses the infrared signals onto the pyroelectric sensor.
The HC-SR501 PIR Sensor Module
The module has just three pins, a Ground and a VCC for powering the module and an output pin which gives high logic level if an object is detected. Also it has two potentiometers. One for adjusting the sensitivity of the sensor and the other for adjusting the time the output signal stays high when object is detected. This time can be adjusted from 0.3 seconds up to 5 minutes.
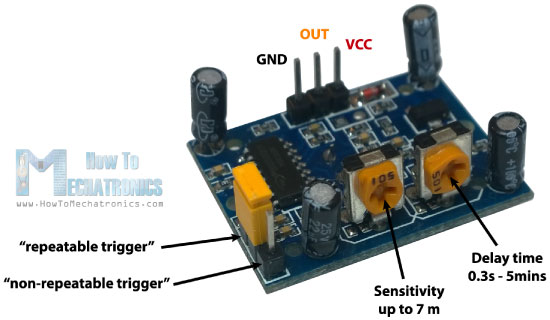
The module has three more pins with a jumper between two of them. These pins are for selecting the trigger modes. The first one is called “non-repeatable trigger” and works like this: when the sensor output is high and the delay time is over, the output will automatically change from high to low level. The other mode called “repeatable trigger” will keep the output high all the time until the detected object is present in sensor’s range.
Components needed for this tutorial
You can get the components from any of the sites below:
- HC-SR501 PIR Sensor Module…….. Amazon / Banggood / AliExpress
- 5V Relay Module…………………………. Amazon / Banggood / AliExpress
- Arduino Board …………………………… Amazon / Banggood / AliExpress
- Breadboard and Jump Wires ……… Amazon / Banggood / AliExpress
- Cable, Plug, Socket
Disclosure: These are affiliate links. As an Amazon Associate I earn from qualifying purchases.
Circuit Schematic
As an example for this tutorial I will make a circuit that will turn on a high voltage lamp when the sensor will detect an object. Here’s the circuit schematics. The output pin of the sensor will be connected to pin number 8 on the Arduino Board and when an object will be detected the pin number 7 will activate the relay module and the high voltage lamp will turn on.
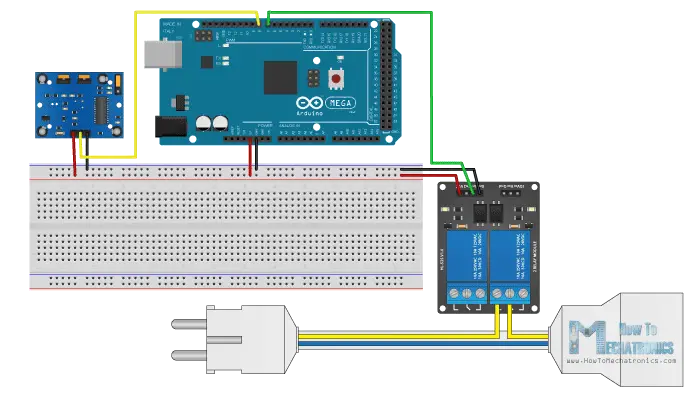
For more details how the relay module works, you can check my Arduino Relay Tutorial. (Keep in minds that we use high voltage in the example, so you should be very caution, because I don’t take any responsibility of your actions)
Source Code
Here’s the Arduino Code for this example. It’s quite simple. We just need to define the PIR Sensor pin as input and the relay pin as output. Using the digitalRead() function we will read the output of the sensor and if its high or if an object is detected it will activate the relay. For activating the relay module we will send a logic low as the relay input pin works inversely.
/*     Arduini PIR Motion Sensor Tutorial
 *
 *  by Dejan Nedelkovski, www.HowToMechatronics.com
 *
 */
int pirSensor = 8;
int relayInput = 7;

void setup() {
  pinMode(pirSensor, INPUT);
  pinMode(relayInput, OUTPUT);
}

void loop() {
  int sensorValue = digitalRead(pirSensor);

  if (sensorValue == 1) {
    digitalWrite(relayInput, LOW); // The Relay Input works Inversly
  }
}Code language: Arduino (arduino)
The demonstration of the example can be seen at the end of the video attached above. Note that after powering the sensor module it needs about 20 – 60 seconds to “warm-up” in order to function properly. Now when you will put your hand in front of the sensor the relay will activate the lamp. But note that even if you move your hand constantly the lamp will turn off after the adjusted delay time is over because the PIR sensor is in “non-repeatable trigger” mode. If you change the sensor with the jumper to the “repeatable trigger” mode and you constantly move the hand, the lamp will be constantly on as well and it will turn off after the movement is gone and the set delay time is over.