In this project we will learn how to make an Arduino Security and Alarm System. You can watch the following video or read the written tutorial below.
Overview
The alarm activates in 10 seconds after pressing the A button. For detecting objects it uses an ultrasonic sensor, and once the alarm detect something a buzzer starts emitting a sound. In order to stop the alarm we need to insert a 4 digits password. The preset password is 1234 but we also have the possibility to change it.
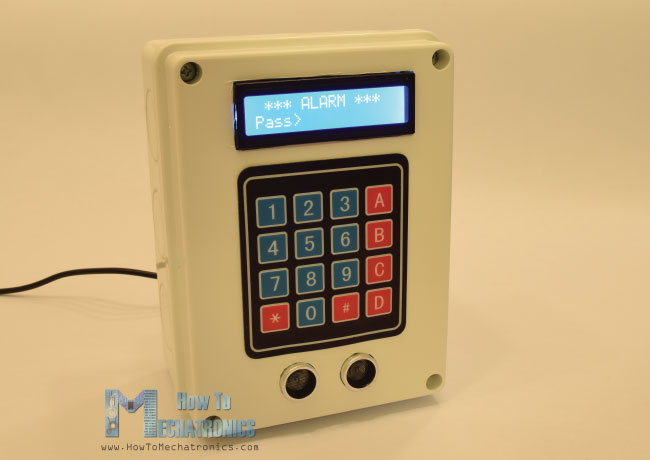
By pressing the B button we enter the password change menu where first we need to enter the current password in order to continue and then enter the new 4 digits password. Once the password is changed, the next time we activate the alarm, we will only be able to stop the alarm by entering the new password. If we enter a wrong password we will get a message that we need to try again.
Required Components
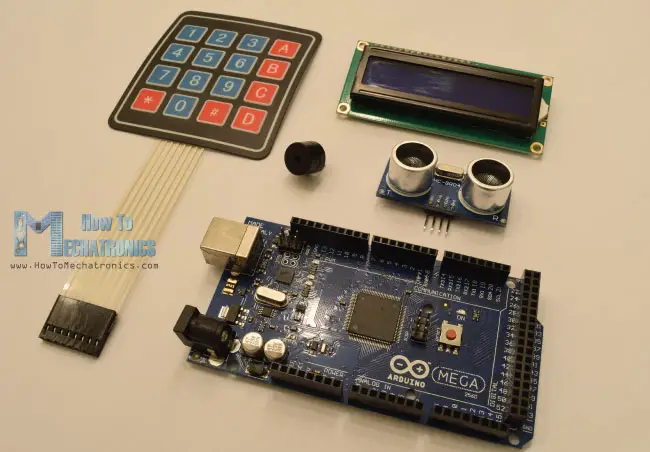
Now let’s see the required components for this project. Obviously, we need an Arduino board, an ultrasonic sensor, an LCD display, a buzzer and a 4×4 keypad.
You can get the components needed for this Arduino Project from the links below:
- Keypad …………………………………….. Amazon / Banggood / AliExpress
- LCD 16×2 …………………………………. Amazon / Banggood / AliExpress
- Ultrasonic Sensor ……………………… Amazon / Banggood / AliExpress
- Buzzer ……………………………………… Amazon / Banggood / AliExpress
- Arduino Board ………………………….. Amazon / Banggood / AliExpress
- Breadboard and Jump Wires ……… Amazon / Banggood / AliExpress
Disclosure: These are affiliate links. As an Amazon Associate I earn from qualifying purchases.
Arduino Alarm System Circuit Schematics
Here’s the circuit schematics.
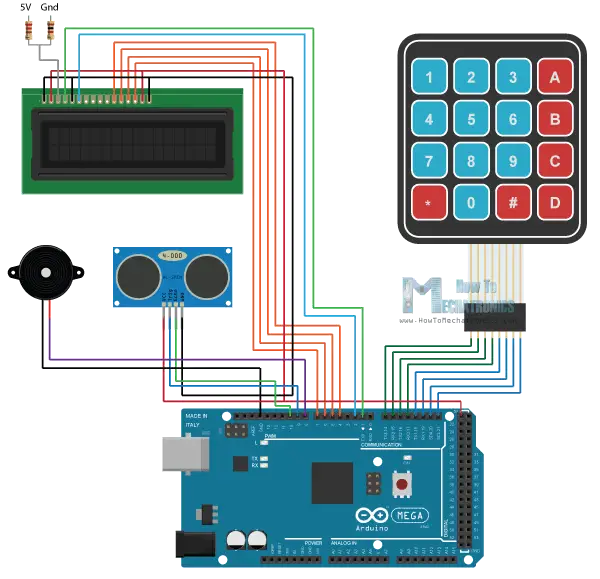
So for the buzzer we need just a single pin but one with PWM support. The 4×4 keypad has 8 pins, 4 of them are for the rows and 4 of them for the columns of the keypad. Each button is actually a push button switch which makes a short between one row and column when pressed.
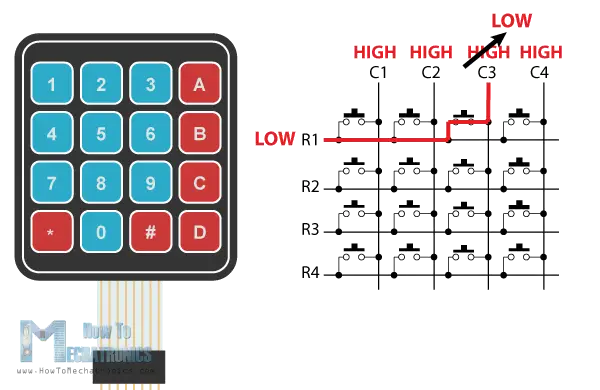
So, for example, if we set the row 1 line low, and all column lines high, when we will press, for example, the button 3, due to the short between the two lines, the column 3 line will drop to low so in such a case we can register that the button 3 has been pressed.
As for the other two components on this project, the ultrasonic sensor and the LCD display, you can check my previous detailed tutorials on how to connect and use them.
Arduino Alarm System Source Code
Next let’s see the Arduino code. As the code is a bit longer, for better understanding, I will post the source code of the program in sections with description for each section. And at the end of this article I will post the complete source code.
So we need to include the standard LiquidCrystal library for the LCD and the Keypad library which needs to be additionally installed. Then we need to define the buzzer and the ultrasonic sensor’s pins, define some variables needed for the program, define the keys of the keypad, as well as create the two objects for the keypad and the LCD.
#include <LiquidCrystal.h> // includes the LiquidCrystal Library
#include <Keypad.h>
#define buzzer 8
#define trigPin 9
#define echoPin 10
long duration;
int distance, initialDistance, currentDistance, i;
int screenOffMsg =0;
String password="1234";
String tempPassword;
boolean activated = false; // State of the alarm
boolean isActivated;
boolean activateAlarm = false;
boolean alarmActivated = false;
boolean enteredPassword; // State of the entered password to stop the alarm
boolean passChangeMode = false;
boolean passChanged = false;
const byte ROWS = 4; //four rows
const byte COLS = 4; //four columns
char keypressed;
//define the cymbols on the buttons of the keypads
char keyMap[ROWS][COLS] = {
{'1','2','3','A'},
{'4','5','6','B'},
{'7','8','9','C'},
{'*','0','#','D'}
};
byte rowPins[ROWS] = {14, 15, 16, 17}; //Row pinouts of the keypad
byte colPins[COLS] = {18, 19, 20, 21}; //Column pinouts of the keypad
Keypad myKeypad = Keypad( makeKeymap(keyMap), rowPins, colPins, ROWS, COLS);
LiquidCrystal lcd(1, 2, 4, 5, 6, 7); // Creates an LC object. Parameters: (rs, enable, d4, d5, d6, d7)
void setup() {
lcd.begin(16,2);
pinMode(buzzer, OUTPUT); // Set buzzer as an output
pinMode(trigPin, OUTPUT); // Sets the trigPin as an Output
pinMode(echoPin, INPUT); // Sets the echoPin as an Input
}Code language: Arduino (arduino)In the setup section, we just need to initialize the LCD and define the pin modes for the buzzer and the ultrasonic sensor.
In the loop section, first we check whether the alarm is activated or not. So if the alarm is not activated, on the LCD we will have the home screen of the program which offers two options, A for activating the alarm and B for changing the password. Then using the myKeypad.getKey() function we read which button from the keypad has been pressed and if that’s the button A, the buzzer will produce a 200 milliseconds sound and the activateAlarm variable will become true.
if (!alarmActivated) {
    if (screenOffMsg == 0 ){
      lcd.clear();
      lcd.setCursor(0,0);
      lcd.print("A - Activate");
      lcd.setCursor(0,1);
      lcd.print("B - Change Pass");
      screenOffMsg = 1;
    }
    keypressed = myKeypad.getKey();
     if (keypressed =='A'){        //If A is pressed, activate the alarm
      tone(buzzer, 1000, 200);
      activateAlarm = true;
    }Code language: Arduino (arduino)
In that case on the LCD we will print the message “Alarm will be activated in”, and using a while loop we will make a countdown of 9 seconds before the alarm is activated. Then the message “Alarm Activated” will appear and we will measure the initial distance from our alarm device to the objects opposite of it.
if (activateAlarm) {
    lcd.clear();
    lcd.setCursor(0,0);
    lcd.print("Alarm will be");
    lcd.setCursor(0,1);
    lcd.print("activated in");

    int countdown = 9; // 9 seconds count down before activating the alarm
    while (countdown != 0) {
      lcd.setCursor(13,1);
      lcd.print(countdown);
      countdown--;
      tone(buzzer, 700, 100);
      delay(1000);
    }
    lcd.clear();
    lcd.setCursor(0,0);
    lcd.print("Alarm Activated!");
    initialDistance = getDistance();
    activateAlarm = false;
    alarmActivated = true;
  }Code language: Arduino (arduino)
So the next step is that the ultrasonic sensor will constantly check whether the currently measured distance is smaller than the initial distance, corrected by a value of 10 cms, and if that’s true it means an object has appeared in front of the sensor and the alarm will be activated. The tune() function will activate the buzzer and the enterPassword() custom function will be called.
if (alarmActivated == true){
      currentDistance = getDistance() + 10;
      if ( currentDistance < initialDistance) {
        tone(buzzer, 1000); // Send 1KHz sound signal
        lcd.clear();
        enterPassword();
      }
    }Code language: Arduino (arduino)
This custom function will print a message that the alarm is activated and that we need to enter a password in order to stop the alarm. So using the next while loop we are constantly checking whether we have pressed a button on the keypad, and each button press is added to the tempPassword variable. If we enter more than 4 digits or press the sharp button the previously entered digits will be cleared so we can type them again from begin.
void enterPassword() {
  int k=5;
  tempPassword = "";
  activated = true;
  lcd.clear();
  lcd.setCursor(0,0);
  lcd.print(" *** ALARM *** ");
  lcd.setCursor(0,1);
  lcd.print("Pass>");
      while(activated) {
      keypressed = myKeypad.getKey();
      if (keypressed != NO_KEY){
        if (keypressed == '0' || keypressed == '1' || keypressed == '2' || keypressed == '3' ||
            keypressed == '4' || keypressed == '5' || keypressed == '6' || keypressed == '7' ||
            keypressed == '8' || keypressed == '9' ) {
          tempPassword += keypressed;
          lcd.setCursor(k,1);
          lcd.print("*");
          k++;
        }
      }
      if (k > 9 || keypressed == '#') {
        tempPassword = "";
        k=5;
        lcd.clear();
        lcd.setCursor(0,0);
        lcd.print(" *** ALARM *** ");
        lcd.setCursor(0,1);
        lcd.print("Pass>");
      }
      if ( keypressed == '*') {
        if ( tempPassword == password ) {
          activated = false;
          alarmActivated = false;
          noTone(buzzer);
          screenOffMsg = 0;
        }
        else if (tempPassword != password) {
          lcd.setCursor(0,1);
          lcd.print("Wrong! Try Again");
          delay(2000);
          lcd.clear();
          lcd.setCursor(0,0);
          lcd.print(" *** ALARM *** ");
          lcd.setCursor(0,1);
          lcd.print("Pass>");
        }
      }
    }
}Code language: Arduino (arduino)
On the other hand, if we press the asterisk button, we will check whether the currently entered password is the same as the originally set password. If that’s true the alarm will be deactivated, the buzzer will stop producing sound and we will get back to the home screen. But if we entered password was wrong the message “Wrong! Try Again!” will appear and we will have to try to enter the correct password again.
For changing the password we use a similar method. Here first we need to enter the current password in order to be able to set a new password.
else if (keypressed =='B') {
      lcd.clear();
      int i=1;
      tone(buzzer, 2000, 100);
      tempPassword = "";
      lcd.setCursor(0,0);
      lcd.print("Current Password");
      lcd.setCursor(0,1);
      lcd.print(">");
      passChangeMode = true;
      passChanged = true;
      while(passChanged) {
      keypressed = myKeypad.getKey();
      if (keypressed != NO_KEY){
        if (keypressed == '0' || keypressed == '1' || keypressed == '2' || keypressed == '3' ||
            keypressed == '4' || keypressed == '5' || keypressed == '6' || keypressed == '7' ||
            keypressed == '8' || keypressed == '9' ) {
         tempPassword += keypressed;
         lcd.setCursor(i,1);
         lcd.print("*");
         i++;
         tone(buzzer, 2000, 100);
        }
      }
      if (i > 5 || keypressed == '#') {
        tempPassword = "";
        i=1;
        lcd.clear();
        lcd.setCursor(0,0);
        lcd.print("Current Password");
        lcd.setCursor(0,1);
        lcd.print(">");
      }
      if ( keypressed == '*') {
        i=1;
        tone(buzzer, 2000, 100);
        if (password == tempPassword) {
          tempPassword="";
          lcd.clear();
          lcd.setCursor(0,0);
          lcd.print("Set New Password");
          lcd.setCursor(0,1);
          lcd.print(">");
          while(passChangeMode) {
            keypressed = myKeypad.getKey();
            if (keypressed != NO_KEY){
              if (keypressed == '0' || keypressed == '1' || keypressed == '2' || keypressed == '3' ||
                  keypressed == '4' || keypressed == '5' || keypressed == '6' || keypressed == '7' ||
                  keypressed == '8' || keypressed == '9' ) {
                tempPassword += keypressed;
                lcd.setCursor(i,1);
                lcd.print("*");
                i++;
                tone(buzzer, 2000, 100);
              }
            }
            if (i > 5 || keypressed == '#') {
              tempPassword = "";
              i=1;
              tone(buzzer, 2000, 100);
              lcd.clear();
              lcd.setCursor(0,0);
              lcd.print("Set New Password");
              lcd.setCursor(0,1);
              lcd.print(">");
            }
            if ( keypressed == '*') {
              i=1;
              tone(buzzer, 2000, 100);
              password = tempPassword;
              passChangeMode = false;
              passChanged = false;
              screenOffMsg = 0;
            }
          }
        }
      }
    }
   }Code language: Arduino (arduino)
Here’s the complete source code of the Arduino Alarm System:
/*
* Arduino Security and Alarm System
*
* by Dejan Nedelkovski,
* www.HowToMechatronics.com
*
*/
#include <LiquidCrystal.h> // includes the LiquidCrystal Library
#include <Keypad.h>
#define buzzer 8
#define trigPin 9
#define echoPin 10
long duration;
int distance, initialDistance, currentDistance, i;
int screenOffMsg =0;
String password="1234";
String tempPassword;
boolean activated = false; // State of the alarm
boolean isActivated;
boolean activateAlarm = false;
boolean alarmActivated = false;
boolean enteredPassword; // State of the entered password to stop the alarm
boolean passChangeMode = false;
boolean passChanged = false;
const byte ROWS = 4; //four rows
const byte COLS = 4; //four columns
char keypressed;
//define the cymbols on the buttons of the keypads
char keyMap[ROWS][COLS] = {
{'1','2','3','A'},
{'4','5','6','B'},
{'7','8','9','C'},
{'*','0','#','D'}
};
byte rowPins[ROWS] = {14, 15, 16, 17}; //Row pinouts of the keypad
byte colPins[COLS] = {18, 19, 20, 21}; //Column pinouts of the keypad
Keypad myKeypad = Keypad( makeKeymap(keyMap), rowPins, colPins, ROWS, COLS);
LiquidCrystal lcd(1, 2, 4, 5, 6, 7); // Creates an LC object. Parameters: (rs, enable, d4, d5, d6, d7)
void setup() {
lcd.begin(16,2);
pinMode(buzzer, OUTPUT); // Set buzzer as an output
pinMode(trigPin, OUTPUT); // Sets the trigPin as an Output
pinMode(echoPin, INPUT); // Sets the echoPin as an Input
}
void loop() {
if (activateAlarm) {
lcd.clear();
lcd.setCursor(0,0);
lcd.print("Alarm will be");
lcd.setCursor(0,1);
lcd.print("activated in");
int countdown = 9; // 9 seconds count down before activating the alarm
while (countdown != 0) {
lcd.setCursor(13,1);
lcd.print(countdown);
countdown--;
tone(buzzer, 700, 100);
delay(1000);
}
lcd.clear();
lcd.setCursor(0,0);
lcd.print("Alarm Activated!");
initialDistance = getDistance();
activateAlarm = false;
alarmActivated = true;
}
if (alarmActivated == true){
currentDistance = getDistance() + 10;
if ( currentDistance < initialDistance) {
tone(buzzer, 1000); // Send 1KHz sound signal
lcd.clear();
enterPassword();
}
}
if (!alarmActivated) {
if (screenOffMsg == 0 ){
lcd.clear();
lcd.setCursor(0,0);
lcd.print("A - Activate");
lcd.setCursor(0,1);
lcd.print("B - Change Pass");
screenOffMsg = 1;
}
keypressed = myKeypad.getKey();
if (keypressed =='A'){ //If A is pressed, activate the alarm
tone(buzzer, 1000, 200);
activateAlarm = true;
}
else if (keypressed =='B') {
lcd.clear();
int i=1;
tone(buzzer, 2000, 100);
tempPassword = "";
lcd.setCursor(0,0);
lcd.print("Current Password");
lcd.setCursor(0,1);
lcd.print(">");
passChangeMode = true;
passChanged = true;
while(passChanged) {
keypressed = myKeypad.getKey();
if (keypressed != NO_KEY){
if (keypressed == '0' || keypressed == '1' || keypressed == '2' || keypressed == '3' ||
keypressed == '4' || keypressed == '5' || keypressed == '6' || keypressed == '7' ||
keypressed == '8' || keypressed == '9' ) {
tempPassword += keypressed;
lcd.setCursor(i,1);
lcd.print("*");
i++;
tone(buzzer, 2000, 100);
}
}
if (i > 5 || keypressed == '#') {
tempPassword = "";
i=1;
lcd.clear();
lcd.setCursor(0,0);
lcd.print("Current Password");
lcd.setCursor(0,1);
lcd.print(">");
}
if ( keypressed == '*') {
i=1;
tone(buzzer, 2000, 100);
if (password == tempPassword) {
tempPassword="";
lcd.clear();
lcd.setCursor(0,0);
lcd.print("Set New Password");
lcd.setCursor(0,1);
lcd.print(">");
while(passChangeMode) {
keypressed = myKeypad.getKey();
if (keypressed != NO_KEY){
if (keypressed == '0' || keypressed == '1' || keypressed == '2' || keypressed == '3' ||
keypressed == '4' || keypressed == '5' || keypressed == '6' || keypressed == '7' ||
keypressed == '8' || keypressed == '9' ) {
tempPassword += keypressed;
lcd.setCursor(i,1);
lcd.print("*");
i++;
tone(buzzer, 2000, 100);
}
}
if (i > 5 || keypressed == '#') {
tempPassword = "";
i=1;
tone(buzzer, 2000, 100);
lcd.clear();
lcd.setCursor(0,0);
lcd.print("Set New Password");
lcd.setCursor(0,1);
lcd.print(">");
}
if ( keypressed == '*') {
i=1;
tone(buzzer, 2000, 100);
password = tempPassword;
passChangeMode = false;
passChanged = false;
screenOffMsg = 0;
}
}
}
}
}
}
}
}
void enterPassword() {
int k=5;
tempPassword = "";
activated = true;
lcd.clear();
lcd.setCursor(0,0);
lcd.print(" *** ALARM *** ");
lcd.setCursor(0,1);
lcd.print("Pass>");
while(activated) {
keypressed = myKeypad.getKey();
if (keypressed != NO_KEY){
if (keypressed == '0' || keypressed == '1' || keypressed == '2' || keypressed == '3' ||
keypressed == '4' || keypressed == '5' || keypressed == '6' || keypressed == '7' ||
keypressed == '8' || keypressed == '9' ) {
tempPassword += keypressed;
lcd.setCursor(k,1);
lcd.print("*");
k++;
}
}
if (k > 9 || keypressed == '#') {
tempPassword = "";
k=5;
lcd.clear();
lcd.setCursor(0,0);
lcd.print(" *** ALARM *** ");
lcd.setCursor(0,1);
lcd.print("Pass>");
}
if ( keypressed == '*') {
if ( tempPassword == password ) {
activated = false;
alarmActivated = false;
noTone(buzzer);
screenOffMsg = 0;
}
else if (tempPassword != password) {
lcd.setCursor(0,1);
lcd.print("Wrong! Try Again");
delay(2000);
lcd.clear();
lcd.setCursor(0,0);
lcd.print(" *** ALARM *** ");
lcd.setCursor(0,1);
lcd.print("Pass>");
}
}
}
}
// Custom function for the Ultrasonic sensor
long getDistance(){
//int i=10;
//while( i<=10 ) {
// Clears the trigPin
digitalWrite(trigPin, LOW);
delayMicroseconds(2);
// Sets the trigPin on HIGH state for 10 micro seconds
digitalWrite(trigPin, HIGH);
delayMicroseconds(10);
digitalWrite(trigPin, LOW);
// Reads the echoPin, returns the sound wave travel time in microseconds
duration = pulseIn(echoPin, HIGH);
// Calculating the distance
distance = duration*0.034/2;
//sumDistance += distance;
//}
//int averageDistance= sumDistance/10;
return distance;
}
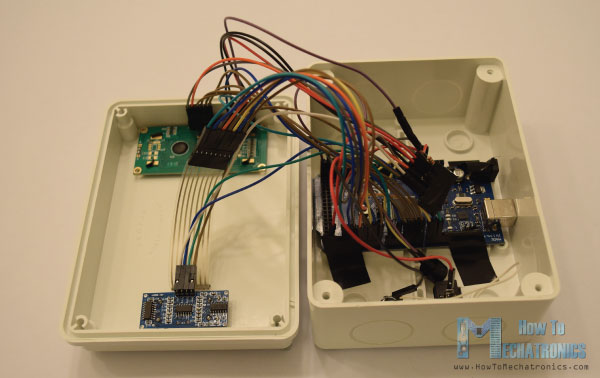
Code language: Arduino (arduino)Final Touch
For finishing the project I used a plastic electrical box in which I fitted all of the components and contacted them together.
That’s all, I hope you enjoyed this project and feel free to ask any question in the comments section below.
Hallo, I a problem for some reason my screen is empty with no text, but the screen still lights up. I dont know what the problem is.
The problem might be the contrast of the LCD. Try to adjust the voltage do the contrast pin. Try to use a simple voltage divider or a potentiometer to bright voltage around 3 volts to the contrast pin.
Absolutely amazing, very helpful, thanks so much!
hallo there am a student in Kenya persuing a degree in Bachelors of Technology in Technical and Applied Physics. am happy for your good work keep me updated on the ongoing projects
can i use arduino uno for this project.
You could use UNO, but it depends what type of keyboard you will use as well as LCD, in terms of pin usage. With this configuration you might lack digital pins if using UNO, but in case you use I2C driven LCD or different keyboard you could have enough pins at the Arduino.
Sir, what is the two resisters in your circuit diagram, why use it? Please help me.
Those resistors are for the LCD brightness. If we connect 5V or 0V(GND) to the Brightness pin of the LCD, it won’t display another. We need to set some voltage between those values of 0 and 5 in order to get a proper contrast, so using the two resistors we make a voltage divider and get a such a value.
Hello, I’m interested to do this for my school project. I have all components except the arduino mega but, I have a arduino uno, can I use the arduino uno for doing this project? I’m new in the Arduino area.
Yes you can do it, but make I’m not sure whether you will have enough pins on the Arduino Mega for all connections. Make sure you count them first. 🙂
Thanks for such a great project! What a great example! I stumbled across this about 6 months ago and have since built an entire security system for my garage. I modified the original code to add a 10 second countdown when the alarm is tripped and employed the use of 4 PIR sensors.
I’m glad to hear this. Thanks!
Hi,
I am new in Arduino world.
I want to follow up this Project but I have Arduino UNO board.
You have already mentioned in the comments that we can use this board too but in Arduino UNO board has not Serial communication female connector that you have used for keypad.
Kindly, guide me.
Thanks
Imran
The problem with the Arduino Uno is that you won’t have enough digital pins if you use the components as I used in this tutorial. Of course, if you use some different components, like an I2C driven LCD which would use less pins, you could make it work with Arduino Uno and some modification.
Hi,
Beautiful project, but it seems to miss a step, you can not imagine triggering a siren every time you enter. A timer identical to that of the output must be added, which allows to enter the deactivation code before the siren is triggered
Best regards
Jack
Yeah, that’s a good suggestion. Of course, a lot of different modifications can be implemented.
I did the code and all the wiring right but all the LCD will do is brighten up I tried it with 2 Mega 2560s
You might be having a problem with the contrast pin of the LCD. Try to use a potentiometer as a voltage divider or different resistor values.
I have the same problem. I would like to ask what value of the resistor I will use instead of 220 Ohms?
Try several different values for getting the best contrast for you LCD. Values like 220,330 and 1k.
how much k do i us for the potentiometer
1k or 10k
Both would work the same.
Hi sr. Im form Argentina, first of all, thanks for this incredible project. How can i insert an RFID sistem to this project, and how can use in the same project the ultrasonic sensor and the PIRSENSOR
I already have tutorials on how to use PIR and RFID sensor with Arduino. You can take a look at them and make your own combination.
Hello, great project! I have a question: How to turn off the alarm before the sensor will detect something? For example, I turned on the alarm but I made up my mind and did not leave the room .. I want to turn it off before the siren goes on, any idea?
Regards, Dominik
Hi there and thanks. Well for sure you could do that, everything is possible with Arduino. 🙂 Maybe you can add some delay between the detection of the object and the activation of the siren, and in that time enter the password.
Hello, very good! How do I turn on a 5V alarm siren, would it have to be for a relay? Can I connect a PIR sensor in place of the Ultrasonic sensor?
Yes, you can use a PIR sensor instead of ultrasonic sensor. And your alarm siren is 5V you don’t need a relay, as the project is already powered with 5V.
Thanks for your creative idea,i done this project with the help of your code.
make some more creative in robotics,request from me.
Nice to hear that. Thanks for the feedback!
Does this have to use the Arduino Mega or am I able to use the Arduino Uno for this?
Sure you can use Arduino Uno.
uhm sir how many amperes do i use in 9v adaptor?
does the Arduino uno have enough pins for this project?
Nope, but for example if you use an I2C LCD you will be able to save some pins.
What power suply you use , how much voltage?
DC Adapter 5V 2A. The positive of the adapter needs to be connected to the 5V pin of the Arduino.
how to power it without connecting to the computer?
You can do that via adapter, 9 – 12V if powered through the Arduino board power jack, or 5V adapter if powered directly to the 5+ pin of the Arduino.
thanks for the response, I modified the lcd wiring connections because I used an I2C . .do I still need a resistor like the schematic u made? in the picture there is a 2 resistors connecting to the LCD….
I got this error when i tried to verify the codes. Can you please help me with it.
C:\Users\myprojects\Documents\Arduino\smart_home_alarm_system\smart_home_alarm_system.ino:3:20: fatal error: Keypad.h: No such file or directory
#include
^
compilation terminated.
exit status 1
Error compiling for board Arduino/Genuino Mega or Mega 2560.
You must download and install Keypad.h library first.