In this Arduino Tutorial we will learn how to use the DS3231 Real Time Clock Module. You can watch the following video or read the written tutorial below.
Overview
The first question that comes here is why we actually need a separate RTC for our Arduino Project when the Arduino itself has built-in timekeeper. Well the point is that the RTC module runs on a battery and can keep track of the time even if we reprogram the microcontroller or disconnect the main power.
DS3231 Real Time Clock
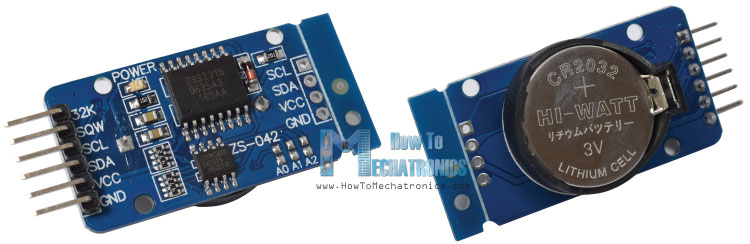
The DS3231 is a low-cost, highly accurate Real Time Clock which can maintain hours, minutes and seconds, as well as, day, month and year information. Also, it has automatic compensation for leap-years and for months with fewer than 31 days.
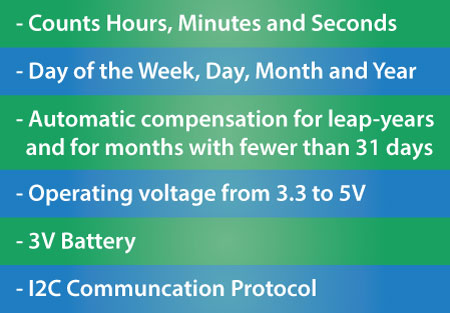
The module can work on either 3.3 or 5 V which makes it suitable for many development platforms or microcontrollers. The battery input is 3V and a typical CR2032 3V battery can power the module and maintain the information for more than a year.
The module uses the I2C Communication Protocol which makes the connection to the Arduino Board very easy.
Here’s the circuit schematics:
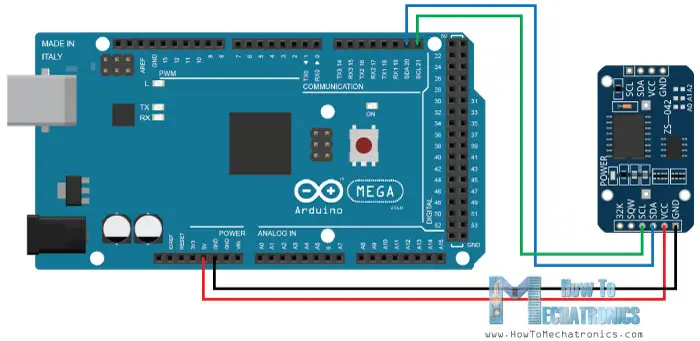
So all we need is 4 wires, the VCC and the GND pins for powering the module, and the two I2C communication pins, SDA and SCL.
You can get the components needed for this Arduino Tutorial from the links below:
- DS3231 Real Time Clock…………….. Amazon / Banggood / AliExpress
- Arduino Board …………………………… Amazon / Banggood / AliExpress
- Breadboard and Jump Wires ……… Amazon / Banggood / AliExpress
Disclosure: These are affiliate links. As an Amazon Associate I earn from qualifying purchases.
Programming
Once we connect the module we need to program the Arduino Board to work with the Real Time Clock. However, when it comes to programing a communication between Arduino and an I2C module the code isn’t that small and easy. Luckily, there are already several libraries for the DS3231 RTC which can be found on the internet.
For this tutorial I chose to use the Library made by Henning Karlsen which can be found and downloaded from his website, www.rinkydinkelectronics.com.
So once we download and install the library we can use its first demo example to initially activate the clock of the RTC module. In the setup section of the demo example code we can notice that there are three line that we need to uncomment in order to initially set the day of the week, the time and the data.
// Code from the Demo Example of the DS3231 Library
void setup()
{
// Setup Serial connection
Serial.begin(115200);
// Uncomment the next line if you are using an Arduino Leonardo
//while (!Serial) {}
// Initialize the rtc object
rtc.begin();
// The following lines can be uncommented to set the date and time
//rtc.setDOW(WEDNESDAY); // Set Day-of-Week to SUNDAY
//rtc.setTime(12, 0, 0); // Set the time to 12:00:00 (24hr format)
//rtc.setDate(1, 1, 2014); // Set the date to January 1st, 2014
}Code language: Arduino (arduino)The first line is for setting the day of the week, the second line is for setting the time in hours, minutes and seconds, and the third line is for setting the date in days, months and years.
Once we upload this code we need to comment back the three lines and re-upload the code again.
// Code from the Demo Example of the DS3231 Library

void loop()
{
  // Send Day-of-Week
  Serial.print(rtc.getDOWStr());
  Serial.print(" ");

  // Send date
  Serial.print(rtc.getDateStr());
  Serial.print(" -- ");

  // Send time
  Serial.println(rtc.getTimeStr());

  // Wait one second before repeating
  delay (1000);
}Code language: Arduino (arduino)
If we take a look at the loop section of the code we can see that now using the three custom functions we get the information from the RTC and print them in the Serial Monitor. Here’s how they appear in the Serial Monitor.
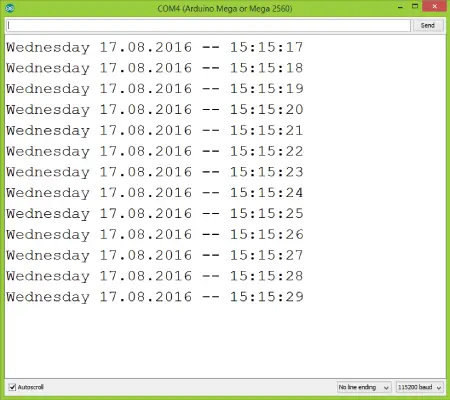
Now even if we disconnect the Arduino power and then reconnect it and run the Serial Monitor again we can notice that the time keeps going without being reset.
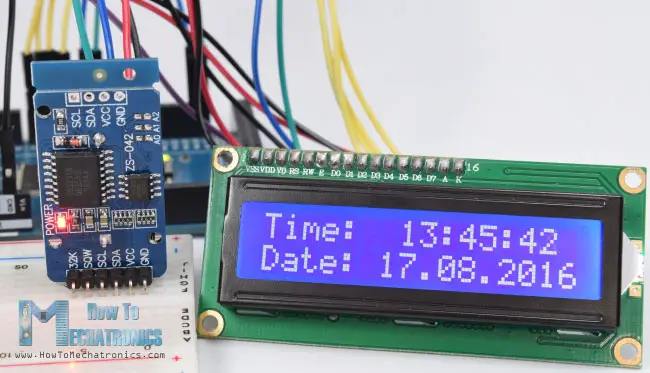
So now we have our Real Time Clock up and running and we can use in any Arduino Project. As a second example I connected an LCD to the Arduino and printed the time and the date on it.
Here’s the source code of this example:
/*
* Arduino DS3231 Real Time Clock Module Tutorial
*
* Crated by Dejan Nedelkovski,
* www.HowToMechatronics.com
*
* DS3231 Library made by Henning Karlsen which can be found and downloaded from his website, www.rinkydinkelectronics.com.
*
*/
#include <DS3231.h>
#include <LiquidCrystal.h> // includes the LiquidCrystal Library

DS3231  rtc(SDA, SCL);
LiquidCrystal lcd(1, 2, 4, 5, 6, 7); // Creates an LC object. Parameters: (rs, enable, d4, d5, d6, d7)

void setup() {
 rtc.begin(); // Initialize the rtc object
 lcd.begin(16,2); // Initializes the interface to the LCD screen, and specifies the dimensions (width and height) of the display }
}

void loop() {
 lcd.setCursor(0,0);
 lcd.print("Time:  ");
 lcd.print(rtc.getTimeStr());

 lcd.setCursor(0,1);
 lcd.print("Date: ");
 lcd.print(rtc.getDateStr());

 delay(1000);
}Code language: Arduino (arduino)
That’s all for this Arduino Tutorial, feel free to ask any question in the comments section below.
Just found your web site. Just wanted to thank you for publishing projects and information for folks like myself who are new to the hobby.
I’m happy yo hear you found the website helpful. Cheers!
Hello Dejan,
I can’t find or download the source code. There are google ads under where it says that I can get the code. I have assembled everything, I have usec an UNO and a DS3231 and a 16 x 2 12c LCD, is that correct? I just need the code. Please help if you can. Thank you,
Hey Patrick, you need to download the library from here: http://www.rinkydinkelectronics.com/library.php?id=73
The code is present on the website, you don’t have to download it, you just have to copy it.
Hi, can you help me with a problem? I followed the code exactly and included the DS3231 library, but I get an error that says: “no matching function for call to ‘DS3231::DS3231(const uint8_t&, const uint8_t&)'”. The Arduino IDE says the error is on the line: ‘DS3231 rtc(SDA, SCL)’;
Nice, your project is too good, and I will use a great part of this.
HI, your project is too good and I tried to copy this idea, but I got a problem, the problem is I set a time and burned the program into an Arduino, so it was working perfectly and when I disconnected the Arduino from the power source and then reconnected to Power to its show previous time (that which I burned the program).
I tried to use Ds3231 much time and got help from many websites but I couldn’t fix the problem, so Plz help me because my personal project depends upon Ds3231.
Hey, thanks! Well I’m not sure whether you have burned the program the right way. First you should set the time in the setup() section. Once done, then you should upload the same code again, without those lines for setting the time in the setup() section.
Hello, thanks for the tutorial. My question is can the real time clock data be manipulated to allow a user control it so as to trigger an alarm at a desired time?
Hey, yes that’s possible. You can read the data from the RTC and extract the hours, the minutes and the seconds and put them into variables (also you should convert them into integers). Then using a simple “if” statement you can make do anything at the desired time.
hey sir, i tried this tutorial and its working
the only problem i have is whenever i disconnected the arduino power, the time is reset to the set time, can you help me?
Well once you set the time you need to program your Arduino again, but without the set time functions, remove them from the setup section.
Using this LCD to display the countdown timer. If I set in the program code as delay (5000); // 5000ms = 5s for example, can I send/display on LCD this delay time in this format: 00:00:05 then countdown to 00:00:00 in time ? Thanks for your help.
Sure, everything is possible with Arduino. 🙂
Very useful your website and the explanation with examples demo is easy to learn. Thanks very much.
Thanks, I’m glad you found it useful!
And how to use the temperature sensor of the DS3231 module in code?
What are the LCD pins to use in Arduino Uno? Thank you
Do I have to use an Arduino Mega,
for say could i shrink it down to an Arduino Micro size?
Sure, you can use any other Arduino board.
Hello ! Please can you help me ? I want to get hours and minuts separate … Is it possible ??? Because i created a variable “hours” and an other “minuts” … Thank you !
😉
Hey, you can use the Arduino substring() function to extract, the hours and the minutes separately, and also if you need them as integers use the toInt() function to convert them to integers.
Hello, How do you manage LCD and RTC with only one SDA and one SLC ?
Thank’s
The LCD I am using is not an I2C LCD, it uses regular digital pins. Anyway, you can use the same SDA and SLC even if you have multiple I2C devices.
What is the LCD module and how is it connected?
It’s a 16×2 Character LCD. You can check my detailed tutorial for it.
Hi, please I want to ask you. I have an arduino project with RTC ds3132 and LCD. I want to display in LCD only the time. is it possible to use the same programming that you use in this video of arduino and DS3231 real time clock
Sure, just remove the part of the code that print’s the date.
‘DS3231’ does not name a type. DS3231 rtc(SDA, SCL);
I get this error. How to get over this issue? Please assist
Make sure you have the DS3231 library included.
Hello Dejan Nedelkovski. Thank you for these videos they are helping me to learn all about these amazing Arduino’s. I am new to these Arduino’s and have decided this is to be my first project. I have ordered all the parts necessary and will have to wait to get started but I have only one question at this time. You mentioned that you connected an LCD but did not say how to do that. Is there some where I can get a schematic or something to tell me how to do that?
Thank you
I do have a separate tutorial how to connect and use an LCD which can be found on my website. (Sorry for the late response)
Hallo sir,
What should i do to add switch based on certain time? Example in 6p.m
How to write code in ‘if else’ operation?
How to separate the TIME so i can get the specified hour or minute in “if else” operation to make an automatic on-off switch?
Hello,
Sorry for the late response. You can separate it using the substring(). You can find more details how this function works on the Arduino official website. Plus you can check my Arduino Touch Screen Music Player and Alarm Clock Project where I use this method to get the hours, the minutes and the seconds into a separate variables.
Sir,
This code executed successfully, but the date is being displayed as 01.01.2000, though i have changed it in the code. Please reply how to solve the problem.
Thank you.
Did you follow the steps as explained. First uploaded the code to set the date, with the three lines in the setup section uncommened, then upload the normal code which shows the date with the three lines in the setup section commened or removed.
Sir, thanku for the reply, sorry for the late reply. i did the same way as u said , but the problem is still repeating, can u please suggest a solution..
Be sure to enter your date in the correct format, i.e. DD, MM, YYYY.
You can then change the way it is displayed with the FORMAT comments
Do you know how to change the DS1302 to 12 hour mode. If no do you know how to change the DS3231 to 12 hour mode. Other whys nice project.
The DS3231 library used in this tutorial doesn’t support 24-hour format.
Hello,
Could you assist me?
I want to develop an android medicine reminder app connected with a medicine pillbox, first i dont know anything about arduino and name of compiler to run it also. how to link my android app to the arduino? I’m still learning android programming using Java. Can you please help me out
Hello,
Well, of course, you would need some knowledge in programming and Arduino in order to do such a project. I cannot see how I could assist you except to tell you to take a look at my Arduino tutorial from the very beginning and start learning.
Cheers!
Throw away that android thing and do the whole project with Arduino.
Hi
Could you help me?
I want Arduino updates the real time clock from a mobile SIM Card, like the Mobile phone always updates the real time clock from the mobile network.
Could it applicable?
Thank you for your help
Not sure about it, I don’t have experience with SIM Card modules.
No, you can not. The telephone’s sim card doesn’t apply here. (Could be done just extremely difficult)
But you can synchronise it to an Internet Time Server easily. Search for it.
As added utily note that the DS3231 also has temperature sensor.
Yes, that’s correct.